Free Skin Grafts
Autogenous skin grafts (ie, free skin grafts) involve harvesting and transferring a segment of skin from a donor site to a recipient site on the same patient for resurfacing a wound or defect (Figure 1).1 The harvested segment of skin is commonly full-thickness, meaning the entire epidermis and dermis are acquired.1-3 In contrast to skin flaps, which contain both vascular and nervous supply, skin grafts are completely separated from all vascularization and innervation prior to transfer to the recipient site.2

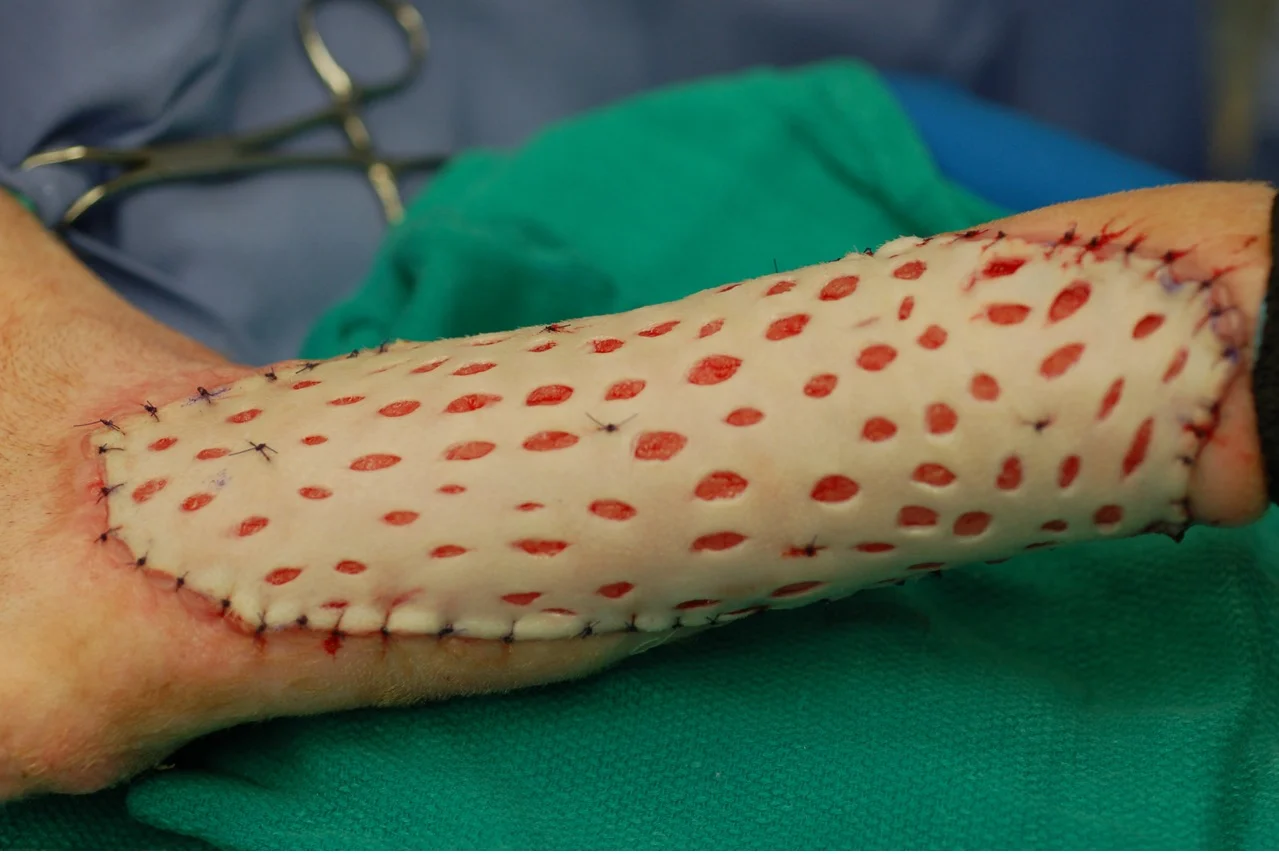
FIGURE 1 Free mesh skin graft on the front leg of a dog immediately after surgery
Free skin grafts are indicated for defects not amenable to closure via more traditional methods (eg, direct skin apposition, skin flaps, second intention healing). These defects are often located on the distal limbs, trunk, or abdomen and typically result from skin trauma (eg, degloving injuries, bite wounds, thermal burns [Figure 2]) or following surgical removal of a tumor.2,4


FIGURE 2 Examples of free skin grafts on wounds in locations not amenable to closure using traditional methods
Donor Site
Donor skin is typically taken from an area where an appropriately sized piece of skin can be harvested and the site can be closed without excessive tension. Common donor sites include the cranial-mid dorsum, lateral sides of the trunk, proximolateral aspect of the limbs, and ventral neck, where loose skin is usually available. For cosmetic purposes, hair color, thickness, and direction of growth on the donor site should match the recipient site as closely as possible2; however, areas with very thick skin (ie, lateral neck, dorsal lumbar region) are less ideal because the increased distance for nutrient diffusion through the thick dermis may have a negative impact on graft survival.
Recipient Site
For a skin graft to be successful, the recipient site (ie, wound or defect being covered by donor skin) must have adequate tissue vascularity and be free of any devitalized or contaminated tissue. The typical recipient site is a healthy bed of relatively smooth, uniform, and nonexudative granulation tissue. Acute traumatic wounds (eg, degloving or bite injuries, thermal burns) should be managed for at least several days with irrigation, debridement, bandaging, and antibiotics until a healthy granulation bed is present for grafting. In other scenarios (eg, surgical removal of a mass or tumor) where the defect is healthy muscle, fascia, or periosteum, the site may be grafted immediately if it has good vascularity.1,2 Excessively inflamed or infected wounds are poor sites for grafting. If there is concern for significant bacterial contamination, the wound bed should be cleaned, debrided, cultured, and treated appropriately based on antibiotic susceptibility results to create a healthy granulation bed prior to grafting.1-3
Engraftment Process
The engraftment process involves 4 stages (ie, adherence, imbibition, inosculation, and revascularization) that begin within 72 hours of graft placement. Adherence starts immediately after graft placement and is the result of fibrin strands connecting the graft and recipient bed. Imbibition starts within 48 hours and involves the dilation of vessels within the graft and pulling of plasma from the recipient site into the graft via capillary action. Inosculation starts within 48 to 72 hours and involves anastomosis of the blood vessels between the graft and the recipient bed. Revascularization starts within 48 to 72 hours as blood begins to flow from the recipient site into the graft.1-3
Skin Graft Assessment
Accurate assessment of graft viability is important to address any potential problems or complications. A graft should be well adhered to the wound bed within 72 hours. A viable graft can range in color from pink to light purple to dark purple. At days 3 to 6, a viable graft should become progressively pinker in color with healthy granulation tissue protruding through the mesh holes. A graft that is pale or white in color would be of questionable viability and may undergo partial thickness loss (sloughing) of the superficial layers. A graft that is black in color is most likely nonviable. In addition, excessive exudate or evidence that a graft is separating from the underlying recipient site is a concern and may indicate lack of take and loss of viability.
Skin grafts should be assessed for viability at the time of each bandage change or as soon as possible if there are concerns for potential problems (ie, infection, separation, sloughing). When assessing the viability of a graft, care should be taken to not prematurely condemn any discolored areas or areas that have partially sloughed, as the deeper layers are often still viable and can serve as a source for epithelialization.1-3 In cases in which viability of the graft is in doubt, proper wound management should be maintained until the status of the graft is completely evident. In most circumstances, the remaining graft provides enough epithelialization to adequately cover the site (despite loss of a substantial portion of the graft) and thus provides an overall successful outcome.
Potential Complications
The most common complication is loss of some portion of the graft due to separation from the bed as a result of excessive shearing forces or fluid (eg, serum, blood, pus) accumulation under the graft. Other causes of partial or complete graft failure include improper preparation of the recipient bed whereby the wound is contaminated or the granulation tissue is uneven or not healthy. In addition, failing to thoroughly remove the fat and subcutaneous tissue from the graft can inhibit revascularization and compromise the engraftment process. Although caution is advised when determining whether a portion of the graft is not viable, any area that is questionable and at risk for disrupting the adjacent graft (due to excessive exudate or progressive sloughing) may need to be resected to protect the remainder of the graft.
Overall Success
Reported success rates for full-thickness autogenous grafts in dogs and cats range from 38% to 95%; however, the definition of success is not well-defined in the literature.5-8 Anecdotally, complete loss of grafts is rare, and it is important to recognize that grafts can undergo partial loss and still be effective in overall wound management. In some cases, a graft may appear nonviable early in the postoperative period but later provide healthy epithelial coverage of the wound.
For example, in Figure 3 a dog is shown with a large skin defect on the ventral cervical region due to a previous abscess. The majority of the wound was closed, and a small free skin graft was placed in the remaining defect overlying the larynx. On days 5 and 7, the superficial layers of the graft had sloughed. Postoperative care of the graft was continued, and despite the loss of the superficial layers of the graft, the cranial aspect of the defect epithelialized relatively normally by day 30.

FIGURE 3A
Free skin graft on postoperative day 3 (A)
Step-by-Step: Performing a Free Skin Graft
What You Will Need
Sterile ruler
Sterile marker
Scalpel blades (#10, #11)
Delicate tissue forceps
Scissors (Metzenbaum or tenotomy)
Needle drivers
Sterile saline
Absorbable monofilament suture material (4-0 or 5-0)
Nonadherent, petrolatum-impregnated gauze
Cast padding and conforming gauze wrap
Self-adhesive bandage wrap
Sterile cardboard (optional)
Hypodermic needles (optional)
Sterile metal bowl (optional)
Splint, external skeletal fixator, or negative pressure wound bandaging (optional)
Step 1: Select the Donor Site
Select an appropriate donor site for the graft based on the location of the wound and characteristics of the adjacent hair.
Step 2: Determine the Site Size
Use a sterile ruler to measure the wound to be grafted, and outline an appropriately sized area of skin for the donor site with a sterile marker.2

Step 3: Obtain Skin from the Donor Site
Incise and remove the skin along the outline of the donor site. Close the donor site routinely.1

Step 4: Prepare the Graft
Remove the fat and subcutaneous tissue from the deep surface of the graft using a #10 scalpel blade or Metzenbaum or tenotomy scissors to the level of the hair follicles to facilitate revascularization.1-3

Author Insight
To help facilitate removal of the subcutaneous tissue, the graft can be secured to a piece of sterile cardboard with hypodermic needles or stretched over an inverted sterile metal bowl.1,3 When properly prepared, the underside of the graft should have a speckled appearance from the exposed hair follicles.
Step 5: Mesh the Graft (Optional)
If meshing is indicated to promote fluid drainage from the wound bed and increase graft coverage, use a #11 scalpel blade to make multiple 0.5- to 1-cm incisions staggered 1 to 1.5 cm apart throughout the graft.1,3,9

Step 6: Prepare the Recipient Site
Ensure the recipient site consists of relatively smooth healthy granulation tissue with good vascularity. Prior to grafting, irrigate the wound bed with sterile saline, and gently scrape the granulation tissue with a #10 scalpel blade to smooth the surface and remove any superficial contamination and chronic fibroplasia that may inhibit engraftment.

Step 7: Trim Wound Edges
Trim any thin epithelial tissue from the margins of the wound to freshen and create a clean edge to abut and secure the graft.
Step 8: Place the Graft
Place the graft on the wound while maintaining proper orientation for anticipated hair growth. Starting on one side, secure the graft to the edge of the wound with interrupted skin sutures using 4-0 or 5-0 absorbable suture material.1-3 Slightly stretch the skin so the mesh holes are open and there is good contact with the wound bed. If necessary, place additional sutures throughout the center of the graft to ensure it is well secured and to minimize shearing.1,3,9

Author Insight
When grafting complex wounds or wounds that span joints or areas of high motion, multiple smaller grafts may be preferable to better conform to the area and allow for seams between areas of motion to further minimize shearing of the graft due to uncontrollable movement. The slight loss of wound coverage when creating seams or using multiple smaller grafts is outweighed by the reduced risk of motion disrupting and propagating into the adjacent graft.
Step 9: Apply Bandaging
Once the graft is secured, completely cover with a nonadherent contact layer (eg, petrolatum-impregnated gauze) followed by the appropriate amount of cast padding and compressive layers based on location and degree of coaptation necessary.1,2
Author Insight
For bandaging, the primary contact layer should be nonadherent to prevent disturbance to the graft when the bandage is changed.1-3 Additional layers will vary based on degree of anticipated drainage, as well as the amount of padding and coaptation needed. For relatively small grafts on the distal extremity, a modified Robert Jones bandage should be used. For extremity wounds that span 1 or more joints, a splint or external skeletal fixator can be used to immobilize the limb and prevent motion or shearing of the graft; however, care should be taken when using splints for immobilization, as slippage or rotation can exert shearing forces on the graft.1 For wounds on the neck, trunk, or abdomen, a circumferential or tie-over bandage can be used.
Although no established guidelines exist in veterinary medicine for the timing of bandage changes, graft survival depends on appropriate timing, as changing a bandage too early or too often can disrupt the revascularization process. The initial bandage should ideally be left in place for at least 3 days (some reports describe leaving the initial bandage in place for 4-5 days) to facilitate graft adhesion and fluid absorption and to minimize the risk for trauma caused during the bandage change process.1-3 After the initial bandage change, subsequent bandage changes can be performed every 2 to 4 days for the first 2 weeks if no problems (eg, infection, maceration, sloughing) are identified. When changing the bandage, gentle irrigation with sterile saline may be performed if any surface exudate is present. After ≈2 weeks, the graft should be well established, and the frequency of bandage changes can be adjusted or discontinued as necessary based on the progression of healing.2,3
It should be noted that bandage changes should be performed with the patient under heavy sedation or general anesthesia to minimize the risk for disrupting the graft during removal and reapplication of the bandage.2
The ideal wound dressing reduces the risk for infection and promotes wound healing. In this article on Nitric Oxide Dressings for Traumatic Wounds in Dogs, researchers looked at nitric oxide dressings in dogs to find out if they hold up to the promise shown in rodent models.
Author Insight
Strict activity restriction and immobilization of the graft is required for at least 12 days postoperatively. Patients should be confined to a small room or crate and prevented from running, jumping, or excessively playing. Activity during the healing period should be limited to only short leash walks outside for elimination.
External Skeletal Fixation
For wounds on limbs that span 1 or more joints, an external skeletal fixator is effective for immobilizing the limb and minimizing shear forces on a graft that cannot be achieved with conventional bandaging or splinting techniques. For this application, the fixator does not have to be complicated or as biomechanically rigid as would be necessary for repair of an orthopedic injury; pin placement and frame construction can thus be simpler. Use of an external skeletal fixator (depending on the type and configuration) also protects the graft from direct contact with the ground when the patient is recumbent.

Negative Pressure Wound Bandaging
Alternatively, negative pressure wound bandaging(NPWB) can be used to cover the graft, facilitate adhesion to the wound bed, and resist shearing as a result of motion of the area. Benefits of NPWB include faster closure of mesh holes and improved graft survival.5,10 Limitations include increased cost of the vacuum unit and potential need for frequent troubleshooting if a seal cannot be maintained around the graft.
For example, in Figure 4 a dog is shown with an extensive wound involving the right axilla and antebrachial region. An external skeletal fixator and NPWB were used to facilitate engraftment of a skin graft placed over the wound.

Figure 4A
An extensive wound involving the right axilla and antebrachial region in a dog (A).
Conclusion
Although performing a free skin graft may appear daunting, the procedure is straightforward and effective for managing wounds and does not require specialized instruments or expertise. From the authors’ perspective, the most important and challenging aspects of free skin grafting are proper preparation of the wound bed, postoperative bandaging, and activity restriction to maximize the chance for revascularization.