Application of a Modified Robert Jones Bandage in Dogs & Cats
Hadley Gleason, VMD, MS, DACVS-SA, University of Illinois
Selecting and applying an appropriate bandage is critical for managing appendicular soft tissue wounds and musculoskeletal trauma in dogs and cats.1-3 The modified Robert Jones bandage (ie, soft padded bandage) is the mainstay of appendicular external coaptation and the basis for protecting surgical incisions or wounds, providing mild compression, and decreasing joint motion (Figure 1), particularly when used in combination with a splint.

Modified Robert Jones bandage on the pelvic limb of a dog
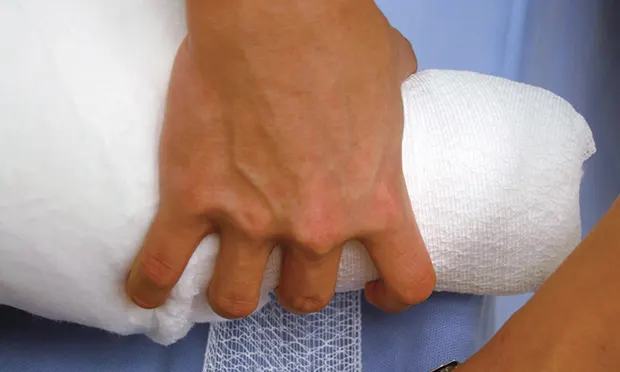
The modified Robert Jones bandage has fewer layers of cast padding, is more economical, and is more well-tolerated than the original Robert Jones bandage, which is thus used less frequently. The original Robert Jones bandage, which comprises many layers of thick roll cotton compressed with elastic gauze, exerts pressure to provide transient support of traumatic injuries without a splint (Figure 2),4 whereas the modified Robert Jones bandage does not provide transient support unless a splint is added to decrease mobility of the affected limb (Figure 3).1

Original Robert Jones bandage on the thoracic limb of a dog

Modified Robert-Jones Bandage with lateral splint placement on the pelvic limb of a dog; the bandage and splint should next be wrapped with rubberized tape.
Bandage Layers
Light sedation is recommended prior to bandage placement, particularly in painful or stressed patients.4
Primary Layer
Application of a modified Robert Jones bandage begins with selection of a primary layer, which will be in direct contact with the wound or incision, can be adherent or nonadherent, and may have absorptive or antimicrobial capabilities.
Secondary Layer
The secondary layer consists of cast padding and conforming gauze roll that hold the primary layer in place and extend down to but do not include the toes (regardless of wound or incision location on the limb), thus avoiding a tourniquet effect on the distal limb and allowing for monitoring for swelling in the toes.
Cast padding covers the primary layer directly, holds the primary layer in place, absorbs exudate, and provides padding for comfort. Conforming gauze holds cast padding in place, provides mild compression to the limb, and should be placed with just enough tension to lightly compress the cast padding; excessive tension can lead to tourniquet effects.
Tertiary Layer
The tertiary (ie, outer) layer consists of rubberized tape to keep the primary and secondary layers clean and dry and should also extend to but not include the toes. The distal end of the bandage can be covered with woven cotton tape to provide additional durability for the weight-bearing portion of the bandage.
Avoiding Slippage
All patients with a bandage should be crate rested and have movement adequately restricted. Activity should be limited to brief walks on a leash for urination and defecation.
In patients not undergoing surgery, fur on the affected limb can be clipped to improve friction between the bandage and the skin to limit bandage slippage; however, clipping should not be performed on patients undergoing surgery, as the skin’s function as a barrier can be damaged, increasing risk for surgical site infection.5 Adhesive spray and adhesive bandages (ie, bandage tape that can be adhered to the patient, providing a textured surface for bandage placement) can also increase friction between the bandage and the limb, preventing bandage slippage.
Tape stirrups can help stop slippage off the foot but do not prevent the proximal portion of the bandage from slipping down. For daily bandages, tape stirrups should be cut and new stirrups applied over the remaining tape (not peeled from the skin, as pulling adhesive can lead to irritation); however, stirrups should not be left on the skin for >1 week to prevent maceration of the underlying skin. Although tape stirrups are usually placed over the medial and lateral aspects of the foot, they can be placed in other locations if there is a wound or irritation on the lateral and/or medial side (Figure 4). The portion of the stirrup not adhered to the limb should be twisted 180 degrees, folded back toward the limb, and adhered to the bandage after placement of the conforming gauze roll but before the rubberized tape.

Tape stirrups on the lateral and medial aspects of the pelvic limb of a dog
Complications
Bandages applied too tightly or with unequal surface pressure can lead to tourniquet effects (Figure 5), and those applied too loosely can lead to repeated slippage (Figure 6). Sores can occur over bony prominences (eg, accessory carpal bone, olecranon, calcaneus, first and fifth metacarpophalangeal joints; Figure 7).

Excessive swelling caused by tourniquet effect in the distal thoracic limb of a small-breed dog

Slippage of a modified Robert Jones bandage with a lateral splint on the pelvic limb of a dog


Pressure sores in dogs caused by inappropriate bandage management over the olecranon (A) and fifth metatarsophalangeal joint (B)
The wrapped limb should be inspected during every bandage change to assess fit and placement. For pressure sores, pressure and friction over the affected area can be decreased with the use of donuts (Figure 8).

Foam donut that can limit bandage pressure directly over bony prominences
Risk for complications can be minimized with appropriate placement technique and bandage care, including using plastic wrap or a plastic bag during walks to prevent the bandage from becoming wet or soiled. Once the patient is indoors, the plastic wrap or bag should be removed to prevent moisture buildup. A wet or soiled bandage should be changed within 12 to 24 hours. A fully soaked bandage should be changed at the clinic immediately.
Bandages should be changed at least every 10 to 14 days to monitor for skin irritation or other complications and may need to be changed more frequently in patients with wounds.
Step-by-Step: Application of a Modified Robert Jones Bandage
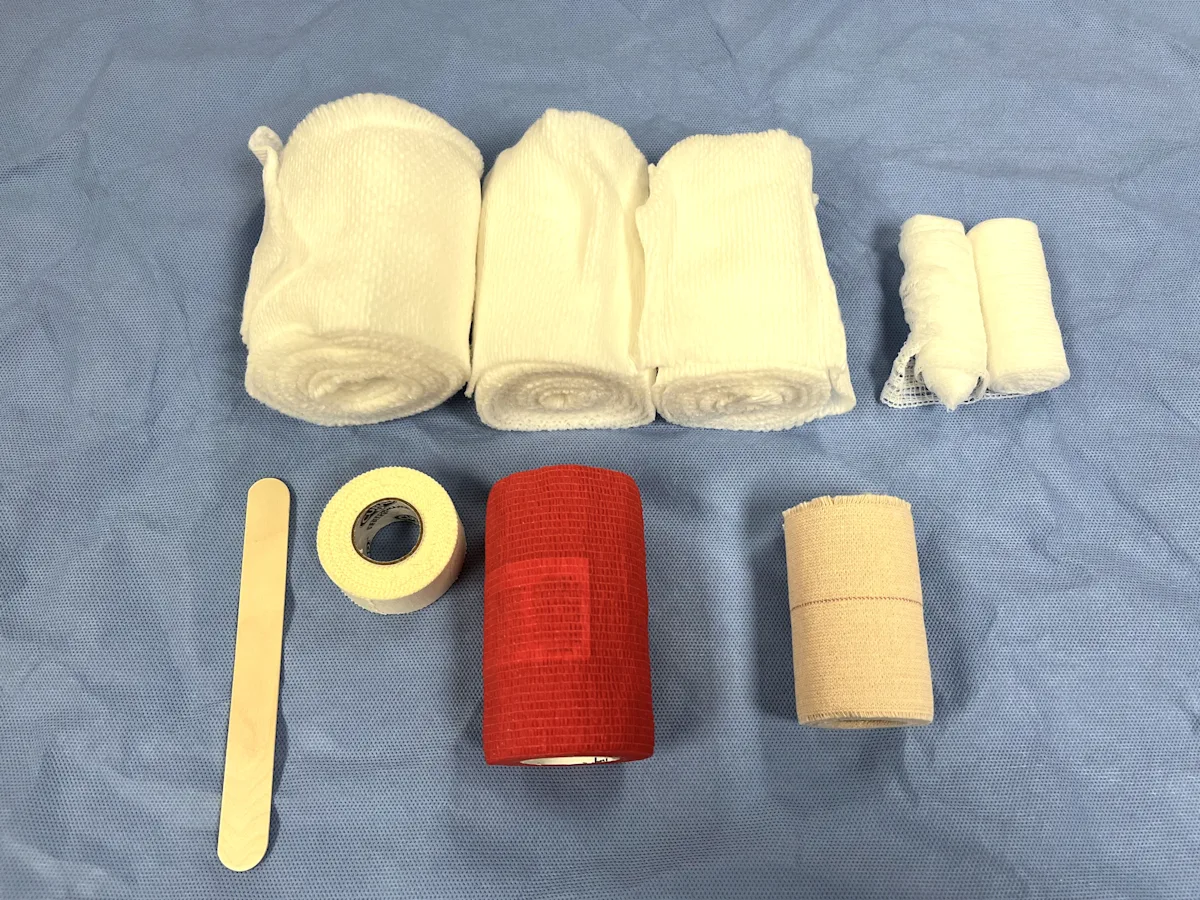
What You Will Need
Strips of 1-inch tape
Tongue depressor
Cast padding (cats and small dogs, 2 inch; medium dogs, 3 inch; large and giant dogs, 4 inch)
Conforming gauze roll (cats and small dogs, 2 inch; medium dogs, 3 inch; large and giant dogs, 4 inch)
Rubberized tape
Woven cotton tape
Step 1: Prepare the Patient
Sedate and place the patient in lateral recumbency opposite the limb to be bandaged (eg, right lateral recumbency when bandaging the left thoracic limb).
Step 2: Apply the Primary Layer
Apply tape stirrups to the lateral and medial aspects of the limb, extending to the level of the proximal half of the metacarpal or metatarsal bones, as well as several centimeters beyond the digits. Attach the loose ends to the tongue depressor. Place the primary layer in a sterile manner if there is a wound or surgical incision of <12 hours.
Author Insight
Tape stirrups can be placed on any circumferential aspect of the pes; wounds and skin abrasions should be avoided. Selection of an appropriate primary layer is outside the scope of this article, but information is available in the literature.6

Step 3: Start the Secondary Layer
Apply cast padding at the distal aspect of the limb so only the nails of the third and fourth digits are visible. Ensure the roll always faces upward.

Step 4: Complete the First Pass of the Secondary Layer
Continue to wrap cast padding proximally on the limb with 50% overlap between the layers. Ensure cast padding is applied with enough tension so the dimples flatten and there are no folds or wrinkles. Do not apply too tightly, as padding can rip with excessive tension. If the bandage shape is becoming conical from distal to proximal, apply additional layers to the distal portion so the bandage is more cylindrical in appearance, helping keep pressure even as subsequent layers are applied. Extend the bandage proximal to the joint above the lesion of interest.
Author Insight
In small patients, tension during bandage placement can lead to external or internal rotation of the limb. This is especially relevant in the antebrachium where there is a tendency to pull the limb into supination. Changing the wrapping direction of cast padding and conforming gauze roll (eg, wrapping the first roll clockwise around the limb and the second roll counterclockwise) can help provide even tension in each direction and prevent the limb from rotating externally or internally.

Step 5: Continue Applying the Cast Padding Layers
Wrap the limb proximal to distal, then distal to proximal again, and continue the process, laying 2 layers (because of the 50% overlap) with each pass up or down the limb. Continue to wrap the cast padding until there are 6 to 8 layers.
Author Insight
Total number of layers should depend on patient needs. For wound and incision coverage only, 4 layers is sufficient. For bandages placed prior to splinting, 6 to 8 layers are recommended to provide adequate padding. All layers should extend the entire length of the bandage, and the final layer should end proximally.
Step 6: Complete the Secondary Layers
Wrap the conforming gauze roll distal to proximal using the method described previously, carefully applying just enough even and adequate tension to mildly compress the underlying cast padding. Leave ≈5 to 10 mm of cast padding exposed at the proximal and distal ends of the bandage. Peel tape stirrups from the tongue depressor, twist 180 degrees, fold toward the limb, and adhere to the outside of the conforming gauze. Typically, only one pass of conforming gauze roll is needed, but if the underlying cast padding has not been compressed homogenously (ie, there are lumps and ridges), place additional layers of conforming gauze to provide even sub-bandage pressure. Always place conforming gauze from distal to proximal.
Author Insight
In a bandage with adequate tension, a pen or pencil can be inserted underneath the bandage without causing wrinkles, folds, or rolls in the cast padding.


Step 7: Apply the Tertiary Layers
Place rubberized tape over the conforming gauze, starting distally and moving proximally. Continue to leave 5 to 10 mm of cast padding exposed at the distal and proximal ends of the bandage. Use 50% overlap of the layers, and cover the entirety of the conforming gauze. Only one pass from distal to proximal is required.
Author Insight
To limit excessive compression due to elasticity of rubberized tape, the rubberized tape can be unrolled and rerolled prior to placement or unrolled prior to each pass around the limb.

Step 8: Apply Tape to the Distal End of the Bandage
Place woven cotton tape over the bottom of the foot. Cut a hole to allow room for visible swelling and exposure of the nails of the third and fourth digits. Wrap a final layer of woven cotton tape around the bottom of the bandage. Optionally, mark the location of the third and fourth toenails on the tape so the pet owner can help monitor for swelling.

Listen to the Podcast
Dr. Gleason dives deeper into the modified Robert Jones bandage in this episode of the podcast.