Dentin Bonding: Uncomplicated Crown Fracture
R. Michael Peak, DVM, DAVDC, Tamp Bay Veterinary Specialists, Largo, Florida
Physiology of Tooth Sensitivity
According to the hydrodynamic theory of tooth sensitivity, rapid fluid movement within the dentinal tubules stimulates nerve endings in the subodontoblastic nerve plexus (plexus of Raschkow) adjacent to the odontoblasts, resulting in the perception of pain or sensitivity.1,2 As long as the crown is covered by intact enamel, the dentinal tubules are sealed and there is no fluid movement (other than the normal physiologic dentinal fluid flow from the pulp to the dentinoenamel junction, which does not incite stimulation of odontoblastic processes). When the enamel is missing, either in cases of altered enamel development or following acute trauma, the dentinal tubules may be exposed and the resultant increased fluid movement within the tubules causes tooth sensitivity.
Related Article: Surgical Extraction: Maxillary 4th Premolar Tooth in a Dog
Uncomplicated Crown Fractures
The American Veterinary Dental College classifies tooth fractures based on both location and depth.3 As fracture classification changes, treatment options typically change as well. The focus here is the uncomplicated crown fracture, that is, a fracture of the crown only (no root involvement) that does not approach the gingival margin or extend deep enough to expose the pulp tissue.
In cases in which there is near pulp exposure, there is a theoretical concern about the ingress of bacteria or bacterial toxins through the dentinal tubules into the pulp, which could result in reversible or irreversible pulpitis, pulp infection, or pulp necrosis. Tooth fractures involving only the crown but extending to the gingival margin have the added concern of periodontal disease. Despite treating potential tooth sensitivity and creating a surface that is less plaque retentive, counseling clients further on the risks for long-term periodontal disease may be necessary.
Dentin bonding, or sealing the exposed dentinal tubules, has been advocated to help reduce or eliminate tooth sensitivity in areas of exposed dentin and prevent possible pulpitis or pulp necrosis.5,6 Shallow defects may be treated simply by smoothing the tooth surface and applying the dentin bonding agent, whereas deeper lesions or cavitations from fractures or enamel dysplasia may indicate dentin bonding and composite restoration.7,8
The equipment, supplies, and technique for application of a fifth-generation dentin bonding agent for treatment of a shallow, uncomplicated fracture of the left maxillary fourth premolar (#208) are described here. Because steps in the procedure may differ slightly for other generations of dentin bonding agents (fourth or sixth), careful implementation of the manufacturer’s instructions is advised.
Related Article: Veterinary Dental Teleradiology

Follow Up
When the procedure is complete, the exposed dentinal tubules should be sealed, eliminating or reducing any tooth sensitivity and preventing any ingress of bacteria or bacterial toxins through the dentinal tubules to the underlying pulp. The smoothed surface should delay plaque and calculus deposition. Because of the potential that the pulp has been irritated or become infected before application of dentin bonding, follow-up dental radiography of this tooth and the contralateral tooth is advised in 9 to 15 months.
Related Article: To Extract or Not to Extract
Basic Tooth Structures
The tooth crown has three basic anatomic structures4:
Enamel is a hard, primarily inorganic, smooth, nonporous tissue that covers the clinical crown of a tooth.
Dentin is the layer of tooth structure immediately deep to the enamel within both the clinical crown and the root. It has a slightly more organic content, similar to bone, with millions of fluid-filled tubules that run perpendicular to both the outer dentin surface and the inner dentin surface adjacent to the pulp.
Pulp is the neurovascular soft tissue at the innermost aspect of the tooth within the pulp chamber. The functional cells of the pulp, called odontoblasts, create dentin and have cellular extensions called odontoblastic processes that spread into the fluid-filled tubules of the dentin.
Step-by-Step Dentin Bonding: Uncomplicated Crown Fracture
What You Will Need
Dental radiography equipment
High-speed handpiece/low-speed handpiece/3-way air−water syringe
Hand, sonic, or ultrasonic scaler
Explorer/probe or fine endodontic file
Arkansas white stone bur or sanding disks
Prophy angle (polishing cup)
Nonfluoride pumice
Contra-angle (if using polishing disks)
Phosphoric acid gel (“etching gel”)
Microbrush, or small brush to apply bonding agent
Lip/cheek retractor (optional)
Gauze squares or other tooth isolation material
Cotton-tipped swabs
Light cure bonding agent (a fifth-generation product is used in this patient)
Curing light
Clean air (canned air)

Step 1
Perform the initial visual examination: Evaluate the tooth, probe the periodontal attachment/support, and look for obvious pulp exposure, tooth discoloration, or other dental disease that would preclude dentin bonding.

Step 2
Conduct a radiographic examination of the tooth: Evaluate the periodontal osseous support, pulp canal diameter, and periapical area for any sign of existing pulp necrosis or periapical osteolysis.
Author Insight
If necessary, compare the radiograph with a radiograph of the contralateral tooth.

Step 3
Clean the tooth: Gently remove any calculus or plaque with an ultrasonic scaler. Use caution if the fracture is close to the pulp canal. Watch for any “pink” areas that could indicate close proximity to the underlying pulp. Calculus must be removed either by hand scaling or mechanical means.

Step 4
Explore for pulp exposure: Use an explorer tip, fine endodontic file, or fine-needle tip to identify any exposed pulp. If pulp exposure is encountered, the tooth should either be extracted or treated endodontically.

Step 5
Remove any sharp enamel edges: Use an Arkansas white stone bur on a high-speed handpiece or use polishing disks (see Step 6) on a low-speed handpiece with contra-angle to remove any sharp enamel edges from the fracture. Apply water coolant to help reduce the chance of thermal pulpitis.

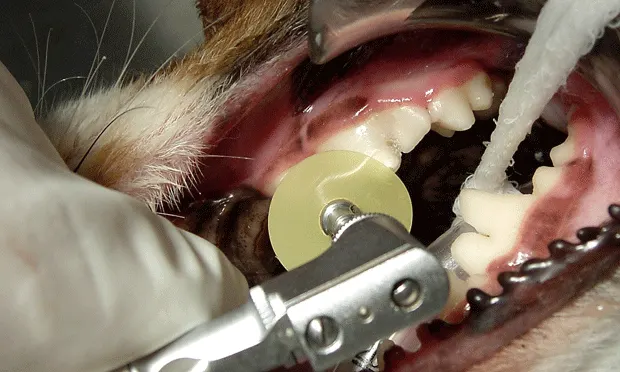
Step 6
Smooth the fractured surface: Use a polishing disk and contra-angle attachment on a slow-speed handpiece to contour any sharp enamel edges and smooth the exposed dentin surface. Start with a coarse or medium-grit polishing disk and proceed to fine and ultrafine disks to obtain a smooth surface.

Step 7
Polish: Use nonfluoride polish to remove any remaining plaque biofilm and further smooth the surface.

Step 8
Isolate the tooth: Protect the adjacent soft tissues by surrounding the crown using either gauze or other method (eg, using a rubber dam).

Step 9
Apply acid etch: Depending on the bonding agent used and the manufacturer’s instructions, apply the acid etch gel for the recommended time, usually 15 to 30 seconds. Remove the gel with a cotton-tipped swab and rinse with water to remove all gel. Lightly dry with air but do not desiccate.

Step 10
Apply bonding agent: Apply the dentin bonding agent with a microbrush in accordance with the manufacturer’s recommendations.

Step 11
Air-dry bonding agent: Follow the manufacturer’s instructions for air drying or air thinning the bonding agent. Excessive drying or desiccation can reduce the bonding agent’s affinity to the conditioned surface. In this case, a gentle stream of air was recommended for 10 seconds.

Step 12
Light cure: Apply the curing light close to tooth surface for the recommended amount of time. In this case, 10 seconds of light curing was recommended, followed by another layer of bonding agent before repeated drying and curing.

Step 13
Visually evaluate and check smoothness with an explorer tip: Additional polishing with the fine-grit sanding disks may be necessary. Ideally, the explorer tip should not hang up or skip when transitioning between the dentin bonding agent and the uninjured tooth structure.
Author Insight
For ease of comparison in the future, obtain a final radiograph for documentation.
