Surgical Extraction: Maxillary 4th Premolar Tooth in a Dog
R. Michael Peak, DVM, DAVDC, Tamp Bay Veterinary Specialists, Largo, Florida
The maxillary 4th premolar (the maxillary carnassial tooth) is one of the most, if not the most, commonly fractured teeth.
This tooth shears edible pieces of food for further degradation by the molar teeth. It lies more buccal (lateral) to its occlusal counterpart, the mandibular 1st molar. When occlusal force is applied to hard objects trapped between these teeth, it creates significant shearing force to the mesial cusp tip of the maxillary 4th premolar. In some cases, the result is a mesial cusp tip fracture in combination with a buccal wall fracture of the tooth, clinically referred to as a "slab fracture."
Fracture Types
The maxillary 4th premolar has 3 roots that are divergent from coronal to apical with respect to one another. One of the most important aspects of fracture of this tooth is whether or not the pulp canal has been exposed. If the pulp is involved, the current terminology refers to this as a complicated crown fracture; if the pulp is not involved, then it is uncomplicated. Fractures of the crown that extend below the gingival margin are classified as crown-root fractures.
Radiography
If the outer enamel is fractured away, exposing the underlying dentin and no pulp involvement is noted by careful exploration, the affected tooth should be radiographed (see Dental Radiography of the Maxillary 4th Premolar, Simplified) to view the root/periapical anatomy and evaluate periodontal health. If there is any question about root integrity, the periapical bone, or periodontal status, the contralateral tooth can be radiographed for comparison.
Techniques
Odontoplasty
If the crown is fractured but the pulp is not exposed and the tooth is otherwise healthy, smoothing of any irregular enamel (odontoplasty) plus the application of a dentin bonding agent should help seal any exposed dentinal tubules, which helps protect underlying pulp tissue and reduces or eliminates sensitivity. Periodic follow-up radiographs will help evaluate any pulpal pathology.
Extraction
If the tooth is not periodontally sound, extraction is indicated. Other indications include:
Retained deciduous teeth or retained roots of teeth
Crowded teeth that may cause periodontal or orthodontic problems
Supernumerary teeth contributing to dental disease
Unerupted & maloccluded teeth
Unsalvageable & nonvital teeth
Teeth with large carious lesions or gross decay
Abnormally developed teeth (root or crown dilaceration)
Teeth experiencing internal or external crown or root resorption
Teeth within neoplastic masses (removed when mass is excised)
Diseased teeth in the line of a fracture that do not contribute to function or interfere with fracture healing.
Extraction may also be an economic alternative to other dental procedures when the client desires definitive treatment.1-4 Contraindications for extraction include poor general health of the patient (anesthesia not possible), patients with coagulation disorders or those on medications that might affect coagulation, and teeth in an area previously treated with radiation therapy or chemotherapy.1
Other Techniques
If there is pulp involvement (complicated crown fracture with or without root involvement) and the tooth is otherwise periodontally sound, then it should either be extracted or have endodontic therapy (in most cases, complete pulpectomy and obturation, which is standard root canal therapy).
The following steps address surgical extraction of a fractured maxillary left 4th premolar tooth (#208).
Step-by-Step: Surgical Extraction: Fractured Maxillary 4th Premolar
The patient is anesthetized, dental radiographs taken, tooth assessed, and multimodal pain management, including dental nerve block, instituted.

Preoperative radiograph of the maxillary left 4th premolar
Step 1
A full thickness mucoperiosteal gingival flap is planned (indicated by the dotted line). Important surgical anatomy includes the parotid and zygomatic salivary ducts at the distal (caudal) aspect of the affected tooth and the infraorbital neurovascular bundle, which is mesial (rostral) to the vertical incision location.

Step 2
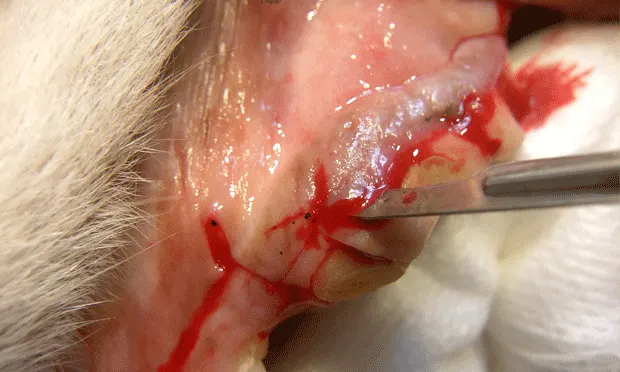
The vertical incision is made starting 5 mm apical to the mucogingival line at the mesial aspect of the left maxillary 4th premolar tooth, with firm pressure along the mesial aspect of the alveolar juga of the mesiobuccal root, and continues ventrally to the gingival attachment at the crown. The incision is then extended horizontally within the gingival sulcus, deep enough to reach the alveolar crestal bone, and along the buccal surface of the tooth to the distal aspect of the maxillary 4th premolar. If more surgical exposure of the buccal bone (over the distal root) is needed, the incision can be extended to the distobuccal line angle of the maxillary 1st molar (as is depicted in this and the following steps).5-7 In addition, the remaining epithelial attachment is also incised circumferentially around the maxillary 4th premolar.

Step 3
A #4 Molt periosteal elevator is used to reflect the full thickness mucoperiosteal flap and expose the buccal alveolar bone. This reflection can stop at the mesiobuccal line angle of the maxillary 1st molar (just caudal to the tooth being extracted) or, if needed, it can continue over the buccal aspect of the maxillary 1st molar to the distobuccal line angle. The result will be a triangular gingival flap that should be well suited for coverage of the triangular defect created when the tooth roots are extracted.

Step 4
The buccal alveolar bone is removed using a round ball bur (#2, surgical length, friction grip) in a water-cooled, high-speed handpiece. The amount removed will depend on the experience and skill of the operator, but removing the alveolar bone to expose 25% to 50% of the buccal root surface should suffice. The removal of alveolar bone is guided by palpation and visualization of the alveolar juga of each root.

Step 5
Using a crosscut fissure bur (#701L, friction grip) and starting in the furcation area, the distal root is sectioned away from the mesial roots using light sweeping cuts until completely through the tooth (A).
Additionally, the distal aspect of this crown/root segment can be trimmed away with the bur to create space for the distal root to move caudally and for a dental elevator to be inserted (B). (Use caution not to cut or damage the maxillary 1st molar.) Otherwise this tooth root segment may be in a stalemate position-unable to move distally and too tight interproximally to adequately allow placement of a dental elevator.

A
Step 6
Place the dental elevator either mesial or distal to the root segment and apply moderate rotational force, holding for 15 to 30 seconds. Then place the dental elevator in the space on the opposite side, applying the same force for 15 to 30 seconds. This process is repeated until the root segment becomes visibly mobile. At this point, the dental elevator can be worked into the palatal aspect periodontal ligament space and force applied for 15 to 30 seconds. The constant force of the dental elevator stretches the periodontal ligament fibers until the ligament breaks down.

Step 7
At this point, the distal root segment is grasped with small extraction forceps and gentle rotational force is applied while extracting the root. Once out, the root should be inspected to make sure it has been removed completely; typically the root apex will be round. Postoperative dental radiographs also help identify any retained root tips.

Step 8
The remaining mesial roots (the mesiobuccal and mesiopalatal roots) are separated using the same crosscut fissure bur, beginning in the furcation on the distal aspect of the remaining segment of tooth and cutting between the 2 cusps to create individual segments.

Step 9
The mesiobuccal root is elevated in much the same manner as the distal root: placing the elevator either mesial or distal to the root, twisting the elevator to apply force, and holding for 15 to 30 seconds (A). This is repeated all the way around the root segment until it is adequately loose to grasp with small extraction forceps. Extraction force is applied while gently rotating the root (B).

A
Step 10
The interradicular bone between the mesiobuccal root (now removed) and the mesiopalatal root is removed with a round ball bur (#2, friction grip) to mid level of the root (A and B). In the author's experience, performing this alveoloplasty greatly reduces the likelihood of mesiopalatal root fracture and eases extraction of this small root segment.

A
Step 11
Just as with the previous 2 root segments, the elevator is placed alongside the root and rotational force applied to the root segment for 15 to 30 seconds. This is repeated around the root segment until the root is loose enough to grasp with small extraction forceps. Extraction force is applied while gently twisting the root.

Step 12
Once all roots are removed (clinically and radiographically), each root alveolus is curetted and flushed with sterile saline and any bony protuberances are smoothed with a round, football-shaped, or tapered bur.

Step 13
The mucoperiosteal flap is now ready for closure over the extraction site (A). Note the triangular flap and triangular defect (B). If additional laxity in the gingival flap is needed for a tension-free closure, the underlayer of the flap (periosteum) can be incised with a scalpel blade or scissors.

A
Step 14
The site is radiographed postoperatively (A) and the mucoperiosteal flap is closed using absorbable suture in a simple interrupted pattern (B).
Procedure Pearl
Extractions are greatly facilitated with proper illumination, magnification, and instrumentation.
Caution
Use of excessive force during the extraction may result in fractured roots and alveolar perforations into adjacent anatomic structures.

A
Postoperative Care
The patient is discharged with analgesics and antibiotics per the veterinarian's discretion. The client should be instructed to feed a softened diet with no access to chew toys for 7 days. The extraction site should be visibly evaluated daily by the owner and reevaluated by the veterinarian in 14 to 21 days.
Complications
Complications of extractions include hemorrhage, broken root tips, damage to permanent teeth, misplacement of a tooth or root tip into the nasal sinus, iatrogenic creation of an oronasal or oroantral fistula, pathologic fractures, and bony sequestra/osteomyelitis.8 Many complications can be avoided with knowledge of surgical anatomy and basic surgical tenets, creation of adequate visualization, utilization of good dental extraction technique, and closure of gingival flaps. Complete discussion of all possible complications and management is beyond the scope of this article but has been covered in other texts.8-10