How to Repair Cranial Cruciate Ligament Tears
Brian S. Beale, DVM, DACVS, Gulf Coast Veterinary Specialists, Houston, Texas
Overview
Surgical repair of cranial cruciate ligament (CrCL) tears in dogs is recommended unless anesthesia or surgery is contraindicated due to comorbid conditions. Extracapsular and intracapsular repair techniques can be used to stabilize the cruciate-deficient stifle. The extracapsular method of stabilizing the joint is most commonly used by general practitioners because of its simplicity and cost. Extracapsular repair techniques have been available for over 50 years, and more than 200 techniques have been described. Surgical approaches may be performed in an open or arthroscopic fashion.1-4 Extracapsular techniques include imbrication procedures, placement of prosthetic ligaments, tibial plateau leveling osteotomy, and fibular head transposition. The method discussed here includes a prosthetic ligament and an imbrication technique. New studies and implant systems have become available to increase the chance of success and simplify the surgical technique.
Step-by-Step: Surgical Approach
Step 1
Place the patient in dorsal recumbency or lateral recumbency with the leg intended for surgery facing up. A standard lateral parapatellar approach is recommended.
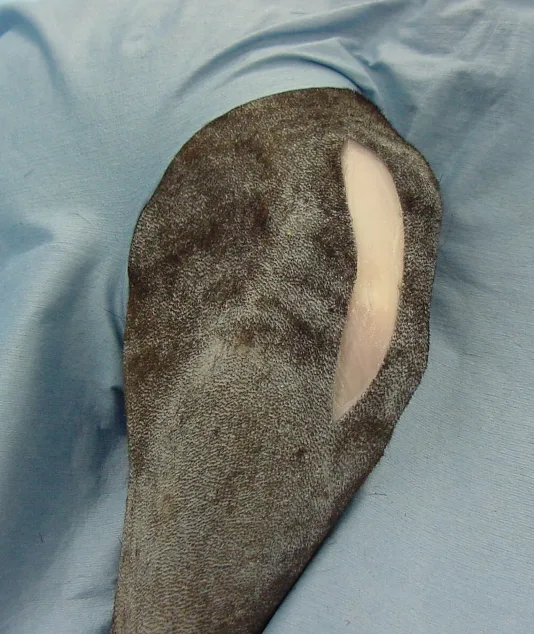
Make a curvilinear skin incision centered over the lateral aspect of the stifle as shown.
Step 2
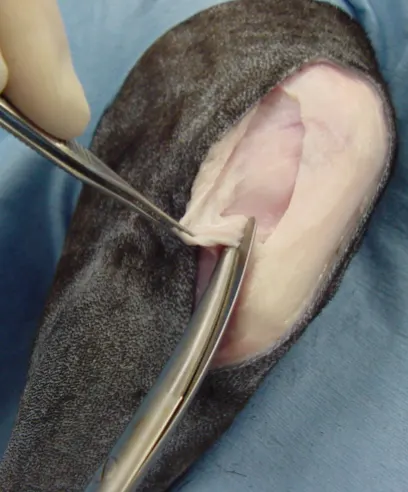
Incise the subcutaneous tissues and deep fascia on the same line.
Step 3
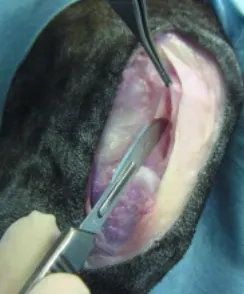
Perform lateral arthrotomy and medially luxate the patella to allow visualization of the joint.
Step 4
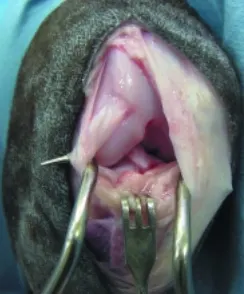
Luxation of the patella is facilitated by use of a Gelpi retractor and incising the joint capsule to its most proximal extent. Use a Senn retractor to retract the patellar fat pad distally to improve visualization.
During Stifle Exploration
If possible, have an assistant hold the leg in flexion and positioned such that you can see the stifle end-on. Identify and evaluate the intraarticular structures. The CrCL is assessed as normal or as having a partial tear or a complete tear. The caudal cruciate ligament should be assessed similarly. If the ligament is torn, remove the remnants using a no. 11 blade. The condition of the articular surfaces should be assessed as normal or as having fibrillation, partial-thickness erosion, or full-thickness erosion. Osteophyte production is graded as none, mild, moderate, or severe.
Structures to Evaluate During Stile Exploration
Cranial cruciate ligament
Caudal cruciate ligament
Medial meniscus
Lateral meniscus
Articular surfaces of the femur and tibia
Patella and patellar groove
Step 5
Assess the medial and lateral menisci for tears; this assessment can be enhanced with use of a Hohmann retractor. A bucket-handle tear of the medial meniscus is the most common type of tear. Perform partial meniscectomy if a meniscal tear is present. A meniscal release procedure can be performed to help prevent future meniscal tears5 and may be most beneficial in dogs having a large amount of cranial drawer preoperatively. Assess the patella for erosion and the patellar groove for adequate depth.
Step-by-Step: Stifle Stabilization
Use a prosthetic ligament to stabilize the joint and simulate the actions of the native CrCL. The prosthetic ligament is made of monofilament or braided material. A heavy monofilament leader line (fishing line) is preferred as it will not stretch to the extent that regular monofilament will. Most surgeons prefer Mason leader line (Mason Tackle, Otisville, MI). I use 20-, 40-, 60-, or 80-pound test depending on size of patient. A rule of thumb is to use a pound of test for every pound of body weight. This material can be autoclaved once without adverse effects. With braided material, it is best to use a commercial, sterile medical suture, usually no. 2 or no. 5.
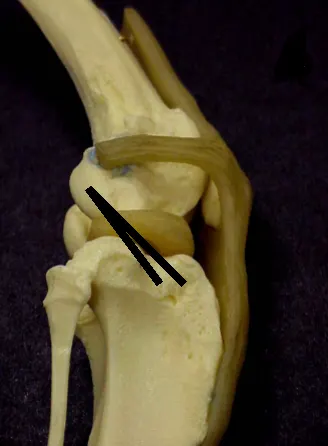
The prosthetic ligament must be placed as isometrically as possible. Isometric positioning maintains similar tension on the ligament throughout the range of motion, decreases the chance of stretching or breaking the ligament, and allows more normal stifle movement. A recent study assessed isometric positioning of a lateral extracapsular suture anchored to the lateral femoral condyle and the proximal tibia.6 Proximal and distal points of attachment are associated with the most isometric placement. The hole for attachment should be positioned just under the articular surface. Care should be taken to avoid drilling too distally on the tibia. The prosthesis can course below or above the long digital extensor tendon, depending on the patient. The prosthesis should be positioned to avoid excessive pressure on the tendon.
Step 1
(1a) Proximal attachment is done at the origin of the lateral collateral ligament on the lateral femoral condyle. This site is located at the caudal extent of the condyle and at the same level as the distal pole of the lateral fabella of the gastrocnemius muscle. Attachment around the lateral gastrocnemius fabella is also acceptable.
(1b) Distal attachment occurs at the proximal tibia, just caudal or cranial to the long digital extensor tendon.
Procedure Pearl
The prosthetic ligament must be placed as isometrically as possible.
1A
Step 2
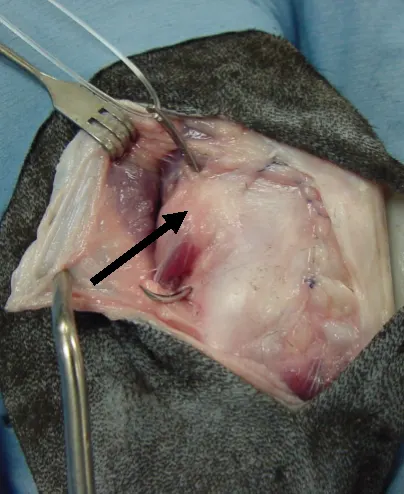
(2a & b) The prosthetic ligament can be anchored in traditional fashion around the lateral gastrocnemius fabella (arrow), which is adjacent to the isometric location identified in the lateral femoral condyle. To attach the prosthetic ligament directly to the lateral femoral condyle, use a suture anchor, bone tunnel, or screw and washer. This article describes use of a suture anchor for proximal attachment of the ligament. Many types of suture anchors can be used.
2A
Step 3
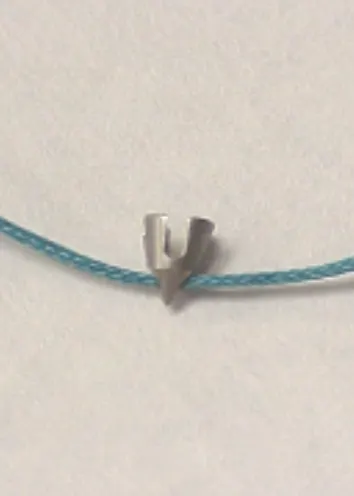
(3a) The Bone Biter suture anchor (Innovative Animal Products, Rochester, MN) has been used for stabilization of cruciate-deficient stifles in dogs.1
The no. 5 anchor is generally used for this application, but toy breeds may require a no. 2 anchor.
Step 4
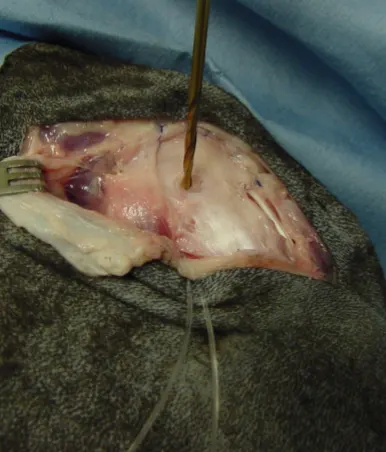
(4a-c) Load the no. 5 anchor with the suture material of choice and insert it into a predrilled 2.5-mm hole in the lateral femoral condyle. The no. 5 anchor accommodates up to 60-pound monofilament or no. 5 suture. Instrumentation is minimal, and placement of the anchor is relatively simple.
(4d) Anchor the prosthetic ligament to the proximal tibia using a bone tunnel technique. Form two bone tunnels by drilling two 1.5- to 2.0-mm holes across the tibial tuberosity using a pin or drill bit.
4A
Step 5
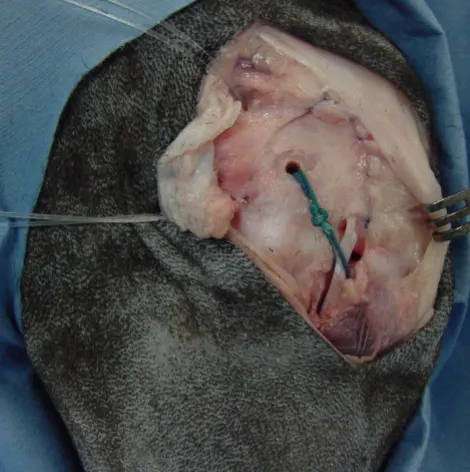
(5a & b) Pass the prosthetic ligament lateral to medial through one hole and medial to lateral through the second hole. Position the stifle at a weight-bearing angle. Tension and tie the suture using six to eight square knots. Alternatively, apply a stainless steel crimp (Securos Veterinary Orthopedics, Charlton, MA) to secure the suture; this technique avoids a bulky knot.7 Ensure that the prosthetic ligament has sufficient tension to eliminate abnormal cranial drawer; however, too much tension may overconstrain the stifle, leading to abnormal range of motion, ligament failure, and osteoarthritis. It is best to maintain normal craniocaudal translation of 1 to 4 mm.
5A
Step 6
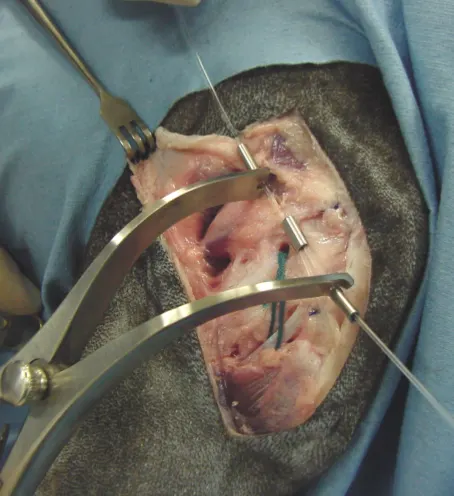
(6a) Imbricate the deep fascia using 0 or 2-0 absorbable monofilament suture placed in a vest-over-pants pattern.
Postoperative Period and Rehabilitation
A soft-padded bandage can be placed for 2 to 5 days to reduce swelling, decrease pain, and prevent self-trauma to the incision. Prolonged bandaging is generally not necessary. Encourage early return to weight-bearing and light activity; exercise should initially be limited to short, slow walks and range-of-motion exercise. Rehabilitation ideally should incorporate strength, postural, and flexibility exercises. Return to full activity is ideally not permitted for 4 to 5 months, but owner and patient compliance can be difficult to attain.
CORRECTION
The discussion of achieving ideal isometric placement of a prosthetic ligament in the above article is confusing. This is what should have been detailed:
Location of Prosthetic Ligament
It is important to place the prosthetic ligament as isometrically as possible. A recent study assessed isometric positioning of a lateral extracapsular suture anchored to the lateral femoral condyle and the proximal tibia.1 The points of attachment associated with the most isometric placement are: proximal attachment at the origin of the lateral collateral ligament on the lateral femoral condyle. This site is located at the caudal extent of the condyle and at the same level as the distal pole of the lateral fabella of the gastrocnemius muscle. Attachment around the lateral gastrocnemius fabella is also acceptable. distal attachment at the proximal tibia, just caudal or cranial to the long digital extensor tendon.
(1a) A prosthetic extracapsular ligament located in these locations is more isometric compared to those shown in 1b. Isometric placement of the ligament decreases the chance of the ligament becoming excessively loose or taut during range of motion of the stifle. Excessive tension placed on the ligament can lead to stretching or breaking of the implant. Isometric positioning of the ligament also maintains more normal motion (flexion, extension, rotation) of the stifle.
(1b) A prosthetic extracapsular ligament located in these locations is less ideal (less isometric) compared to those shown in 1a.