Ultrasound-Guided Biopsy of the Liver
Daniel VanderHart, DVM, DACVR
Clifford R. Berry, DVM, DACVR, University of Florida
Liver biopsy is an important step in the evaluation of the dog and cat with hepatic disease and is required for histopathologic diagnosis to direct therapy and to provide an accurate prognosis. Ultrasound-guided percutaneous liver biopsy has gained popularity because it is minimally invasive with a low complication rate.1-3 Ultrasound guidance is important for determining optimal biopsy location and avoiding large vascular structures and the biliary system. Ultrasound is also important for the evaluation of hemorrhage post-biopsy.3
The clinical decision to obtain a hepatic biopsy takes into consideration potential risks and benefits. Potential contraindications for a hepatic biopsy procedure include microhepatica, coagulation defects, large-volume ascites, suspected hepatic biloma or abscess, cavitated vascular mass or tumor, or a lesion adjacent to large bile ducts or hepatic vessels.2,3 Prior to hepatic biopsy, patients should have a coagulation profile and platelet count conducted to ensure adequate clotting ability.
Spring-loaded needle biopsy devices are preferred over manual devices because the samples provided are more consistent and larger. The spring-loaded needle biopsy devices come in 2 types: semiautomated and fully automated (Figure 1; see Image Gallery). The semiautomated device is spring-loaded to drive the cutting cannula over the manually preplaced inner stylet. With a fully automated device, a spring-loaded gun is used to drive both the inner stylet and outer cutting cannula in rapid succession (Figures 1 and 2; see Image Gallery). Usually 14-, 16-, or 18-gauge biopsy core needles are used for liver biopsy. Choice is partially dependent on the overall animal size, lesion size, pathology service, and type of test (eg, histopathology, culture and susceptibility, copper levels) for which the biopsy sample is being used.
Related Article: Fine-Needle Aspiration of the Liver
Larger-gauge biopsy devices (14-gauge) increase the risk for hemorrhage, especially with passage of the needle deep into the liver. However, a major limitation of needle biopsies is the size of the sample retrieved, so a balance between patient safety and sample size needs to be considered.4,5 Biopsy needles vary in actual length and in length of the biopsy stylet for the core liver tissue to be obtained (typically 12, 15, or 20 mm long). Semiautomated devices tend to have a fixed stylet length, whereas biopsy length can be altered with some of the fully automated devices. The fully automated biopsy device (Figure 3A; see Image Gallery) advances into the tissue a set distance depending on the length of the inner stylet that receives the tissue. This distance should be taken into account before firing the device to ensure that a proper specimen is likely to be collected and that non-target tissues are not sampled. For the semiautomated biopsy device, the inner (receiving) stylet is manually advanced prior to firing the outer cutting portion of the biopsy device (Figure 3B; see Image Gallery). On average, 3 to 4 quality samples are taken and placed in formalin for routine histopathology. Other types of sample handling will be required for determining copper content or specific types of tissue testing, as well as for culture and susceptibility testing. The clinician should be prepared ahead of time for the type of fixation or sample handling procedures so that the tissue sample is fresh and handled in an appropriate fashion.

FIGURE 1A
Fully automated Bard biopsy device (A; bardbiopsy.com) in which the disposable biopsy needle is placed into the biopsy device at the time of the biopsy. A semi-automated Bard biopsy device (B) in which the spring-loaded trigger will only engage the outer sleeve in a cutting fashion over the receiving tissue stylet that has already been manually advanced into the tissue.
In dogs, the choice of a semiautomated vs fully automated device is often based on clinician preference; however, in cats a semiautomated device is recommended because of potential fatal complications that have been described using fully automated devices.6 Biopsy sample holders are ideal to isolate small samples before placement in formalin.
The sample can be retrieved using a freehand technique or an ultrasound-based biopsy guide setup that locks the biopsy needle to the transducer. The freehand method can provide the greatest leverage and flexibility to the operator; this can ensure a safe procedure for the patient.
The primary advantage of the biopsy guide setup is the ability to know exactly where the needle tract is because the angle is fixed adjacent to the ultrasound transducer. The downside is that these are cumbersome and unreliable, and it is easy to pop out of the biopsy holder when maneuvering the transducer and biopsy device. The primary advantage of the freehand technique is having a free hand to move the device at any angle relative the ultrasound beam; however, with the freehand technique, the operator must be practiced and confident at finding the biopsy tip and needle tract to follow while advancing in tissue.
Whichever system is used, the operator should be skilled so the patient is not harmed because of the technique. Use of ultrasound phantoms or cadaver patients for practice is appropriate before attempting these procedures on a live patient.
Related Article: Laparoscopic Liver Biopsy
Step-by-Step: Ultrasound-Guided Liver Biopsy
What You Will Need
Automated (left) or semi-automated (right) biopsy device (14- to 18-gauge)
No. 11 surgical blade
Biopsy sample tissue cassette
10% buffered formalin
25-gauge needles for removing sample from biopsy stylet
Microscope slides (if cytologic touch preparations are desired)
Surgical scrub
Alcohol

Step 1: Evaluate the Liver & Determine Biopsy Area
Use image-optimization techniques (near field setting, focal zone at the level of the lesion, highest frequency transducer, and perpendicular to the lesion) so that the area of interest is as close to the skin
surface as possible. The highest frequency of transducer should be used, with focal zone placement at the level of the area of interest. Ensure the ultrasound probe and biopsy area are in a position in which the operator can see the ultrasound and the probe positioning is comfortable. While imaging the liver and area of interest, the operator should be able to use the biopsy device without interference of the transducer, cable, or other devices that might be present.
Once the image area is optimized, turn on color flow Doppler to ensure there are no major vessels in the area of interest (Figure 4). The hepatic and portal veins—but not the distribution of the hepatic artery—can be visualized on a standard gray-scale 2-dimensional ultrasound image. Angle to the right and left to ensure that there are no major vessels within the target area. Turn off imaging compounding to ensure accurate needle-tract and needle-tip placement at depth in the liver.

Color Doppler of a potential biopsy area in the liver. On account of the presence of large portal veins (colored in red—flow toward the transducer) and hepatic veins (colored in blue—flow away from the transducer), this area was not chosen for biopsy.
Author Insight
Optimize the image before the procedure to know exactly where the least amount of vasculature is, relative to the parenchyma, to be obtained. This includes using the highest frequency transducer, ensuring the biopsy area is within several inches of the surface, reviewing the biopsy plan on screen with the image frozen for depth of distal or deep-needle placement, and using color flow Doppler or power Doppler to check that no large vessels are in the sample area.
Related Article: Surgeon's Corner: Visceral Biopsy Technique
Step 2: Prepare for Biopsy
With the patient under general anesthesia, clip the sample area and clean using a surgical scrub and standard aseptic technique. Use a sterile transducer sleeve with nonsterile gel inside (5A). Using sterile technique, have an assistant place the transducer into the sterile sleeve. Use sterile gel provided with the ultrasound biopsy set-up to provide contact between the transducer and sterile sleeve and the skin surface. Ensure that there are no air bubbles in the gel between the sterile sleeve and the transducer interface.

A
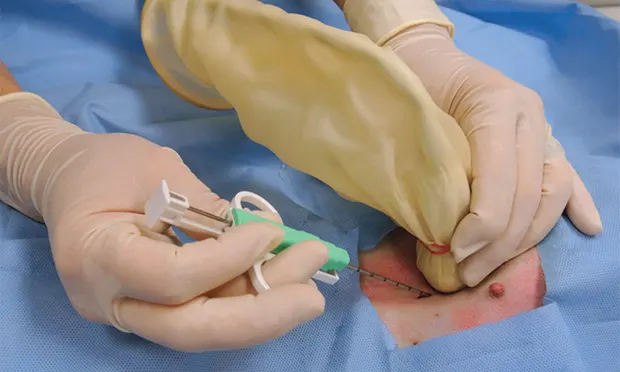
Figure 5. Sonographer with the transducer in one hand and the semiautomated biopsy device in the other (A). Image was taken just before positioning the biopsy needle in the patient. A sterile field has been created using a sterile drape.
Biopsy needle tract within the patient after firing and just before removing the biopsy device (B). Post-biopsy hemorrhage often collects between hepatic lobes as seen in this image (white arrow heads) (C). The echogenic fluid represents acute hemorrhage. Color flow Doppler post-biopsy ensures there is no persistent hemorrhage in the peritoneal space (D). Power Doppler imaging is the most sensitive form of Doppler to detect the presence or absence of blood flow.
Step 3: Relocate the Sample Area
If a general liver sample is desired, select the most superficial and accessible portion of the liver. Take care to identify and avoid large vessels within the sample area and to avoid traversing liver lobes with the biopsy device, as this can increase the risk of hemorrhage.2,3 Identify any structure in the path or direct vicinity of the lesion that would contribute to complications if inadvertently sampled.
Step 4: Plan the Trajectory
There are 4 key steps to ensure proper needle placement. First, the needle should always be oriented with the long axis of the transducer to ensure needle visualization throughout its length and through the entire process. Always know where the tip of the needle is. The second step is to realize the transducer's orientation to anticipate from which direction of the monitor the needle will enter. In general, enter from the same side of the transducer (transducer notch) for biopsies and fine-needle aspirates (5B). Anticipate exactly where the needle tip will enter the patient relative to the transducer to visualize the tip immediately on the screen. Third, the angle of trajectory should be calculated based on the depth of the lesion. Deeper lesions require a steeper angle, and superficial lesions require shallow angles. Once the angle is planned, place the needle approximately 1 cm away from the head of the transducer, oriented in planned trajectory. Do not go perpendicular to the skin if the transducer is placed perpendicular to the skin, as the parallel configuration is the worst possible reflector, and the biopsy device will not be seen in the image. Make a small skin incision with a No. 11 blade to facilitate needle placement.
Step 5: Advance Needle
Preload the biopsy device before advancing in the tissue. Advance the needle to the near field and pick up the needle device in the scan plan. Then, advance the biopsy needle tip to the area of interest or focal lesion. Next, move the transducer to find the needle tip (ie, do not move the needle to find the transducer) and reassess trajectory. With the trajectory planned and the needle 1 cm away from the transducer, the needle can be advanced for a semiautomated device before firing the outer cutting sleeve. Visualize the needle throughout the entire process to ensure proper sampling of the lesion selected and avoid inadvertent needle placement.
Author Insight
One of the most difficult parts of a percutaneous biopsy is driving the needle through the body wall. Use caution not to over-advance the needle once it has popped through the body wall. Rotate the device while driving though the body wall with steady, controlled pressure to facilitate this process.
Step 6: Sample the Lesion
When using a semiautomated device in the correct position, the inner stylet can be advanced through the desired biopsy location and when ready, the cutting outer cannula can be deployed. If the stylet is a 20-mm cutting length, advance the inner stylet at least another 2.5 cm deep in the tissue. Always be mindful of the depth of the tip of the needle. Ultrasound calipers can be used to determine the depth the device tip will travel. With a fully automated device, the needle tip is advanced to a location that is 1.2 to 2 cm from the area of interest, which is in the trajectory of the device. Remember that when fired, the inner stylet advances and the outer cutting cannula fires in rapid succession (microseconds). Where exactly the tip will end up depends on many factors, including hand steadiness. Again, when triggered, both the inner stylet and cutting cannula will advance through the lesion. Whichever device is deployed, once fired, the needle should be held steady for several seconds to evaluate for any immediate hemorrhage or areas of linear hypoechogenicity. Remove the device and hand to an assistant for removal of the core liver sample.
Step 7: Prepare the Sample
After sampling the lesion, retract the needle. In both device types, retract the cutting cannula to reveal the sample. In the case of the semiautomated biopsy gun, the device has been reloaded and there is typically no safety, so care should be taken when obtaining the core sample. Inspect the sample for size and quality, and transfer to the biopsy holder using a small-gauge needle (25 gauge, 1 in) to minimize sample disruption. One of the biopsy specimens can be rolled on a slide for cytology. Once 3 to 4 quality samples have been taken, place the biopsy holder into 10% neutral buffered formalin, a sterile tube for culture, or into a container containing other preservatives that may be indicated for specific testing.
Author Insight
Microscope slide touch preparations can be made prior to placement in formalin. This allows for rapid microscopic assessment for expedited case management, as well as quick assessment of the potential quality of the biopsy samples.
Step 8: Inspect for Hemorrhage
Every time a biopsy is made, the site should be inspected for evidence of hemorrhage. Hemorrhage will often collect around and between liver lobes as seen in 5C between the arrowheads. Color (or power) Doppler ultrasound may help visualize active bleeding as seen in 5D. Once the patient is no longer bleeding, the patient can be recovered. Observe the patient closely in the postoperative period for clinical evidence of blood loss. Serial ultrasound examinations may be beneficial for discovering progression hemorrhage. If the patient continues to bleed, a blood transfusion may be needed. It is usually beneficial to obtain packed-cell volume readings at 15 and 45 minutes post-biopsy to ensure that active bleeding has stopped. An external elastic belly wrap can be helpful in preventing further hemorrhage.