Tracheostomy
Michael Tillson, DVM, MS, Diplomate ACVS, Auburn University
Tracheostomies can be broadly grouped as emergency or planned surgeries: An emergency tracheostomy is performed when there is severe upper respiratory tract obstruction. Situations demanding an emergency tracheostomy typically occur with little advance warning and sometimes must be performed under less than optimal conditions-such as in an unstable patient in severe respiratory distress, at cage-side or in the critical care unit, and with inadequate patient preparation.
Planned tracheostomies provide an airway for patients before diagnostic or surgical procedures of the upper airway or oral cavity, most typically in situations where there is potential for severe airway obstruction or when an alternative to orotracheal intubation is needed. Planned tracheostomies are performed under controlled, aseptic conditions. They offer the clinician an excellent opportunity to become familiar with the procedure in a calm, minimally stressful environment.
Step-by-Step: Tracheostomy
What You Will Need
Scalpel blade (10 or 15 blade) and handle
Needle holders
Suture scissors, Metzenbaum scissors
Two mosquito hemostatic forceps
Small Gelpi retractor
Suture materials:
Nonabsorbable monofilament suture (eg, 2/0 Vicryl [www.ethicon.com])
Absorbable monofilament suture (eg, 3/0 or 4/0 Monocryl [www.ethicon.com])
Umbilical tape

Step 1
The patient is placed in dorsal recumbency and a towel is placed under the neck to extend the head and flatten the ventral neck. In all but the most extreme circumstances, the neck is clipped, prepared, and draped for aseptic surgery. The prepared area includes the cricoid cartilage and extends caudally to the thoracic inlet and laterally half the distance to the dorsal midline.
Step 2
The tracheostomy is begun by incising along the ventral midline of the neck. The incision is centered 3 to 5 tracheal rings below the cricoid cartilage and extends from the cricoid 5 to 10 cm toward the manubrium. Since performing a tracheostomy can be stressful, the clinician needs to be careful to avoid making the initial skin incision too deep-it might cause unintended damage to the trachea and peritracheal structures.

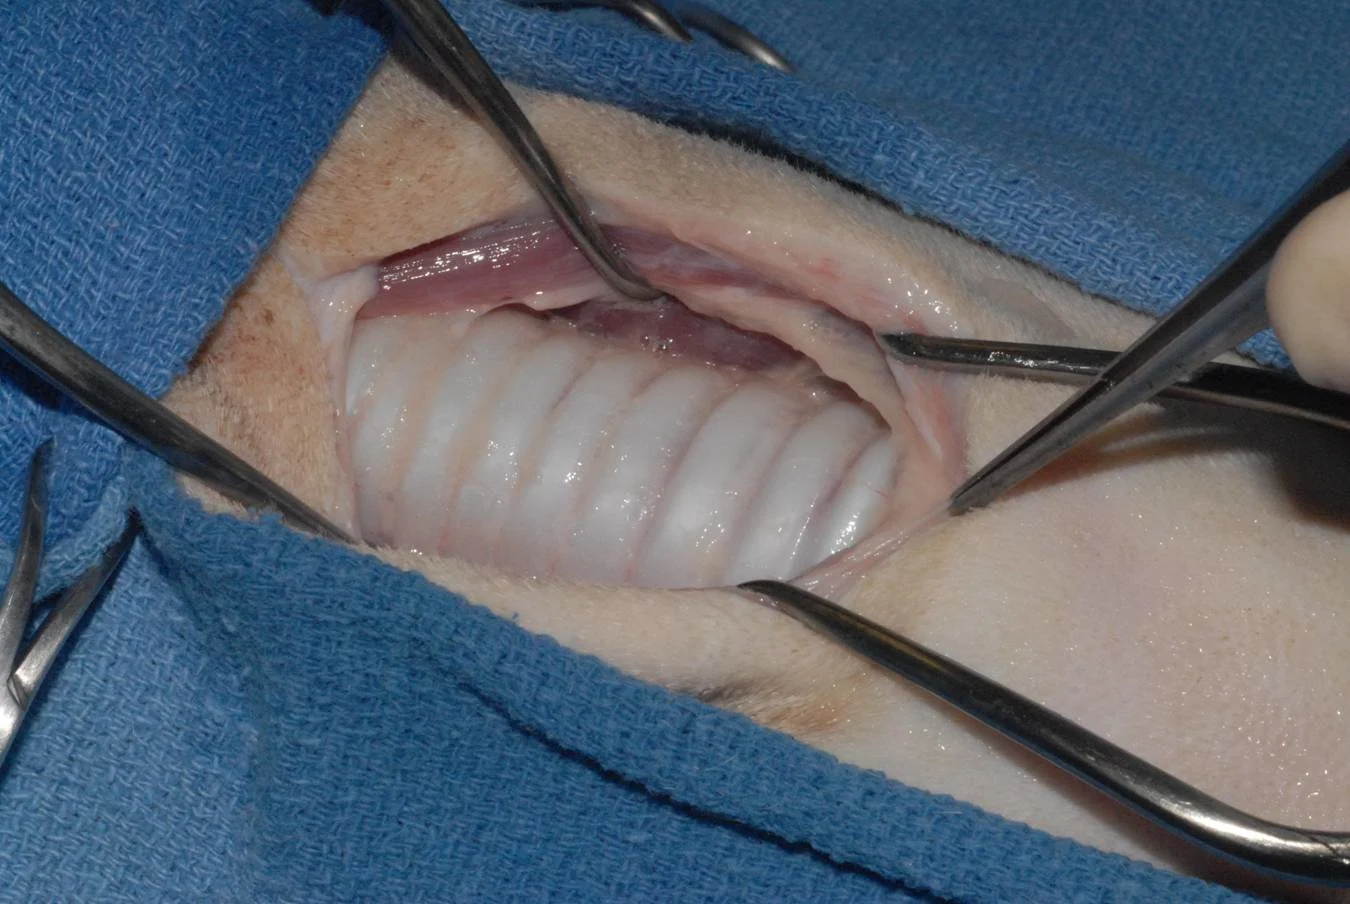
Step 3
After the initial incision, bleeding is controlled with hemostats or electrocautery. The subcutaneous tissues are separated and the sternohyoideus muscle identified (A). The muscle is split, revealing the ventral surface of the trachea (B).

A
Step 4
Gelpi retractors are placed in the incision to expose the trachea and improve visualization. It is important to carefully place the Gelpi retractors so as to avoid unintentional injury to the esophagus, vagosympathetic trunk, jugular vein, thyroid gland, or the carotid artery (A through C). It is also important to avoid damaging these structures when incising into the trachea or during other portions of the procedure.

A
Step 5
Once the extent of the trachea is visualized, the fascia covering the trachea is dissected away, exposing roughly 50% of the tracheal diameter. Excessive dissection does not improve visualization and increases risk of damage to adjacent structures and potential for vascular compromise to the trachea.

Step 6
Two stay sutures (2/0 monofilament nylon) are placed above and below the intended incision site and are tied as long loops (8 to 10 cm). These stay sutures aid in manipulation of the tracheal stoma. Before this is done, check the location of the endotracheal tube (if one is in place) to avoid snagging the inflated cuff with the stay sutures. It may also be helpful to accentuate the curvature of the suture needle (ie, bend it) before placing the stay sutures. This is especially true when using a flatter needle (3/8 curvature) normally associated with skin sutures. The stay sutures can be used to pull the stoma apart when the tracheostomy tube is changed or replaced.

Step 7
The actual tracheostomy can be performed by several different techniques. I prefer to make a horizontal incision between tracheal rings 3 and 4 or 4 and 5. The incision extends roughly 40% to 50% of the circumference of the trachea. Again, care is taken to avoid iatrogenic injury to structures on the sides of the trachea.

Alternative Techniques
An alternative technique uses a longitudinal (vertical) incision across several tracheal rings. Although this technique decreases the risk for injury to peripheral structures, it does incise multiple tracheal rings, which has been previously discouraged. The third technique (transverse flap tracheostomy) involves forming a flap from the ventral wall of the trachea. This is done as either an I or “lazy U” incision and reportedly allows for easy removal and replacement of the tracheostomy tube by a single individual.
Step 8
When finishing the tracheostomy, I sometimes place 1 to 3 horizontal mattress sutures through the sternohyoid muscles (A and B). These sutures pass dorsally to the trachea and are tied to draw the sternohyoideus muscles dorsal to the trachea, elevating them toward the ventral surface of the neck. This reduces tension and minimizes the potential for soft tissues occluding the tracheostomy stoma. This step, although essential for a permanent trachestomy, is not required for every temporary tracheostomy.
Procedure Pearl
You can elevate the trachea toward the skin by drawing the sternohyoideus muscles dorsal to the trachea. This will minimize potential for soft tissue occlusion of the tracheostomy site.

A
Step 9
With the tracheal incision made, the endotracheal tube is withdrawn (A) and the tracheostomy tube is inserted. Traction on the stay sutures will open the tracheal stoma for easy insertion of the tracheostomy tube (B).

A
Thoughts on Tracheostomy Tubes
When a tracheostomy tube is in place for an awake animal (or an animal not requiring ventilation), I prefer a noncuffed, double-lumen tracheostomy tube (Shiley tube) (A). The double-lumen design allows for easier management of the tube. The inner cannula is simply unlocked and removed from the outer cannula to permit cleaning. Since the outer cannula remains in place, there is minimal risk for respiratory distress, and replacement of the inner cannula is simple. However, double-lumen tubes are not available in very small sizes.
If the tracheostomy tube is placed for mechanical ventilatory support, a cuffed tracheostomy tube (B) is used. The cuff is inflated only enough to prevent leakage during positive pressure ventilation. Overinflation of a tracheostomy tube cuff is one of the most common causes of tracheal stenosis in patients with long-term tracheostomies.
If a cuffed tracheostomy tube is used in an awake patient, the cuff remains deflated. This minimizes the risk for patient asphyxiation in situations where the cuff is inflated and the tube lumen becomes obstructed.


Step 10
The tracheostomy site can be partially closed with a few subcutaneous and skin sutures. This decreases the size of the open wound. The tracheostomy tube should fill 50% to 60% of the tracheal lumen. A nonadherent pad is cut to go around the tracheostomy tube, and the neck is lightly bandaged. The bandage should be secure and not excessively bulky, since a large or shifting bandage could obstruct the tracheostomy tube. The tube is secured around the neck with umbilical tape or gauze to prevent dislodgement.
Procedure Pearl
Secure the tube around the neck with umbilical tape or gauze to prevent dislodgement.

Step 11
Anesthetic tubing can be attached to the tracheostomy tube for ventilatory support or for continuation of general anesthesia. Alternatively, if the tracheostomy is performed to bypass intubation through the oral cavity or if anesthesia is to be continued, a sterile endotracheal tube can be placed through the stoma. The cuff of the endotracheal tube is inflated and secured routinely.

Step 12
To change the tracheostomy tube and to clean the site, any bandage material used to secure the tracheostomy tube is removed. Traction is applied to the stay sutures, and the tube is withdrawn. The stoma site is quickly cleaned, with care taken not to dislodge debris into the tracheal lumen. The replacement tube is inserted through the lumen and secured. Although it may seem self-evident, it is essential that the tube be correctly inserted into the tracheal lumen again. Incorrect tube placement can have devastating consequences. The fresh tube is once again secured to prevent it from dislodging.
