Top 5 Fine-Needle Biopsy Sample Collection & Handling Errors
Lisa M. Pohlman, DVM, MS, DACVP (Clinical Pathology), Kansas State University
Isabelle Soga, DVM candidate, Kansas State University
Fine-needle biopsy is an effective diagnostic tool that allows for the retrieval of samples without anesthesia (and often without analgesia), thereby significantly reducing cost and avoiding potential adverse effects associated with more invasive procedures. In-clinic cytology examination or submission to a reference laboratory with a rapid turnaround time can provide cursory information. In cases in which a definitive diagnosis is not achieved, cytology can typically help direct additional testing. One study found 89% sensitivity and 100% specificity for cytologic detection of neoplasia in cutaneous and subcutaneous lesions.1 Sample quality is a key factor in ensuring diagnostic yield, and proper technique in sample collection and handling can help avoid nondiagnostic samples.2
Following are, in the authors’ opinion, the 5 most common fine-needle biopsy collection and handling errors that result in nondiagnostic samples, along with corrective actions.
1. Improper Collection Technique
The 2 fine-needle biopsy collection techniques are aspiration and nonaspiration. The nonaspiration technique (also called the capillary, stab, or woodpecker technique) is the preferred method of collection because it reduces the amount of blood contamination and can produce samples of excellent diagnostic quality.3,4
Common errors with the nonaspiration technique include lack of redirection, which can result in a nonrepresentative sample, and timid collection, which can result in a poorly cellular sample. Occasionally (ie, when lesions are poorly exfoliative), the nonaspiration technique does not yield an adequately cellular sample for cytologic interpretation. Therefore, an additional (less common in the authors’ opinion) error is not recognizing when use of the nonaspiration technique alone does not suffice and, consequently, when additional sampling via the aspiration technique is required.
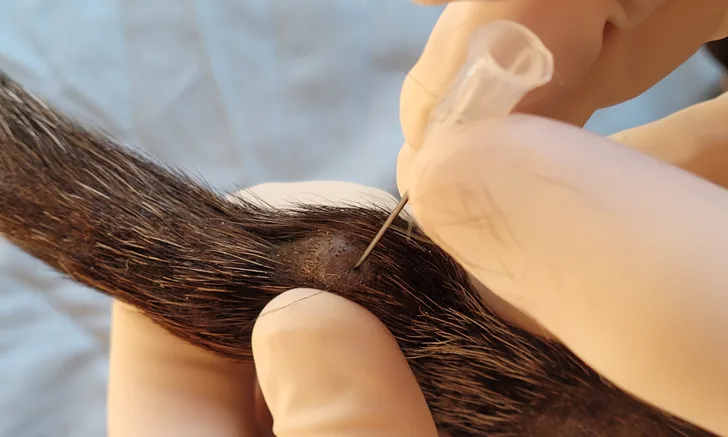
The nonaspiration technique can be performed using a needle only (Figure 1) or a needle attached to an air-filled syringe (Figure 2).3 For cutaneous and subcutaneous masses or peripheral lymph nodes, the tissue to be sampled should be stabilized with the clinician’s free hand, and the needle should be inserted into the tissue and redirected (ie, moved back and forth) several times without exiting the mass.5 The sample can then be expelled onto a slide via an air-filled syringe. The goal is to gather a representative population of cells.3-5

FIGURE 1 A soft mass on the tail of a 14-year-old dachshund. Fine-needle biopsy is performed using the needle-only nonaspiration method. The mass is stabilized with the clinician’s free hand, and the collection needle is inserted into the tissue and redirected multiple times before exiting the tissue. Following collection, the collection-needle should be attached to an air-filled syringe so the sample can be expelled onto a clean glass slide. A squash preparation can then be prepared.

A soft mass on the tail of a 14-year-old dachshund. Fine-needle biopsy is performed using the nonaspiration method with an air-filled syringe attached to the needle. The mass is stabilized with the clinician’s free hand, and the collection needle, with an air-filled syringe attached, is inserted into the tissue and redirected multiple times before exiting the tissue. Following collection, the sample is immediately expelled onto a clean glass slide, and a squash preparation can be prepared.
Errors with the aspiration technique are common and include prolonged aspiration or repeated pulses of negative pressure, both of which can result in significant blood contamination and an overly diluted sample3,5; failure to release negative pressure and stop aspiration before the needle is removed from the tissue, which can result in the sample entering the barrel of the syringe and an inability to easily retrieve it; and timid collection, which can result in a poorly cellular sample.3
For the aspiration technique, the needle should be attached to an empty syringe and inserted into the mass. Negative pressure should then be applied by withdrawing the plunger once (Figure 3) and redirecting the needle while negative pressure is maintained and without the needle exiting the mass. Before the needle is removed, the negative pressure should be released, as maintaining pressure while the needle exits the mass can result in the sample entering the barrel of the syringe. After the needle is removed from the mass, it must be removed from the syringe. Air is added to the syringe, then the needle is reattached so the sample can then be expelled on a clean glass slide.3

Fine-needle biopsy using the aspiration technique on a firm, cutaneous mass on the right lateral forelimb (just distal to the elbow) of a border collie crossbreed. The needle, which is attached to an empty syringe, is inserted in the lesion. Negative pressure is applied by pulling the plunger back once (arrow). Pressure is maintained during needle-redirection to obtain a sample.
Highly exfoliative and vascular tissues (eg, lymph nodes, round and epithelial cell neoplasms) are typically successfully sampled using the nonaspiration technique6; thus, the nonaspiration technique should be attempted first. The aspiration technique should only be used if cells are not exfoliating with the nonaspiration technique. In the authors’ opinion, spindle cell lesions are more likely to be poorly exfoliative with the nonaspiration technique and may require the aspiration technique to obtain an adequate sample.
2. Incorrect Needle and/or Syringe Size
In general, 22- to 25-gauge needles can be used for fine-needle biopsy collection, but needle size should be determined based on firmness of the tissue to be aspirated.3 Softer tissue requires a needle gauge on the higher side of the range (eg, 23-25–gauge). Using needles that are <25-gauge increases the risk for breakage and distortion of cells.7 Firmer tissue requires a larger needle size; hence, a 22-gauge needle is ideal. Needles >22-gauge often result in tissue cores, preventing creation of a proper monolayer for analysis. Larger needles also increase the risk for blood contamination.3
For the nonaspiration technique, the size of the syringe is not critical, as it is simply used to rapidly expel the sample on the slide after collection.3 However, for the aspiration technique, the size of the syringe (much like needle size) should be selected based on tissue consistency. A smaller syringe size (3-mL) is sufficient for softer tissue (eg, lymph nodes) because minimal negative pressure is needed for sample collection. Firmer tissue requires increased negative pressure to obtain a sufficient number of cells.3
If there is uncertainty, a 12-mL syringe3 with a 23-gauge needle is generally safe.
3. Localization Error
Successful sample collection depends on the accuracy of the needle-tip delivery. Common localization errors include a geographic miss (ie, the needle misses the lesion entirely and instead samples a nonrepresentative area [eg, subcutaneous or perinodal fat])3; shallow passes of the collection needle (ie, the needle hits the lesion, but just barely), which can result in a poorly cellular sample3; and inadequate or insufficient needle redirection—the likelihood of a nondiagnostic sample increases with <4 redirections.6
4. Inappropriate Slide-Preparation Technique
The slide-over-slide (also called squash prep) method is the preferred smear preparation for fine-needle biopsy samples.3 The goal is to achieve a thin film of cells spread out in a single layer (ie, the monolayer) without damaging the cells. Contrary to its name, this procedure requires minimal to no pressure, as overly aggressive pressing of the slides can result in cell rupture (Figure 4).3 The sample should first be expelled onto a clean glass slide toward one end, leaving room for the sample to be spread; this is referred to as the sample slide. A spreader slide is then gently placed either parallel to or perpendicular on top of the sample slide with no downward digital pressure, allowing just the weight of the slide to “squash” the preparation. The top slide should be pulled horizontally to glide over the bottom slide until the 2 slides are separate. A common error is to pull the 2 slides vertically apart; the resulting suction can rupture the cells.3

Nondiagnostic sample from a fine-needle biopsy of a lymph node. Almost all cells on the smear are ruptured. One nucleated cell (a neutrophil; circle) is intact. Nuclei with no associated cytoplasm (ie, naked nuclei; solid arrows) can be seen. Streaming nuclear material (dashed arrows) and scattered RBCs (curved arrows) can be seen. Large, clear spaces (asterisks) represent lipid (likely subcutaneous or perinodal fat in this case), which is a common finding on cytology samples. Modified Wright’s stain, 600x magnification
Slides that are being used for cytologic preparation (including sample and spreader slides) should never be heat- or formalin-fixed. After the squash preparation is made, the smears should be air-dried via rapid waving of the slides or by placing the slides in front of a fan.3,5 After air-drying, the slides can either be shipped unstained to a reference laboratory for assessment by a clinical pathologist or stained for in-clinic viewing.
5. Inappropriate Shipping Procedure
Properly protecting slides during transportation/shipping is a major concern.3,8 Cardboard and soft-plastic casings require additional protection (eg, bubble wrap), as slides are easily broken (Figure 5).3 Containers made of hard plastic or polystyrene foam are ideal (Figure 6). Unstained slides should be packaged separately from formalin-containing samples. Even if the slides are individually wrapped, the formalin fumes can penetrate packaging and deleteriously affect the cytology preparations, resulting in a nondiagnostic sample.3,5

Slides broken during shipment due to inadequate protective packaging

Slide holders that can be used for shipping slides. The hard-plastic box and polystyrene foam container (solid arrows) are protective enough to ship slides without additional packaging. The cardboard and soft-plastic casing (dashed arrows) need additional protection during shipping.
Relevant history and clinical findings are essential to provide context for clinical pathologists. Therefore, it is important to include location and macroscopic description of the lesion, method of sample collection, clearly labeled slides, time of collection, and concise clinical history (including signalment) with every shipped sample.6 Submitting several slides (rather than one) increases the likelihood of a productive report.
Conclusion
Collection and preparation of quality fine-needle biopsy samples is a skill that is honed through experience and refinement of technique. Collection method and needle and syringe size should be determined based on tissue characteristics. In the authors’ opinion, the nonaspiration technique should be attempted first because it is the preferred method to obtain a sample of excellent diagnostic quality.3,4 If the nonaspiration technique fails to exfoliate cells, the aspiration technique may be successful, but it is also more likely to be contaminated with peripheral blood. Squash preparations should be prepared with a view to minimize cell damage and maximize production of a monolayer of well-spread, intact cells. Labeled, air-dried smears can then be stained for in-clinic viewing or packed appropriately and shipped (along with relevant history and lesion description) to a reference laboratory for evaluation by a clinical pathologist.