Surgical Repair of Open Fractures
Karl H. Kraus, DVM, MS, DACVS, Iowa State University
An open fracture is one in which broken bone penetrates the skin, exposing the fracture to the environment. Open fractures can lead to contamination of the fracture site, potentially resulting in infection, including osteomyelitis.
There are several general principles and steps in treating open fractures, although some fracture types (see Table) require specific treatment or more urgent care.1,2
Table: Classification of Open Fractures1,2
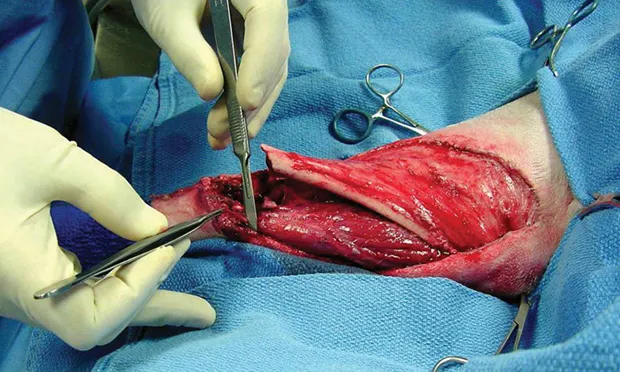
Open fractures may have prolonged healing times and higher incidence of nonunion (compared with closed fractures), even without becoming infected. With proper therapy, however, severe open fractures can have successful outcomes (Figure 1).

FIGURE 1A
Successful treatment of type III open tibial fracture
Emergency Treatment
When an open fracture occurs, the caregiver should cover the wound with sterile dressing (eg, Telfa pad) or material that is as clean as possible, followed by placement of appropriate bandage. Dressing type is unimportant, but it should be sterile and porous and should not leave particulate matter. Hemorrhage should be controlled with pressure. Splinting or tourniquet application should not be encouraged unless necessary.
The patient should be transported to a hospital with adequate facilities for treating trauma. If the hospital does not have equipment and personnel consistent with a level-1 trauma center (ie, any hospital equipped to care for any level of trauma that always has an available trauma surgeon), the patient should be treated initially and then referred. If arteries require ligation, the suture ends should be sufficiently long to facilitate locating the artery later.
After the patient has been stabilized, open fractures need to be surgically repaired. Historically, the initial surgical treatment had to occur within the first 6 hours of injury, but this is not supported by clinical studies in humans.3 Nevertheless, it is prudent to provide initial care as soon as practical to prevent contamination from progressing to infection, especially in the case of type III or higher open fractures.
Initial Wound Cleansing
Initial wound cleansing can occur in a nonsterile but sufficiently clean treatment area, but debridement and final cleansing should be completed in a sterile surgical suite. The patient must be anesthetized for proper wound treatment.
The wound should be generously covered with sterile water-soluble surgical lubricant, which should wash away easily and prevent hair from becoming embedded in the wound. The area around the wound should be clipped and washed generously with saline. If available, a 1-L fluid bag with a pressure cuff at 300 mm Hg results in consistent lavage pressure.4 Alternatively, lavage can be performed with 4 to 6 L of saline using a 35-mL syringe and 19-gauge needle,5 although this may result in too much pressure.
To remove grime and particulates that do not rinse off, a mild detergent can be used. Use of a 0.05% castile soap solution (purchased for surgical lavage or made by adding 30 mL of liquid castile soap to 1 L of saline) has been reported.6,7 Other mild detergents may be effective without causing undue tissue damage, but most have not been studied.
Adding antibiotics, antiseptics (eg, iodinated solutions of chlorhexidine), or hydrogen peroxide to lavage solutions should be avoided.8 Use of these products in higher concentrations (ie, with less water) can cause tissue damage.
Debridement & Lavage
Removal of nonviable tissue is the most important factor in preventing infection, as dead skin can facilitate bacterial growth. The wound edges only need to be removed if they are nonviable. Definitive signs of nonviable skin are dark discoloration, cut edges that do not bleed, leathery texture, or maceration.
Because it plays little positive role in healing, fascia should be removed liberally. Wispy fronds of fascia are most easily removed with scissors.
Nonviable muscle should also be removed, with attention to the four Cs to help determine muscle viability: color, contraction, circulation, and consistency. Muscle should be bright red, contract when grasped with thumb forceps, bleed from cut edges, and have a firm consistency. Small exposed tendons should be removed. Larger tendons, especially the common calcaneal tendon, are best preserved, as they are needed for function; however, they should be covered with soft tissue as soon as possible. Small bone fragments without soft tissue attachments should be removed. Bone deficits are best treated with autogenous bone grafts during fixation.
If large areas of cortical bone are exposed and have been stripped of soft tissue, including periosteum, then osteostixis should be performed. This allows blood and mesenchymal stem cells to come from the medullary cavity to maintain viability of the large area of cortical bone. This does not weaken the bone significantly and allows rapid granulation in 3 to 5 days.
After debridement, lavage should be performed again to remove any remaining surgical lubricant, dirt, blood, and tissue particles from the wound.
Stabilization
The fracture can be stabilized following debridement and lavage. For types I and II open fractures, any typical fixation can be used. However, careful consideration of fixation methods should be made with all type III open fractures. When possible, external fixators may allow wound treatment with no implant in the area of fracture healing. Fixation pins can provide an exit point for exudates. Fixators are often easily applied in the distal limb.
Open fractures of the humerus and femur are more problematic because fixators increase morbidity and can be less stiff in these bones. Here fixators are used when feasible; if not, locking plate fixation may be chosen.
Closure
Primary skin closure may be performed in types I and II open fractures, ideally with monofilament nylon or polypropylene sutures.9 Staples may be used as well. Dead space can be addressed with closed-suction drains and pressure bandages (eg, Robert Jones bandage). Monofilament antibacterial suture should be used sparingly to close deeper structures.
Closure should be performed with little tension on the suture line. If significant skin and other tissue are lost so that closure can only be performed with tension, the wound should be allowed to heal by second intention.
Antibiotic Therapy
Antibiotic use should be limited, particularly if the wound is allowed to heal by second intention. Parenteral first-generation cephalosporins can be used for 48 hours, followed by oral antibiotics for no more than 7 days. Prevention of infection should focus on debridement and wound care rather than repeated culturing and changing the course of antibiotic therapy, which might only result in shifting bacterial growth to more virulent strains without decreasing the incidence of infection.10
Step-by-Step: Surgical Repair of Open Fractures
What You Will Need
Sterile gloves
Mask
Fine clipper blades
Isopropyl alcohol
1-L fluid bag (set pressure cuff at 300 mm Hg)
Sterile water-soluble lubricant
Sterile saline (4–6 L, depending on the extent of the wound)
Blood pressure cuff
35-mL syringes and 18- to 19-gauge needles
#3 Bard scalpel handle and #15 blades
Brown-Adson thumb forceps
Metzenbaum scissors
Surgical drill with sterile 2-mm bit (optional)
External fixators
Pressure bandage (eg, for Robert Jones)

STEP 1
After the patient is anesthetized, use a generous amount of sterile water-soluble surgical lubricant to cover the wound. The lubricant will wash away easily and prevent hair from becoming embedded in the wound.
Author Insight
Throughout the cleansing process, the surgeon must wear sterile gloves and mask to prevent nosocomial infection with resistant bacteria from the hospital environment.