Subcutaneous Fluid Administration at Home
Liz Hughston, MEd, RVT, CVT, VTS (SAIM, ECC), VetTechXpert
Subcutaneous fluids (SQF) are used in patients needing fluid support or therapy when IV fluids are not indicated or hospitalization is not possible. SQF can help prevent dehydration in patients not eating well and in those needing intermittent fluid therapy but not hospitalization (eg, patients with chronic kidney disease [CKD]).1 Mild dehydration cases caused by short durations of vomiting or diarrhea may also benefit from SQF.
Veterinary nurses can teach clients to administer SQF at home, which has several benefits:
Home administration may lead to lower stress levels for the patient.
SQF can encourage a client’s active role in the pet’s care, strengthening the human–animal bond.
SQF can provide an alternative option for clients with financial constraints, although it may be less effective than IV fluid therapy, which requires hospitalization and skilled monitoring.
Chronic Kidney Disease & SQF
Chronic kidney disease (CKD) is characterized by structural or functional deficiencies (or both) that have been detectable for 3 months or longer in one or both kidneys,2 leading to a progressive loss of the ability to3:
Concentrate urine
Excrete waste products
Maintain proper electrolyte balance
Produce hormones
Because the kidneys cannot concentrate the urine, free water is lost, leading to dehydration that in turn leads to decreased flow through the glomeruli and increased plasma concentrations of waste products, particularly nitrogenous waste in the form of urea (ie, blood urea nitrogen [BUN]).
In CKD patients, uremia (ie, increased BUN) is a primary cause of clinical signs (eg, vomiting, anorexia, weight loss, lethargy, ulcerations of the mucous membranes) that lead to poor quality of life. SQF helps prevent dehydration, dilute waste products in plasma, and reduce BUN, all which improve quality of life.3,4
The following information should give veterinary nurses the confidence to teach clients how to administer SQF.

A bag of fluids, a fluid administration or drip set, and needles are necessary for at-home SQF administration.
The Basics
First, ensure the environment for SQF instruction is distraction-free (eg, an examination room without the patient) and all the supplies the client needs for practice are readily available. (See Figure 1.)
Use a variety of techniques (eg, live demonstrations, videos, written instructions, hands-on practice) because each client absorbs information differently and should have access to learning methods that work best for him or her. (See Resources.)
Offer a handout that provides answers to the most frequently asked questions to help at-home treatments go smoothly.
Setup Review
Most patients will be prescribed SQF for ongoing at-home treatment and have several bags of fluids dispensed at a time.
Describe to the client the type of fluid the veterinarian has prescribed, show him or her the bag in the packaging, and demonstrate how to properly open the package.
Point out the bottom of the fluid bag and the port that will be used to insert the drip set, explaining how it differs from the injection port.
Clamp & Pin Operation
Allow the client to actively participate until he or she feels comfortable with this step.
Open the drip set packaging and demonstrate how both the roller clamp and the slide or clip clamp on the fluid line operate. Allow the client to practice operating both clamps, and show him or her that closed clamps will not move on the fluid line, but open clamps will move freely.
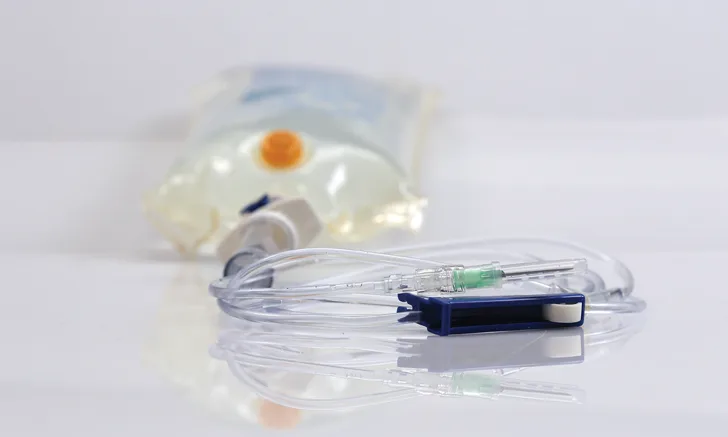
Allow the client to insert the drip set piercing pin into the fluid bag with one or both clamps closed (see Figure 2) until he or she is accustomed to the force required to access the fluid.
Make sure the client knows to push in the piercing pin until its hard plastic ridge is flush with the edge of the tube accessing the fluid bag, and explain that inserting the piercing pin at an angle may puncture the fluid bag. Also, emphasize the importance of keeping the piercing pin from touching anything to prevent contamination.

The client should spike the bag with the piercing pin on the drip set and ensure the bag is not punctured. Photos courtesy of Liz Hughston, MEd, RVT, CVT, VTS (SAIM, ECC)
Fluid Administration
Show the client the drip chamber where he or she will monitor the rate of fluid administered to the pet. Explain what constitutes a good rate and what indicates the needle has been properly inserted.
Again, allow the client to practice.
Demonstrate how to adjust the fluid level in the drip chamber. Ask the client to practice filling the chamber and emptying it back into the fluid bag until he or she is comfortable with the process.
Have the client again practice filling the fluid line with the clamps. Remind the client to watch the drip chamber while filling the line and note the changes in speed flow based on the tightness of the clamp on the line.
Review with the client the fluid amount that will be administered each time, and demonstrate how to read the measurements on the bag. Clients may find masking tape helpful for indicating when the prescribed volume has been administered.
Needle Safety
Needle safety is critical when teaching clients how to deliver SQF at home. Many do not have experience with needles of any kind; some may be intimidated by the thought of sticking their pet, while others may need to overcome a general fear of needles. The following steps will prepare clients for safe and effective needle use.
Show the client how to open the needle package.
Review the construction of the needle (ie, hub, shaft, bevel, point) and show the client how the open end is perfectly sized to fit on the end of the fluid line.
Explain that touching any part of the needle other than the hub can introduce contamination and the client should ensure he or she touches only the hub.
Demonstrate removing the cap and recapping the needle, and allow the client to practice. Some clients will want to uncap and recap the needle several times to feel comfortable with the action.
When removing and discarding the needle without recapping is difficult, as may be the case with SQF, using a one-handed recapping technique is acceptable. (See The One-Handed Needle Recapping Technique.)
Remind the client that the needles are sharp and every effort should be made to avoid a needle stick of any person.
Show the client how to attach the needle to the end of the fluid line and how to remove it, and allow him or her to practice.
The One-Handed Needle Recapping Technique5
Step 1: Place the cap of the needle on a flat surface (eg, floor, countertop).
Step 2: Holding the needle hub or the end of the fluid line with the needle attached, slip the needle into the cap without using the other hand. Pushing against a firm, heavy object (eg, a wall or baseboard if on the floor, the backsplash if on a counter) may help.
Step 3: Push the capped needle against the wall or backsplash, using only the hand holding the needle hub or the end of the fluid line, until the cap is “seated” on the needle—it will click when the cap is secure. Alternatively, tip the capped needle so the cap’s end is against the floor or counter and push until the cap is seated.
Needle Use
When demonstrating proper needle insertion, use a towel as a stand-in for the patient. A towel provides more resistance to the needle than the patient’s skin and allows the client to practice performing a quick, decisive stick.
Ask clients to imagine the towel is their pet’s back, from the base of the skull to the back of the shoulder blades. Pull the towel up to create a tent. (See Figure 3.) Have the client feel the tension formed in the tent door (ie, the triangle formed when the towel is pulled up) and encourage him or her to practice creating and feeling the tent.

The veterinary nurse can use a towel to simulate the skin tent needed to create a subcutaneous space for fluid administration. The client can practice inserting the needle into the towel.
Show the client how to insert the needle into the towel tent with the bevel up, explaining the point is the sharpest part of the needle and the least traumatic or painful for the patient. Instruct the client to insert the needle into the towel up to the hub.
Explain that the client should change the insertion point on the pet each time fluid is administered to avoid creating scar tissue. Once the needle is in place, let the client operate the clamp and watch the fluid flow in the drip chamber when there is no resistance to the flow of fluid in the line.
Needle Disposal
Clients must know how to safely dispose of used needles at home. In many states, veterinarians are barred from accepting used needles from clients, but many pharmacies and medical offices provide needle return services as long as the needles are disposed of in an approved sharps container. (See Figure 4.)

An approved sharps container is made of thick, puncture-proof plastic with a sealable lid.
Mail-in sharps disposal services also can be purchased at local pharmacies. All used needles must be discarded safely to avoid possible injury.
Strongly emphasize safe needle disposal during the SQF lesson. Most clients find leaving the used needle on the end of the fluid line the easiest way to keep the end of the line clean, but that potentially allows bacterial growth and contamination. Best practice is to immediately replace the needle with a clean needle labeled as such.
Remind clients to use a fresh needle every time they provide SQF, and be sure to supply enough needles for the duration of prescribed treatment, including several extra in case clients need to reinject the pet.

A walk-in closet offers excellent confinement for the pet’s at-home SQF administration and also makes elevating the fluid bag easy.
Extra Tips for At-Home SQF Administration
Advise clients on potential spaces in their home that allow for confinement (eg, walk-in closets, bathrooms).
Emphasize the importance of an elevation differential between the fluid bag and the patient to ensure fast flow of fluid. (See Figure 5.)
Remind clients a second person may be necessary initially to help restrain the patient until both client and pet are accustomed to the procedure.
Assure clients many pets—if not most—accept SQF readily and adapt well to the treatment.
Be sure clients know a small amount of blood-tinged leakage can be expected once fluid has been administered.
Conclusion
Any client can be taught to provide SQF therapy at home. Education is crucial for making clients feel confident and secure, and if they are effectively taught the required skills, they may find SQF administration a rewarding experience that gives them an active role in promoting their pet’s health.