Stifle Surgery
Spencer Johnston, VMD, Diplomate ACVS, University of Georgia
Patellar luxation is a common cause of lameness in dogs. Medial luxation of the patella occurs more frequently than lateral luxation and is identified in both small- and large-breed dogs.
Patellar luxation results from abnormal conformation of the hindlimb, which causes medial or lateral displacement of the tibial crest in relationship to the distal femur and trochlear groove. Successful correction of patellar luxation requires reestablishing the normal alignment of the extensor mechanism to include the proximal femur, tibial tuberosity, and trochlear groove.
Correction typically involves transposing the tibial tuberosity, imbricating or releasing the periarticular soft tissues, and sometimes deepening the trochlear groove.
Following is a description of the procedure for deepening the trochlear groove by using the wedge recession trochleoplasty technique.
Step-by-Step: Trochleoplasty
Step 1
My approach is to place the patient in dorsal recumbency with the instrument table placed over the patient. This allows me to operate on one or both stifles without having to reposition and redrape the patient. It also provides easy access to both the medial and the lateral aspects of the joint.
Step 2
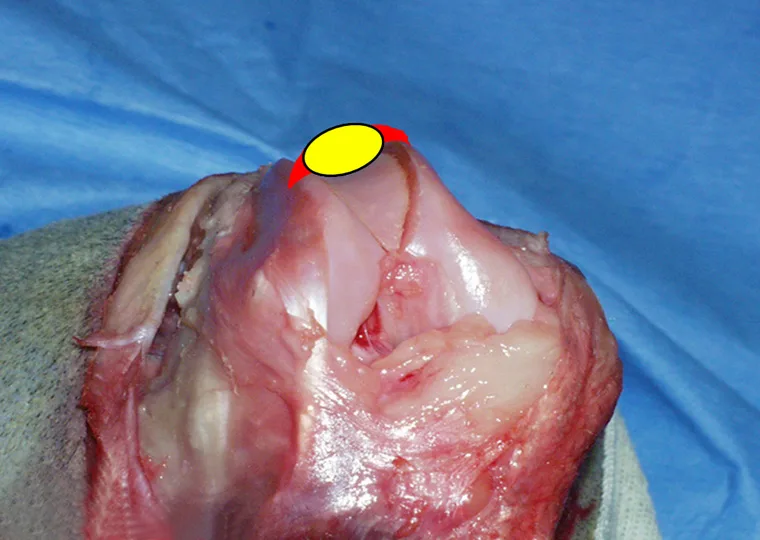
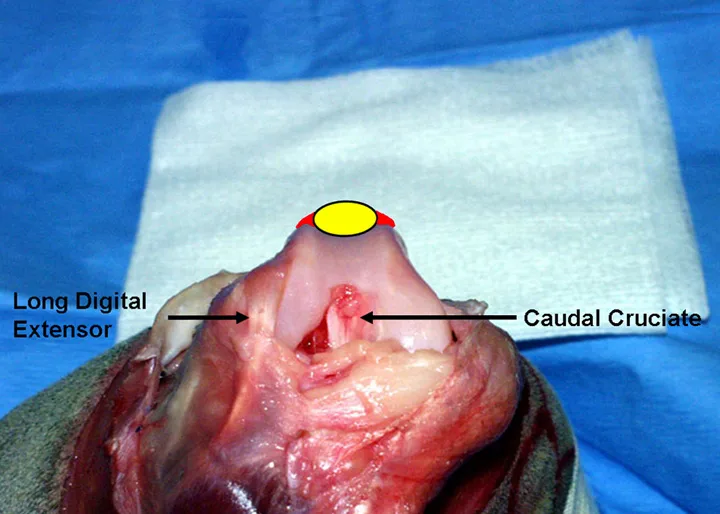
I typically perform a lateral arthrotomy because imbrication of the soft tissues on the lateral side is necessary. Once the arthrotomy is performed, the trochlear groove is assessed. The trochlear groove depth should be approximately half the thickness of the patella (A): The red area is parapatellar fibrocartilage; the yellow oval designates the patella and demonstrates the depth of the trochlear groove (normally 50% of the patellar thickness). The trochlear groove in B (an example from a clinical case) is absent and trochleoplasty is clearly required.
A
One way to deepen the trochlear groove is the wedge recession technique. This technique requires use of a small hobby saw to create cuts in the distal femur, freeing up a wedge of bone with cartilage attached. The wedge is removed, the bed from which the wedge was taken is deepened, and the bone/cartilage wedge is replaced. Although the pictures presented here are from a normal stifle, the method of performing the procedure applies to the clinical case.
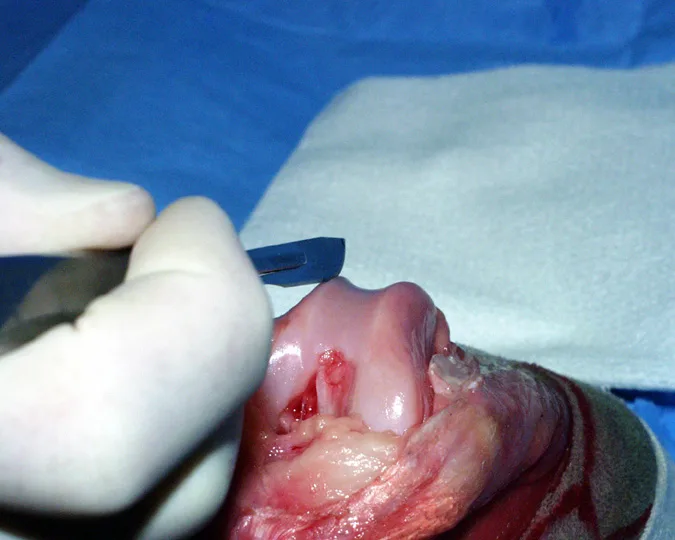
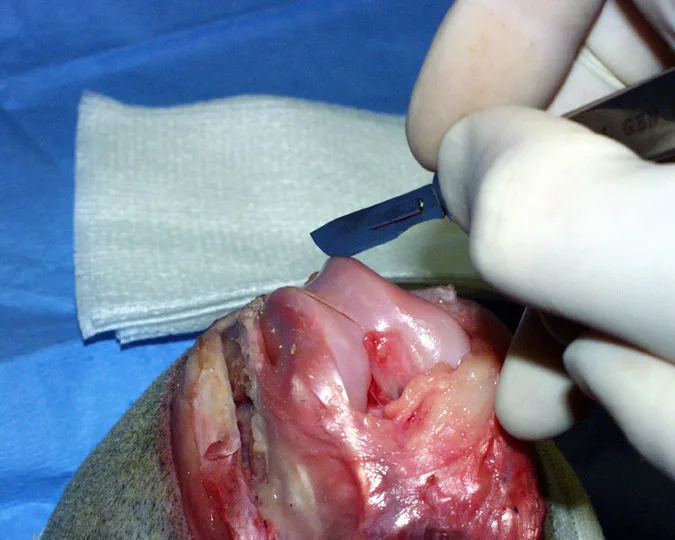
Step 3
The cuts in the distal femur are started by scoring the cartilage with a scalpel blade. This provides a small tract with which to facilitate starting the saw cut. The distance between the medial and lateral cuts must be as wide as the patella; otherwise, the patella will not sit within the created groove.

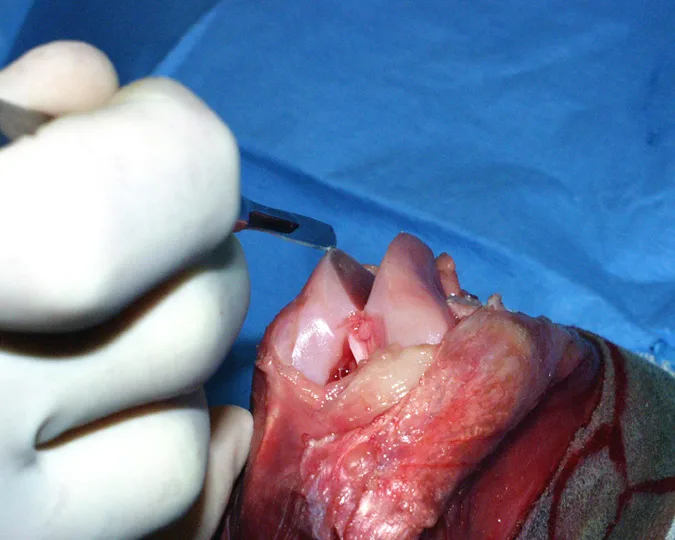
Step 4
Once the cartilage is scored, the cut is started by using the saw (A). The cut is angled toward the region of the intercondylar fossa (arrow), with the apex of the wedge just proximal to the origin of the caudal cruciate ligament (B).
Procedure Pearl
Score the cartilage with a scalpel blade to help prevent the saw from sliding when the cut is started.
A
Step 5
The cartilage is then scored on the medial side (A). The saw cut is angled (B) so that the cuts meet just cranial to the intercondylar fossa and just proximal to the origin of the caudal cruciate ligament (C). The cuts are continued until the created wedge is completely free from the donor bed (D).
A
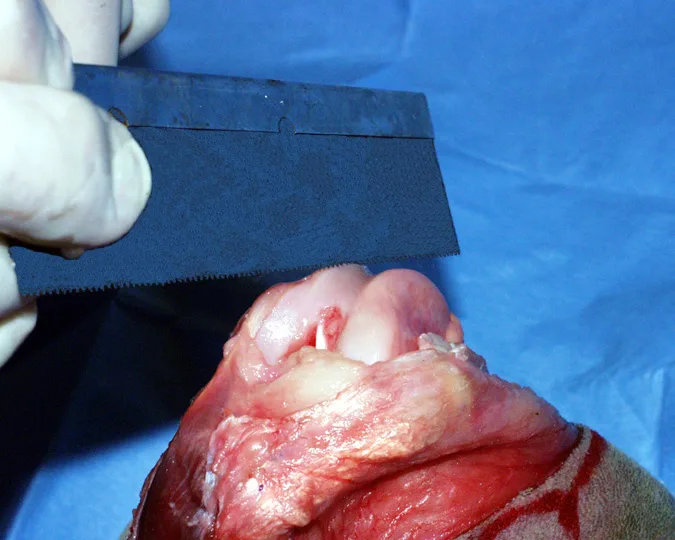
Step 6
Once the fragment is removed, additional bone is removed from the donor site by making a second cut on the side opposite the direction of the luxation (ie, on the lateral side for a medial luxation). Remember to score the cartilage first with a scalpel blade in order to facilitate purchase of the saw blade on the surface (A) before starting the cut (B). The goal of this step is to remove a thin kerf of bone (C and D). Removal of bone from one side generally allows sufficient deepening of the trochlear groove.
A
In patients with soft bone, scraping the donor bed with a sharp scalpel blade aids in removing bone. In all animals, additional bone may be removed by using a file; in small dogs, the serrated portion of a straight Kelly or Crile hemostat can serve the same purpose. In some patients, this step may be used instead of removing a thin kerf of bone with the saw.
Step 7
Before placing the bone/cartilage wedge into the prepared bed, remove bone from the apex of the isolated wedge using rongeurs. Doing so allows the wedge to sit more deeply. If the wedge does not seat satisfactorily, flip the wedge (so that the end that originated from the proximal aspect is now directed distally), which often will improve seating of the wedge. Once the depth is judged to be satisfactory, the wedge is pressed firmly in place and should be stable. The goal of deepening is to provide a groove that is approximately 50% of the thickness of the patella. This allows the patella to sit in the groove while the parapatellar fibrocartilage is supported by trochlear ridges. If the groove is deepened much further, the articular cartilage of the patella will not contact the articular cartilage of the trochlear groove because of the parapatellar fibrocartilage contact and support on the trochlear ridges.
Procedure Pearl
Removing bone from the caudal aspect of the wedge or rotating the wedge 180 degrees can aid in seating of the wedge in the prepared bed.

Step 8
After the trochlear groove is deepened, tibial tuberosity transposition and imbrication of the periarticular soft tissues are performed.