Orthopedic referral is not always feasible or even necessary. There are many opportunities to practice your orthopedic skills in general practice. Explore our Fractures clinical portal to learn more about managing fractures in dogs and cats.
Updated May 2025 by Kaitlyn Mullen, DVM, MS, DACVS-SA; Allied Veterinary Specialists, South Daytona, Florida.
Thoracic limb amputation is a salvage procedure performed for traumatic injuries (eg, irreparable fractures, soft tissue wounds), severe neurologic or ischemic lesions confined to the thoracic limb (eg, brachial plexus avulsion), certain congenital deformities, invasive neoplasia, and uncontrolled infection.
The forequarter technique described here may be preferred because it readily exposes major nerves and vessels, does not require bone cutting, and results in a cosmetic wound, as no prominent scapula remains. This procedure also carries lower risk for postoperative pressure necrosis because scapular/bony prominences (eg, the acromion) are removed. This is also the preferred technique to remove neoplasia, particularly lesions located in the proximal thoracic limb, because it allows resection with extensive surgical margins.
Does thinking about a big surgery make you a little nervous? Just like surgery itself, successful management of a surgical patient, from the presurgical consult to the final follow-up visit, should be addressed step by step.
Remember these essential pieces of the surgical puzzle:
Preparation is key—for you, the patient, and the client. Clients should be advised of what treatment is being planned and must give informed consent.
Mistakes happen when winging it. The most efficient way to remove doubt about patient treatment (and thereby reduce the risk for errors) is to introduce checklists and standard operating procedures that encourage all members of the care team to carefully examine what is being done and why.
Everyone should feel comfortable speaking up. It is essential to develop a culture within the team that allows anyone to voice questions or concerns in the best interest of optimal patient care without fear of reprisal.
Clients are part of the team. To improve chances of a successful outcome, provide carefully thought out, concise discharge instructions that outline the client’s responsibilities.
Content modified from this article on Managing the Surgical Patient's Journey Through the Hospital.
Considerations for Large-Breed Dogs
Large- or giant-breed dogs undergoing thoracic limb amputation may have difficulty adapting after surgery, particularly if they are obese or have concurrent neurologic deficits or significant contralateral limb osteoarthritis. Prior to surgery, temporarily placing a sling on the affected limb may reveal how the dog will adapt following the procedure. The clinician and pet owner should weigh the risk for disability against the immediate benefit of pain relief after removal of a debilitating neoplastic process or a life-threatening limb infection.
Talking With Clients About Goals of Care
The decision to amputate is often difficult for families, even if it’s medically best for the pet. Try these tips for helping clients make difficult treatment decisions by having goals-of-care conversations.
Timing is critical. Start early and communicate often about client’s goals, understanding, and fears regarding their pet’s care. For a patient needing an amputation, ongoing conversations about how the patient is feeling is an important part of recovery.
Try to schedule a consultation with all family members present. Hard decisions should not be rushed, and less time will be spent in back-and-forth conversations if everyone is part of a scheduled conversation.
Let clients be in charge of the conversation. It can be tempting to want to control the flow of difficult conversations, but care will feel more mutual if clients are able to talk as much as they need.
Allow for awkward moments and silence. Owners may feel vulnerable during these difficult decisions, but discomfort is expected and should not be hurried.
Be open. In a discussion about a clients hopes, fears, and worries, make every effort to be transparent and honest, and take a nonjudgmental approach to what clients say.
These tips are modified from the article, Top 5 Tips for Guiding Pet Owners Through Difficult Decisions.
Before the Procedure
IV prophylactic antibiotics (eg, cefazolin) that target skin contaminants should be administered 60 minutes prior to the first incision and readministered every 2 half-lives to ensure optimal blood and tissue concentrations when the wound is created and throughout the procedure.
Moderate to severe pain should be anticipated, especially during the first 24 hours after amputation. Appropriate pre-emptive analgesic medications are warranted, and multimodal analgesia should be administered, including full mu opioids (eg, hydromorphone, methadone, fentanyl IV CRI), ketamine, and lidocaine (dogs). Butorphanol provides insufficient management for surgical pain.
In general, blood products are not needed in otherwise stable patients; however, a large-bore venous catheter is required for possible rapid fluid infusion or transfusion. Electrocautery for intraoperative use minimizes hemorrhage and patient morbidity.
Step-by-Step: Thoracic Limb Amputation
What You Will Need
Clippers
Sterile impermeable foot drape and sterile vet wrap
Sterile marking pen
Standard general surgery pack
Scalpel handles and blades (#10, 15)
Mayo-Hager needle drivers
Scissors (Mayo, Metzenbaum, operating)
Mosquito hemostats
Forceps (Brown Adson, Debakey)
Monopolar electrocautery (optional, but can reduce blood loss)
Bipolar vessel sealing device (optional)
Mixter right angle forceps
Self-retaining (eg, Gelpi) or handheld (eg, Senn) retractors
Bone-holding forceps (eg, Kern) or towel clamp
2-0 to 4-0 monofilament absorbable and nonabsorbable suture
2-0 silk suture
Note: The right limb is shown in all steps; cranial is toward the right of the image. Labeling of structures has been deliberately limited to avoid obscuring pertinent surrounding landmarks.
Step 1: Preoperatively Prepare the Patient
Place the patient in lateral recumbency with the affected limb uppermost on the table. Clip the hair dorsally to the midline/spine, ventrally to the sternum, caudally to the midthorax, and cranially to the midcervical area. Wrap the foot to enable the limb to be hung for clipping, scrubbing, and draping. Perform a dirty scrub in preparation to remove gross debris from the clipped skin/surgical site.
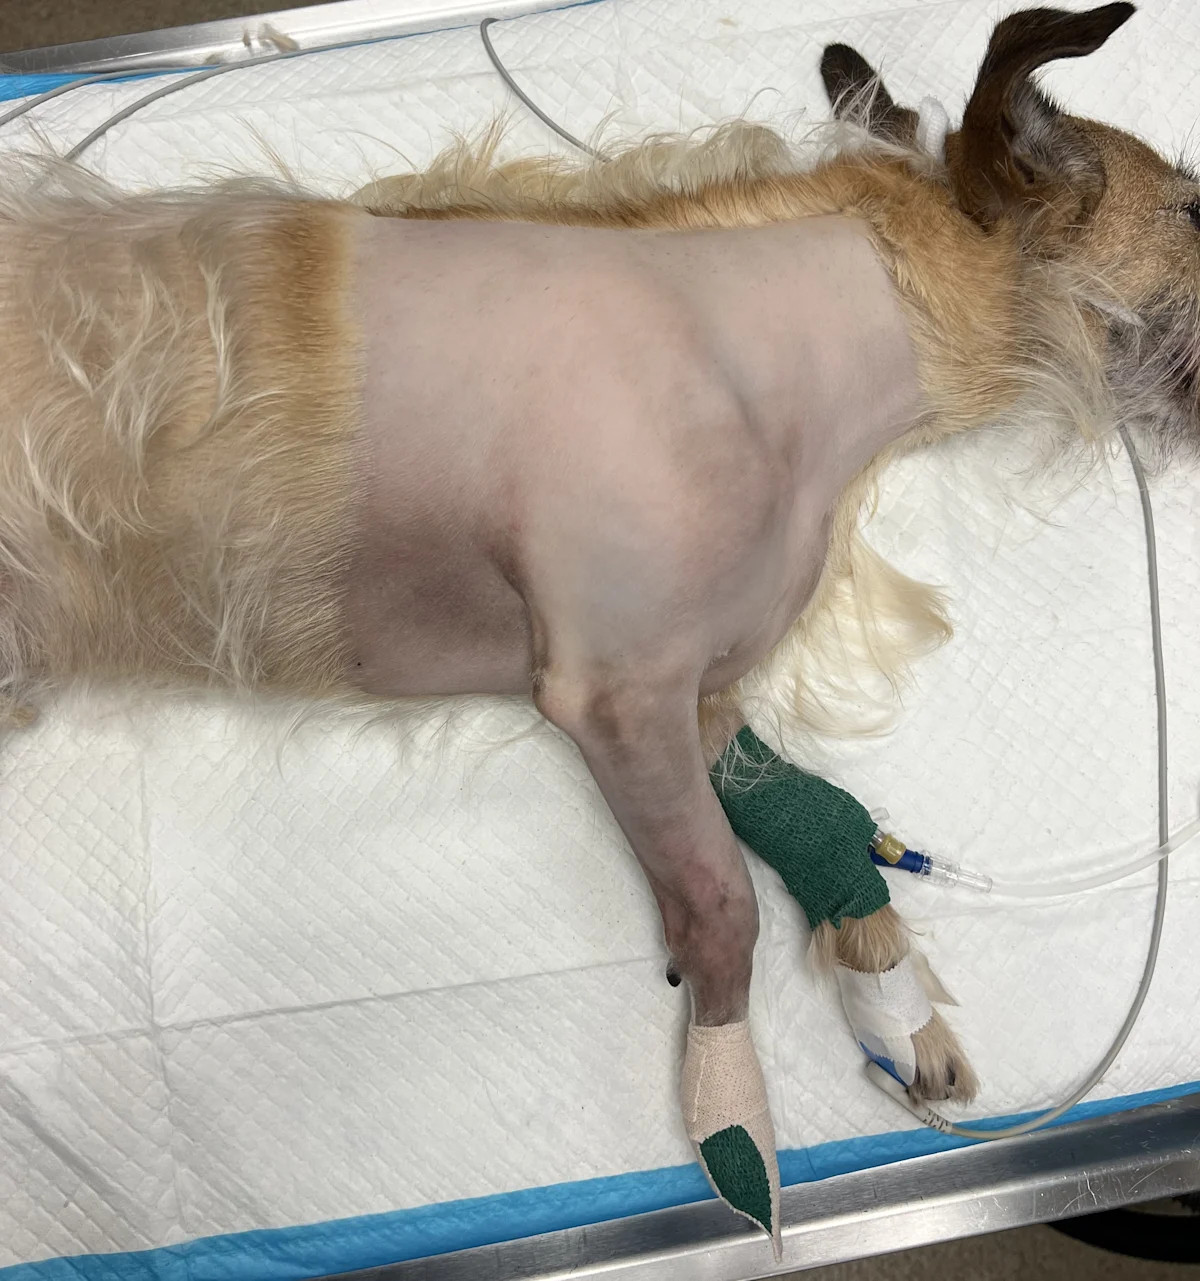
Step 2: Prepare the Patient for Incision
Move the patient to the operating room, and use a towel clamp or hemostat to grasp the end of the wrapped foot and suspend it from an IV pole. Sterilely scrub the patient for surgery. Drape the patient according to the prepared margins. Grasp the foot with a sterile impermeable foot drape, and wrap the foot with sterile vet wrap. Mark the planned incision site with a sterile pen. Ensure the lateral incision is an inverted Y with the stem extending along the length of the scapular spine before curving cranially and caudally at the level of the acromion (arrow) around the proximal limb to the medial aspect. If possible, try to preserve the axillary skin fold for closure.

Author Insight
Studying an anatomy textbook closely before performing this procedure can be extremely helpful. The regional anatomy can be confusing, and excessive dissection and unnecessary collateral damage to surrounding structures results in increased risk for wound complications (eg, infection, seroma).
Step 3: Incise the Skin
Make the initial incision over the scapular spine beginning at the dorsalmost aspect and proceed down to just above the acromion. Curve the incision cranially across the shoulder joint. Extend the incision medially in a gentle curve through the midbrachium and toward the axillary skinfold. Create a second incision beginning at the acromion, and slowly curve the incision caudally toward the axillary fold to connect with the medial incision. Control subcutaneous bleeding with electrocoagulation or ligation.
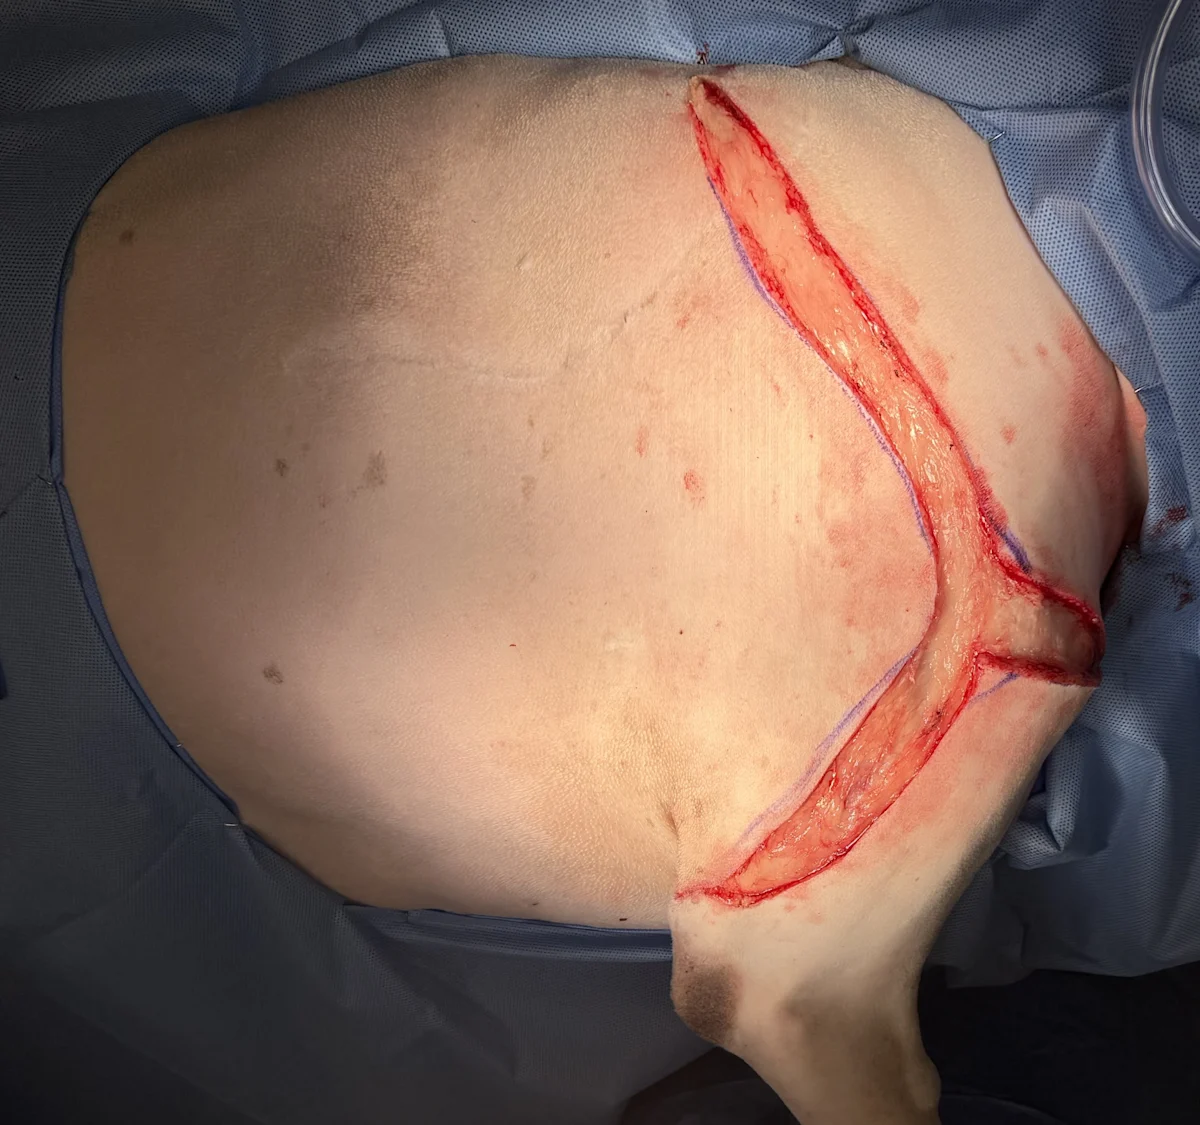
Step 4: Dissect the Scapula From the Trunk
Incise through the SC tissue, and reflect the cranial and caudal skin margins on the scapular spine just enough to see the muscular insertions on the scapular spine (arrow).
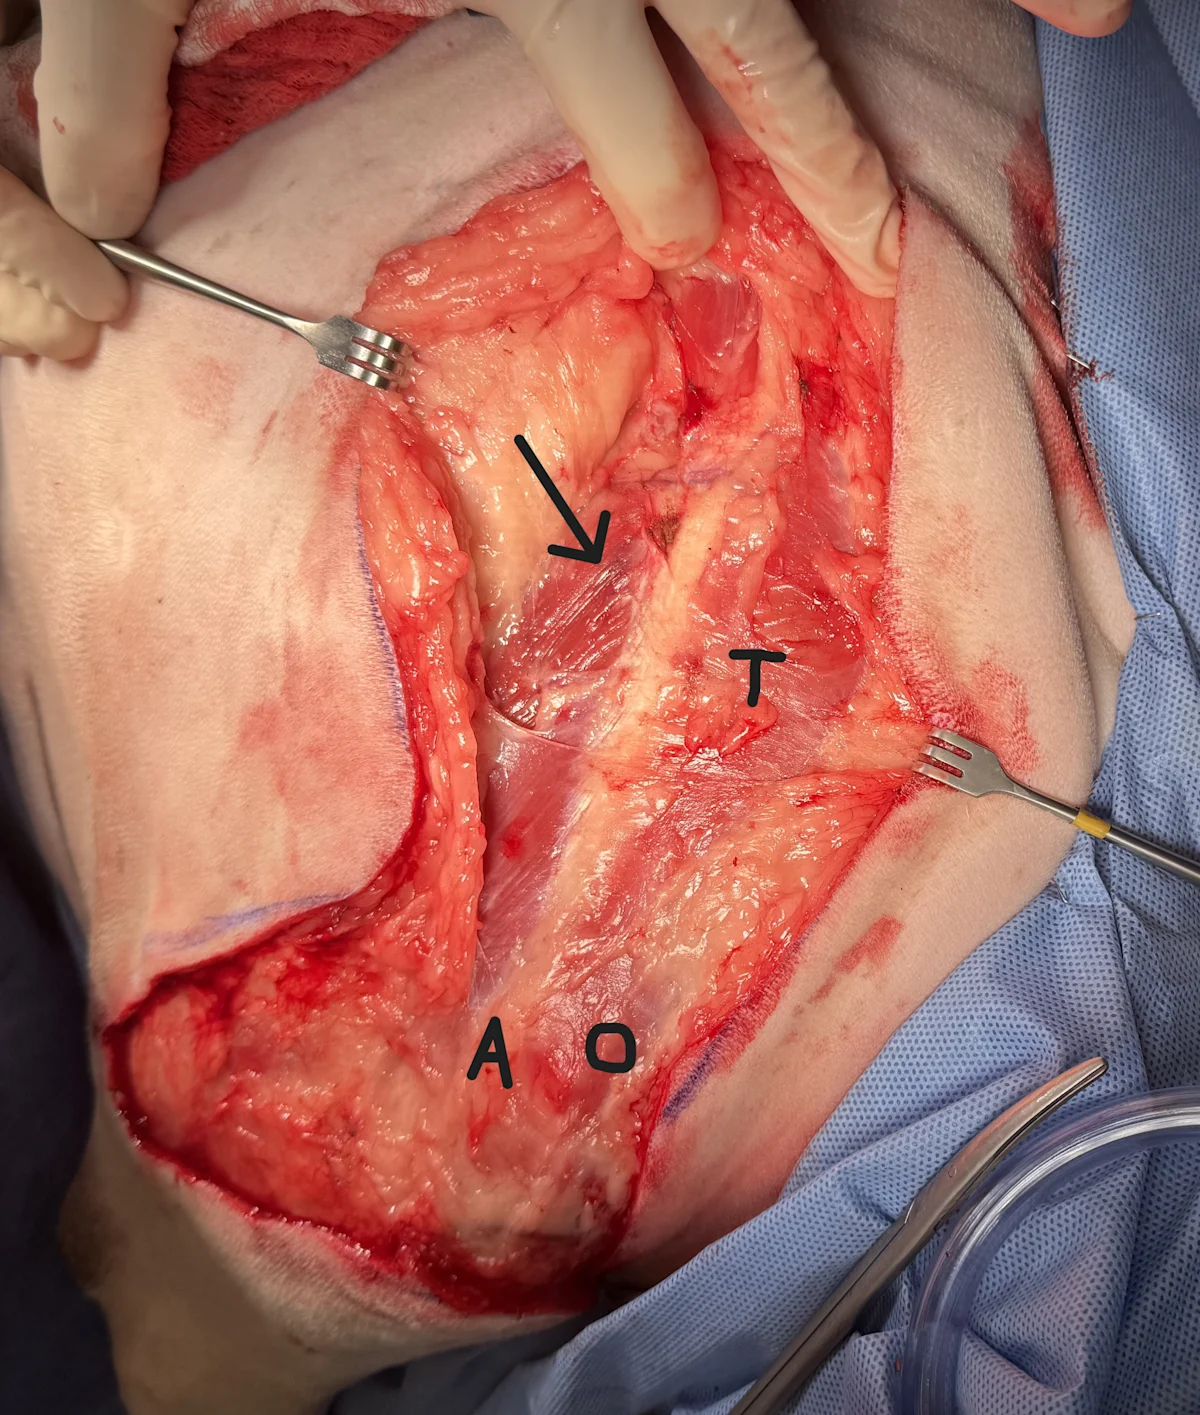
Step 5: Incise the Muscle Attachments
Find and undermine the ventral margin of the thin omotransversarius (O) muscle cranial to the acromion (A) bluntly with scissors. Continue to undermine the cranial portion of the trapezius (T) muscle to the dorsal aspect of the scapular spine. Incise these muscle attachments close to the scapular spine. The thin trapezius muscle caudally attaches more dorsally, about three-quarters up the scapular spine (arrow). Incise the caudal part of the trapezius at its insertion on the scapular spine. Do not incise the intrinsic muscles deep to the omotransversarius and trapezius muscles (ie, deltoideus, supraspinatus, infraspinatus), as they will be removed with the limb.
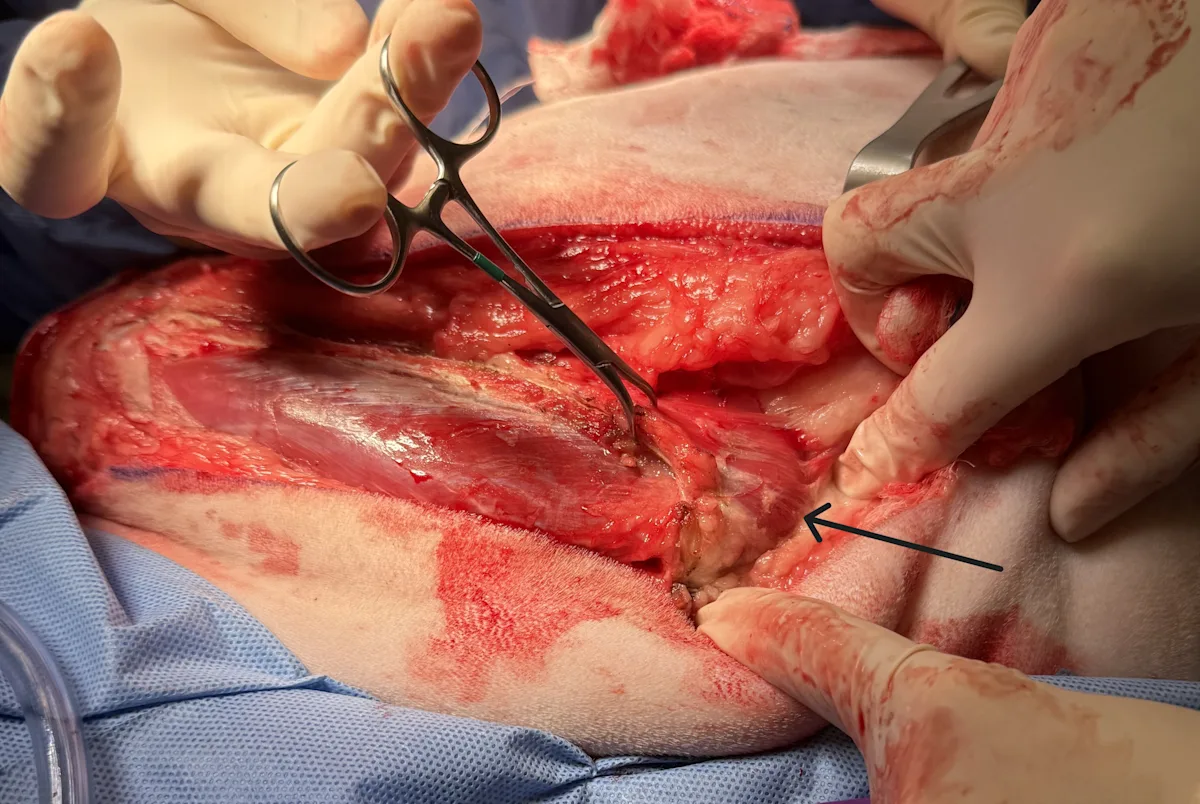
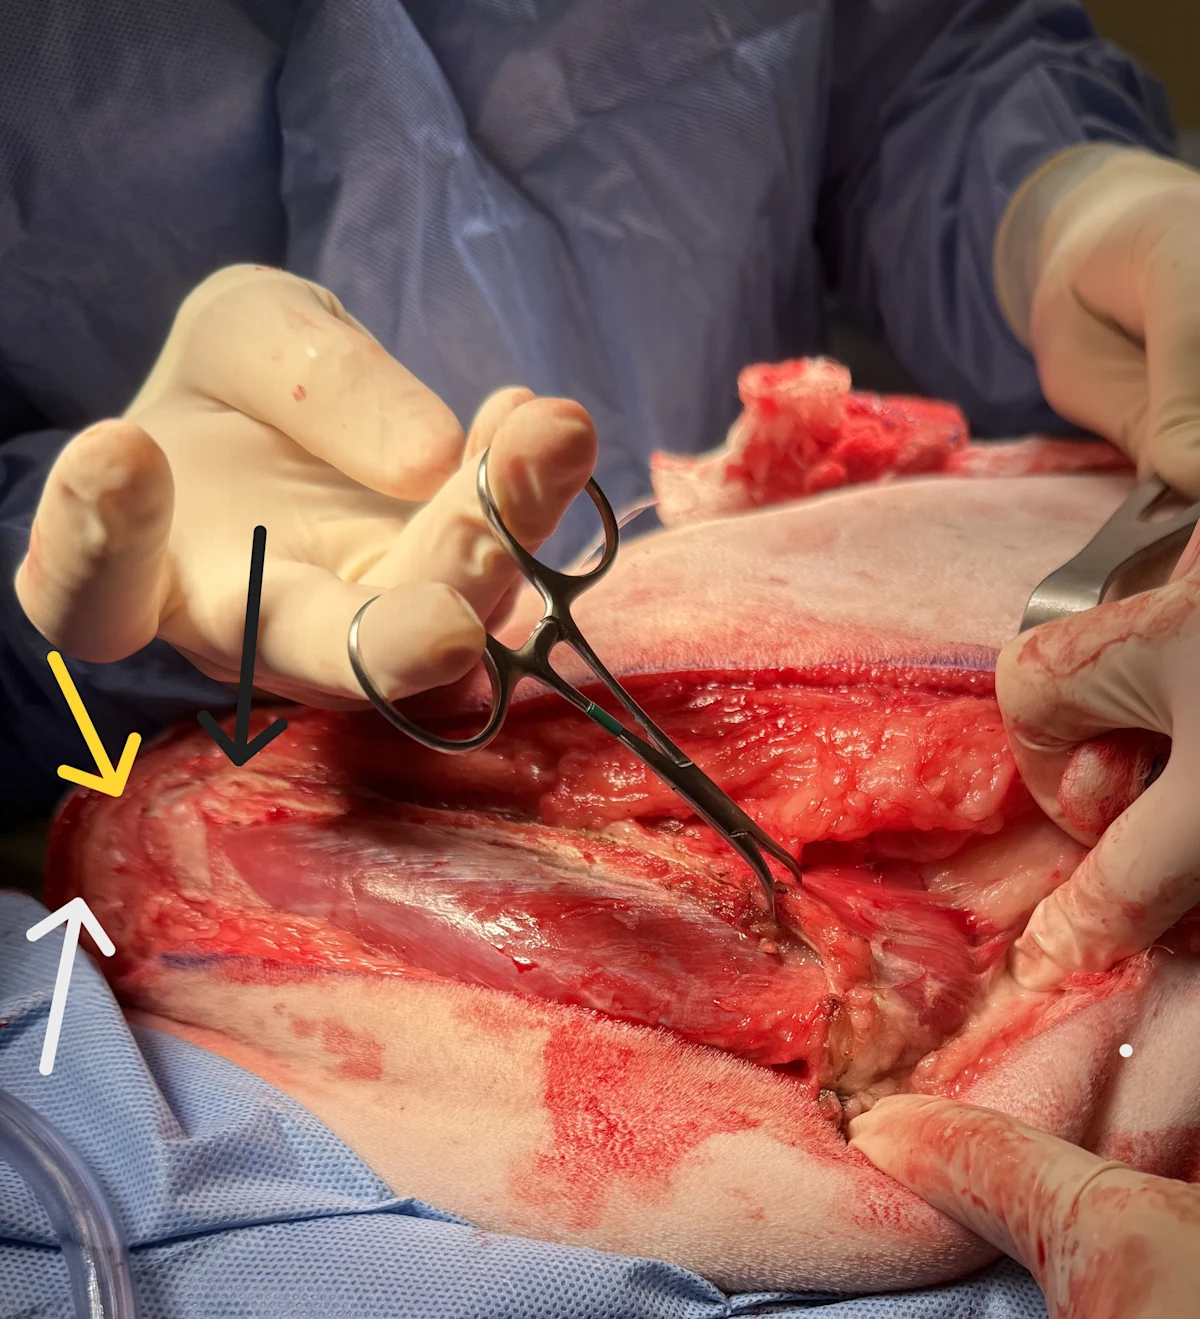
Step 6: Sever the Taut Rhomboideus Muscle
Retract the cranial and caudal parts of the trapezius, and place bone-holding forceps or a towel clamp on the dorsal spine of the scapula. While retracting the scapula laterally, sever the taut rhomboideus muscle (arrow) close to its dorsal scapular attachment.
NOTE: It is helpful to move to the opposite side of the dog (the dorsum) for Steps 6 to 12. Images for the following steps are viewed from the perspective of the surgeon standing at the dorsal aspect of the patient.
Cranial is to the left and dorsal is to the bottom of the image.
Step 7: Sever the Serratus Ventralis Muscle
Continue lateral retraction of the scapula, and elevate the broad insertion of the serratus ventralis muscle (arrows) off the dorsomedial face of the scapula.
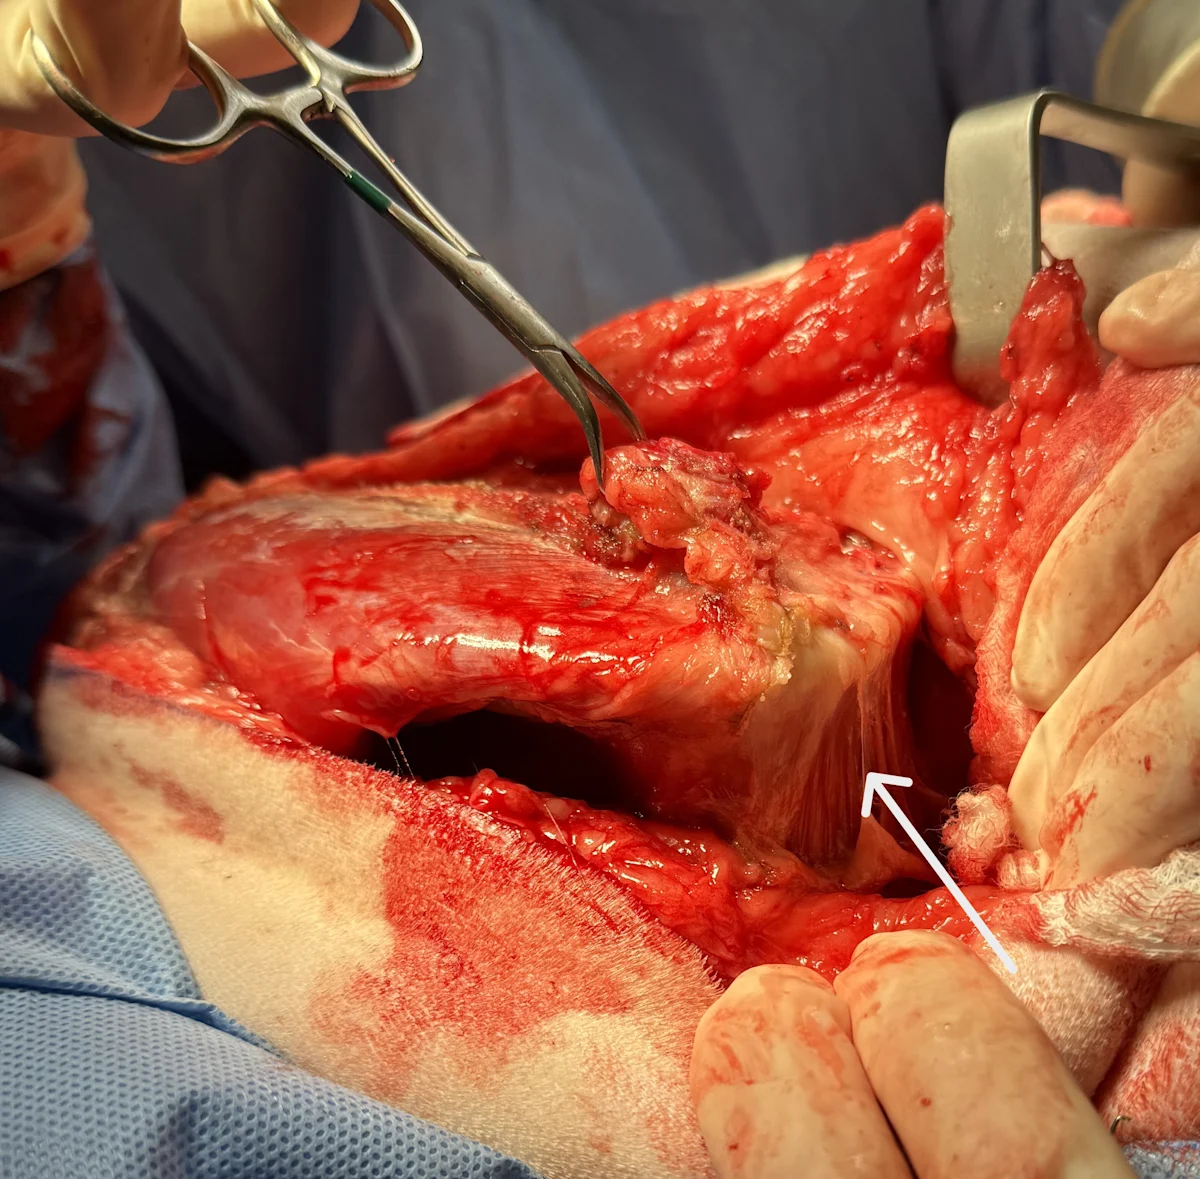
Cranial is to the left and dorsal is to the bottom of the images.
Author Insight
Muscles should be incised at their origins or insertions if possible. Radiosurgical division of muscle bellies and insertion sites can be helpful in controlling hemorrhage.
Step 8: Expose the Brachial Plexus
Retract the scapula laterally to expose the brachial plexus (arrow).
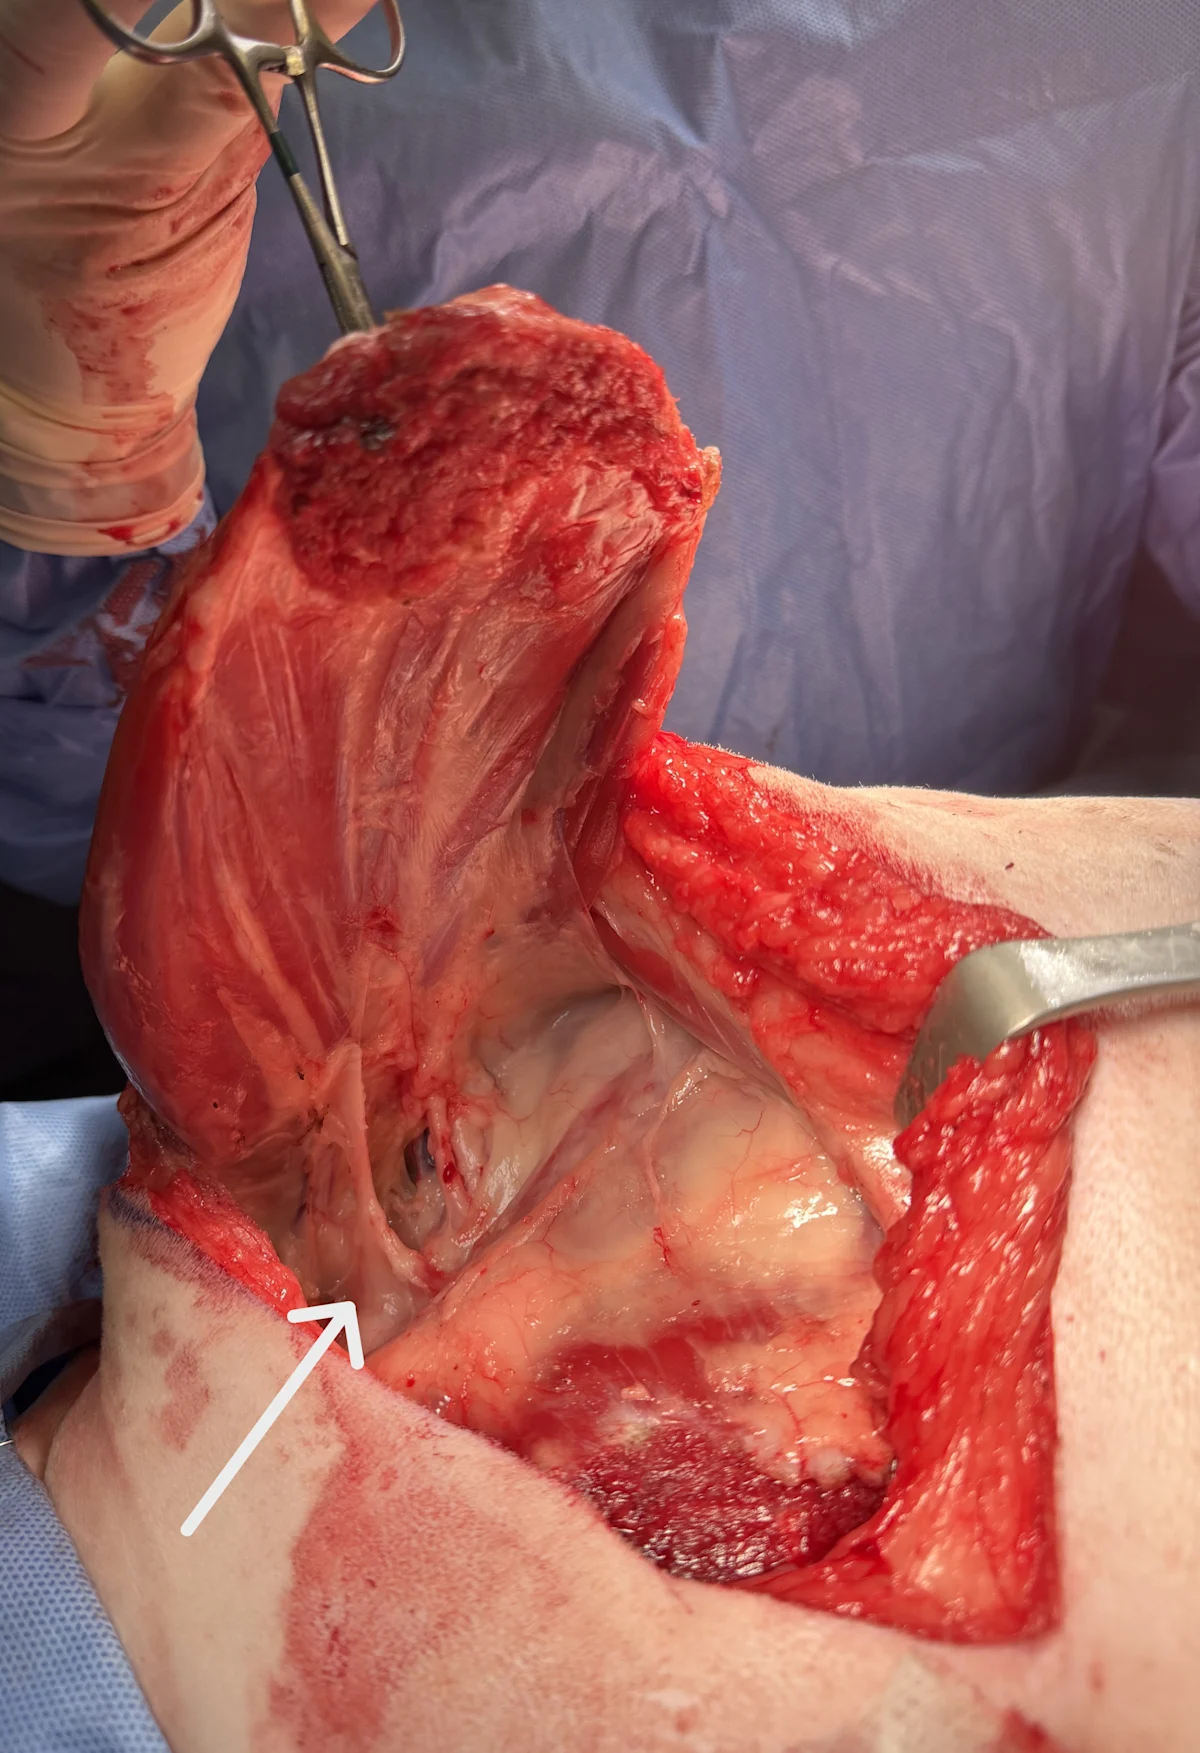
Cranial is to the left and dorsal is to the bottom of the image.
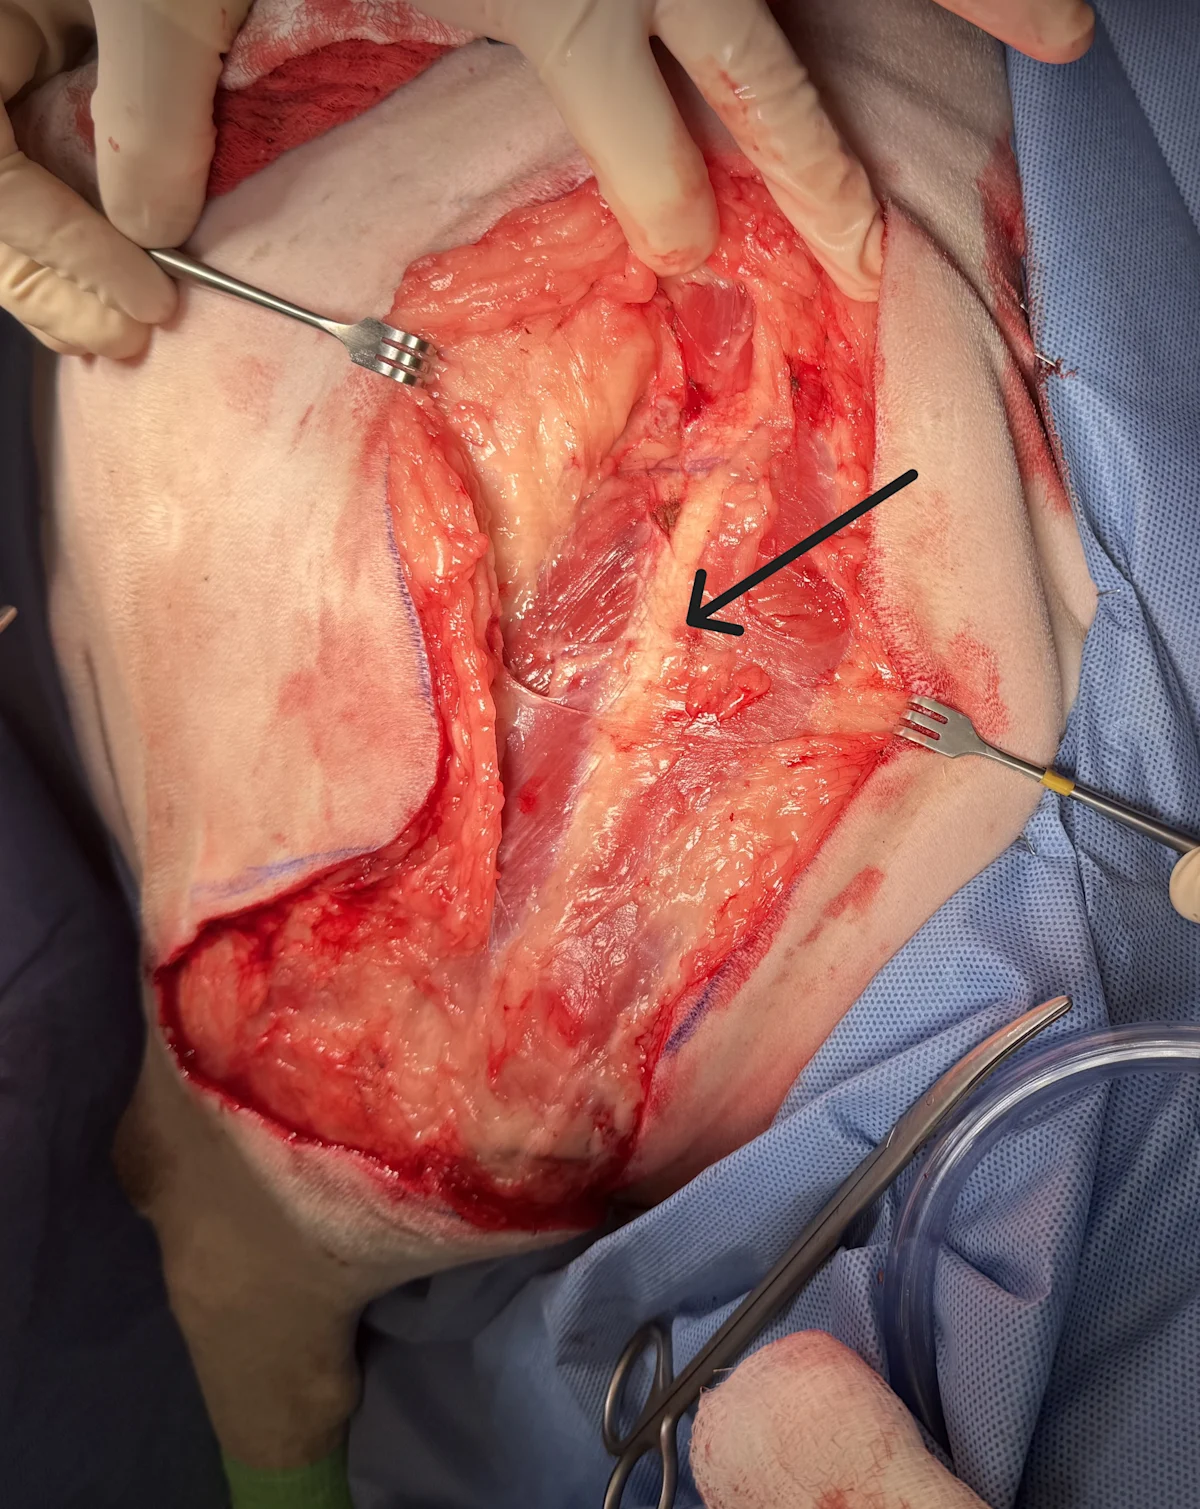
Step 9: Isolate the Brachial Plexus Nerves & Vessels
Using right-angle forceps, bluntly dissect the brachial plexus from the loose connective tissue. Inject local anesthetic (eg, lidocaine, bupivacaine) into the epineurium of each nerve until a bleb is created (usually 0.2-0.4 mL), and sharply sever each nerve at the level of the bleb. Bluntly dissect the axillary artery (yellow arrow) and vein (white arrow) circumferentially in preparation for ligature placement.
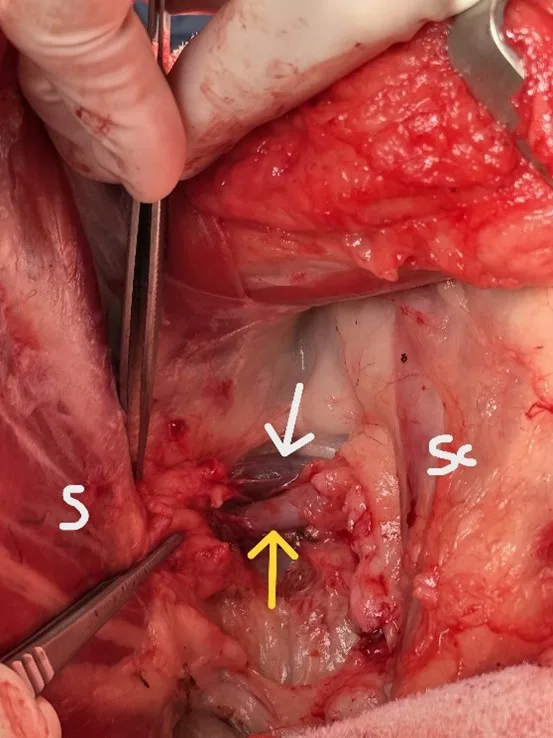
FIGURE Thumb forceps holding the transected brachial plexus nerves against the scapula (S) to expose the vessels deep to the plexus, which emerge just distal to the scalenus (Sc) muscle.
Author Insight
Deep dissection around the artery and vein should be avoided. It is important to stay superficial to the level of the adjacent first rib to avoid accidental penetration into the nearby thoracic cavity during vessel isolation.
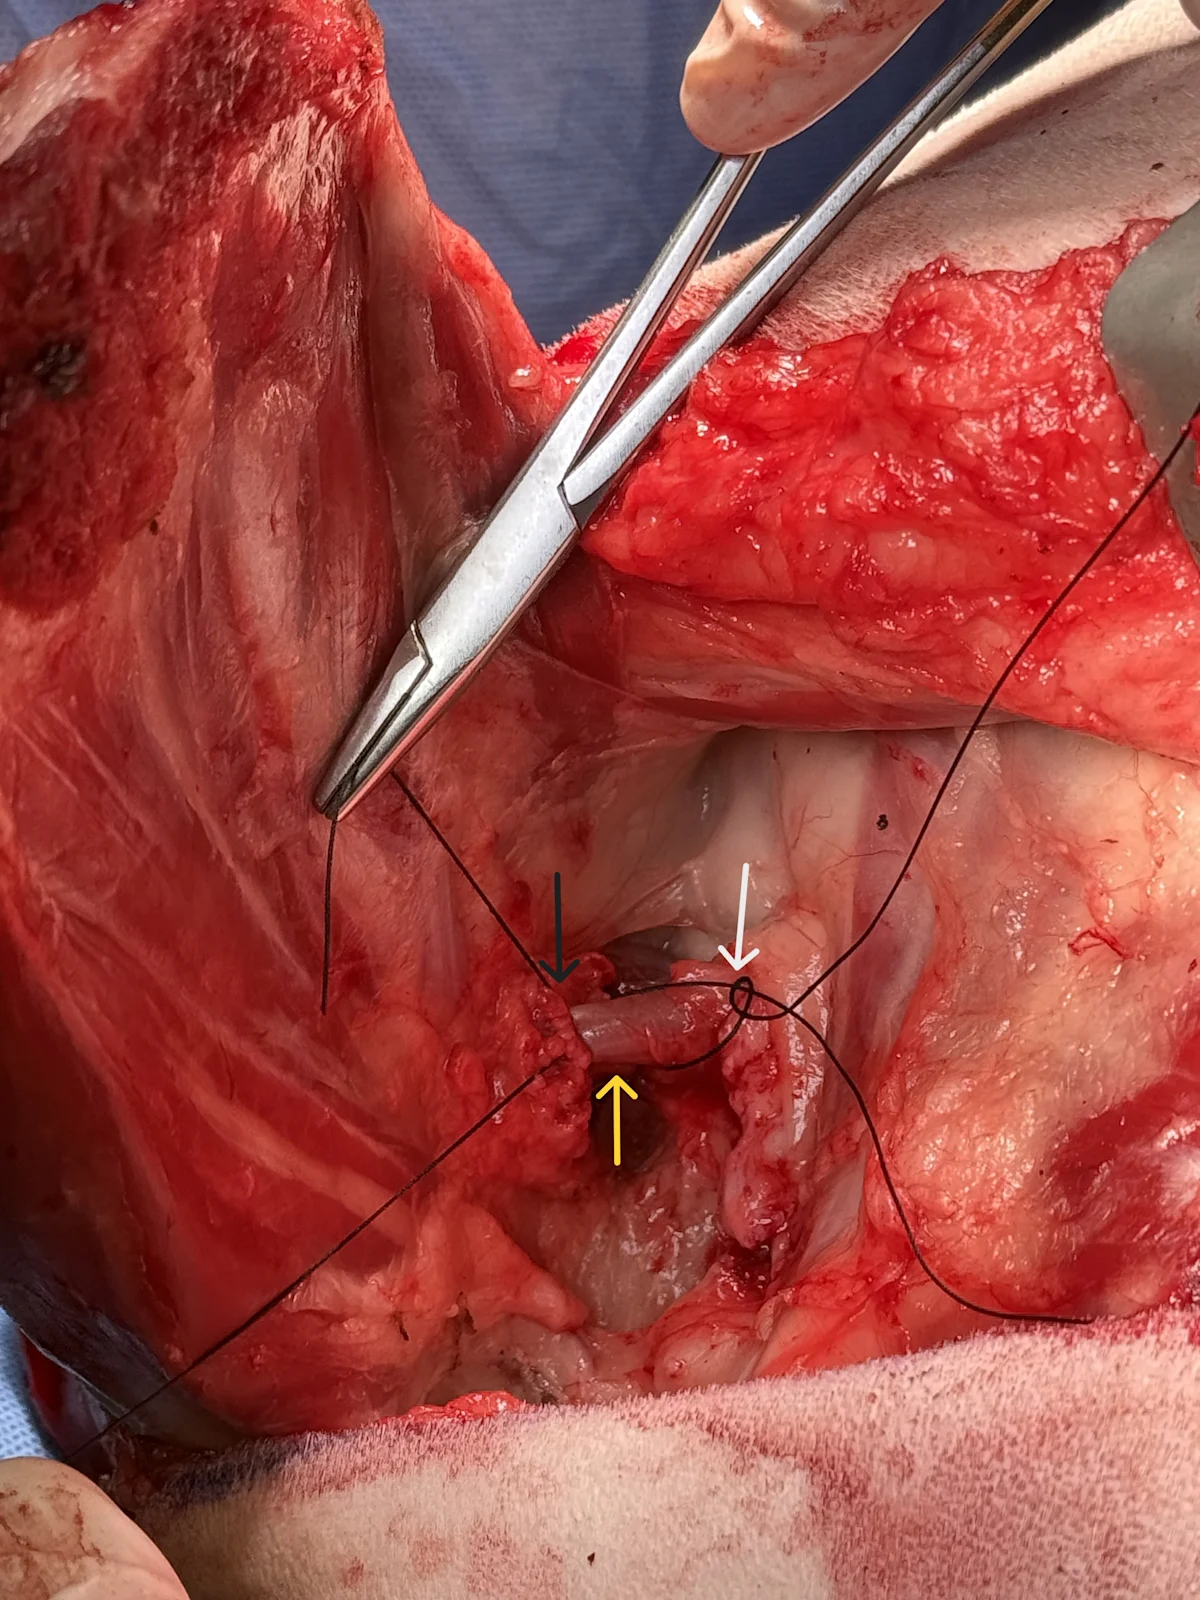
Step 10: Place the Sutures
Use right-angle forceps to pass suture around each vessel individually. For the artery, place a circumferential ligature (A) closest to the body to stop blood flow (white arrow), followed by a circumferential ligature distal near the scapula (black arrow). Place a transfixing ligature (not shown; at the level of the yellow arrow) between the 2 circumferential ligatures. The artery will be transected between the yellow and black arrows. Similarly ligate the vein (B), but first place the circumferential ligature closest to the scapula (furthest from the body).
Double ligate major blood vessels with prolonged absorbable monofilament suture (eg, polydioxanone, polyglyconate) or nonabsorbable multifilament suture (eg, silk). Ligate large arteries and veins separately to avoid risk for formation of an arteriovenous fistula.
Author Insight
Ligation of the artery before the vein reduces pooling of blood in the limb and subsequent blood loss. When amputation is performed for neoplasia, ligation of the vein first may be warranted to reduce metastasis that may occur with limb manipulation. The location of the ligated vessels should be checked, particularly when continuing medial dissection, to avoid accidental disruption of the vessels and severe hemorrhage. It can be helpful to leave long tags on the pedicles (Figure) until dissection is complete to improve visibility and enable rapid identification of the pedicle in the event of sudden hemorrhage.
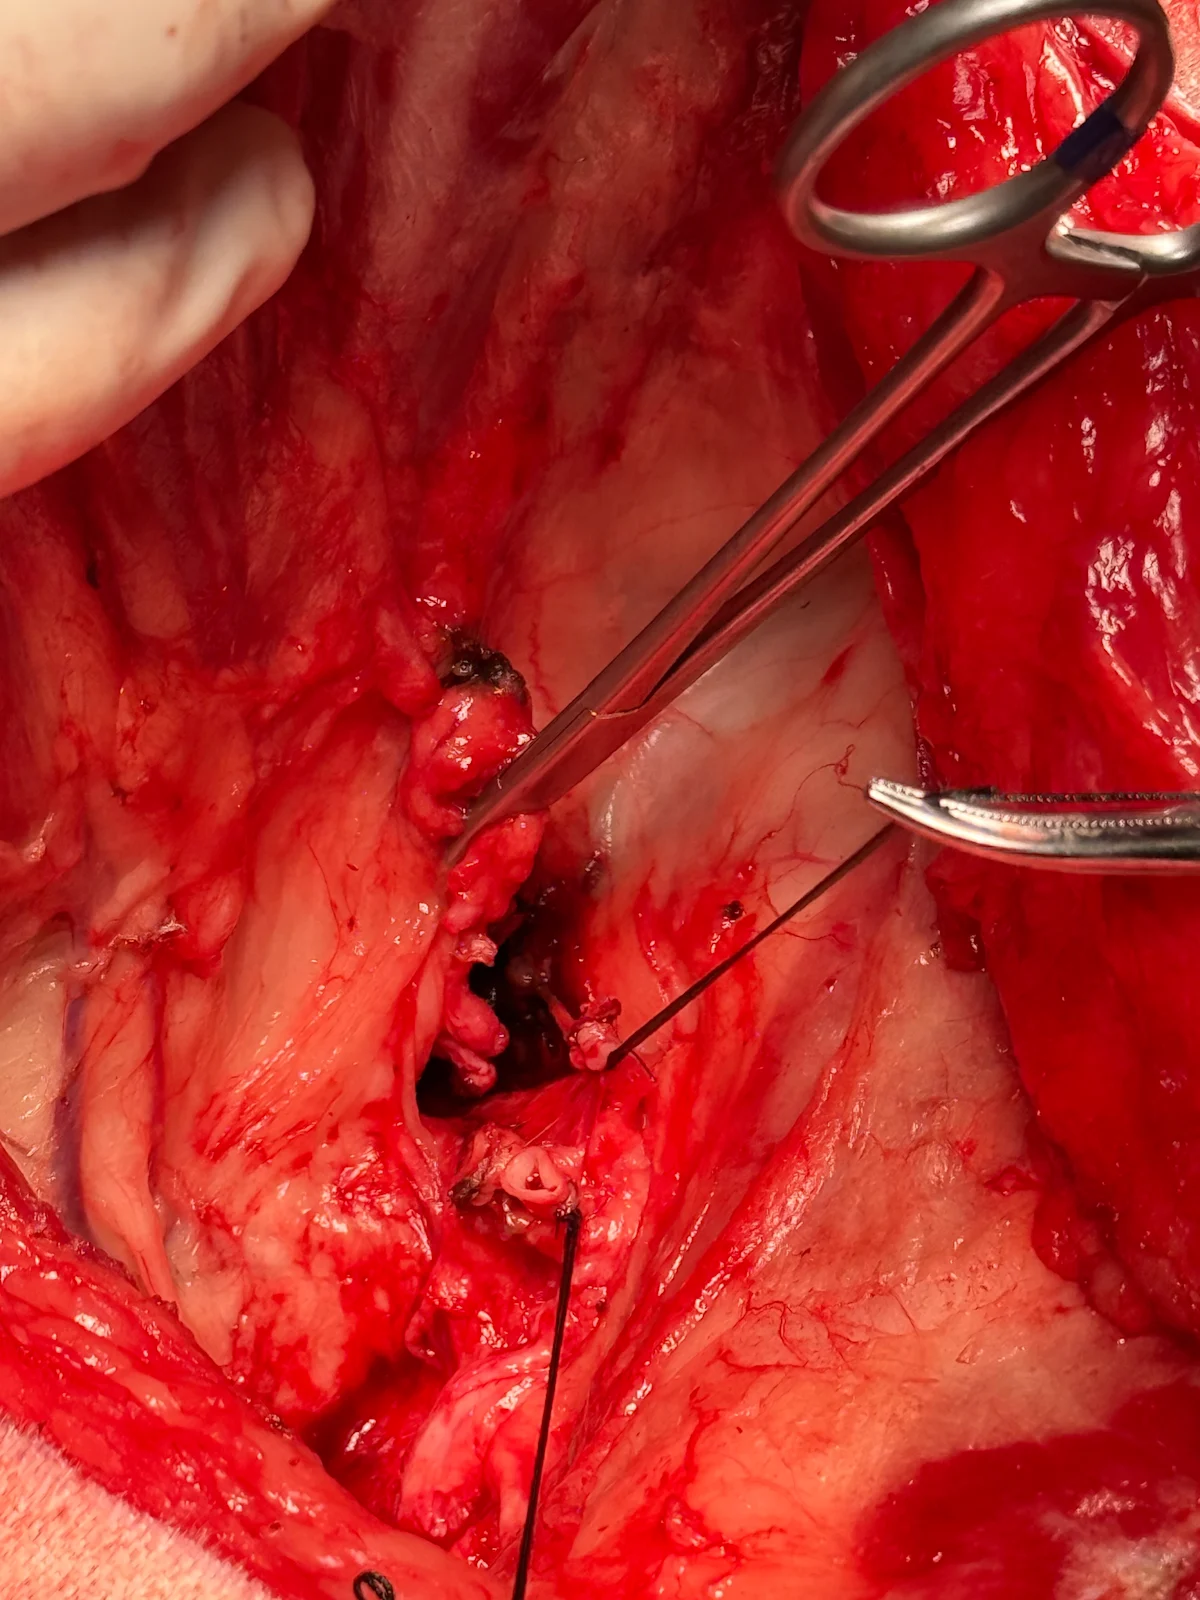
Step 11: Incise Attachments & Remove the Lymph Node
Dissect any remaining SC tissue attached to the caudal aspect of the scapula and upper thoracic limb (black arrow). Internally rotate the limb, and isolate the latissimus dorsi (white arrow) muscle with blunt finger dissection down to its attachment on the medial brachial fascia. Incise this attachment, and preserve the lateral thoracic vessels and axillary lymph node (yellow arrow) that lie just under it; ligate the lateral thoracic vessels. Bluntly remove the lymph node located just cranial to the incised latissimus dorsi fascia and submit for biopsy if indicated.
Cranial is to the left and dorsal is to the bottom of the image.
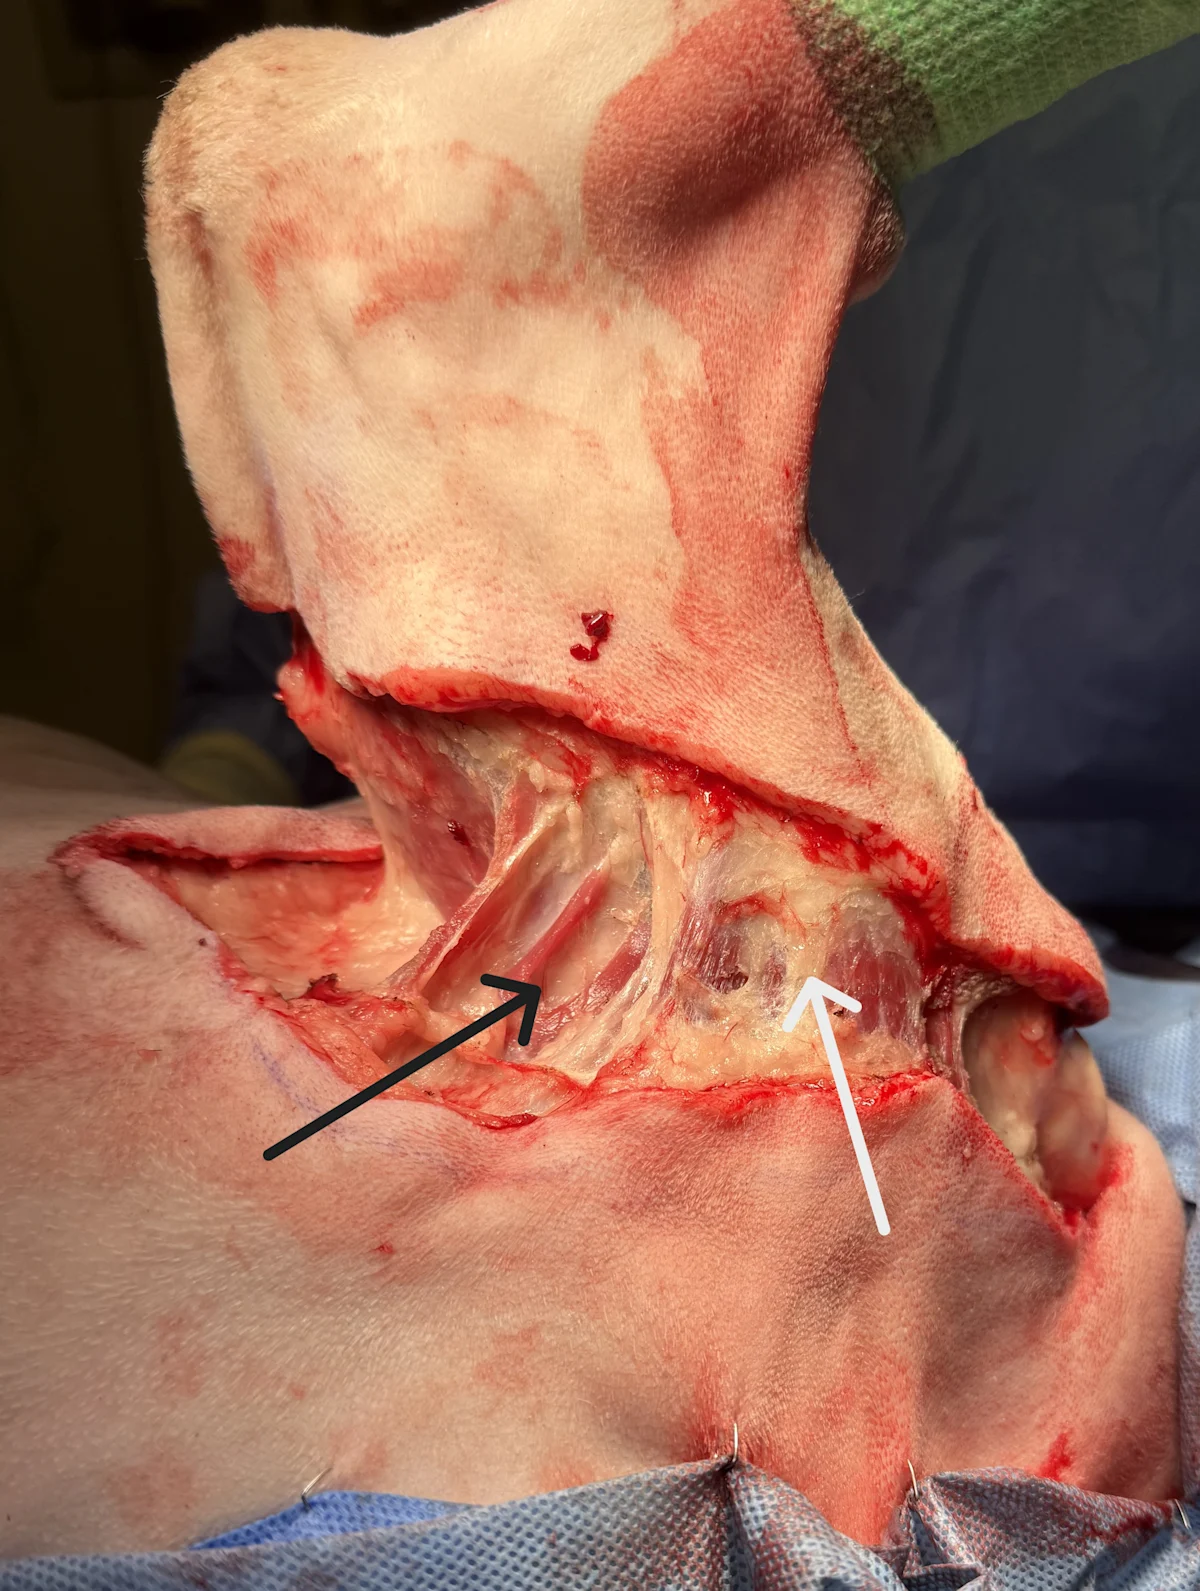
Step 12: Transect the Cleidobrachialis Muscle
Locate the cleidobrachialis muscle (A; white arrow) near the greater tubercle (yellow arrow) of the humerus just distal to the acromion (black arrow). Externally rotate the limb, and ligate the omobrachial vein overlying the cleidobrachialis muscle (B; arrow) on the cranial aspect of the limb. Transect the cleidobrachialis muscle near the greater tubercle of the humerus. Isolate and ligate the omocervical artery and vein just under the muscle.
Cranial is to the left and dorsal is to the bottom of the images.
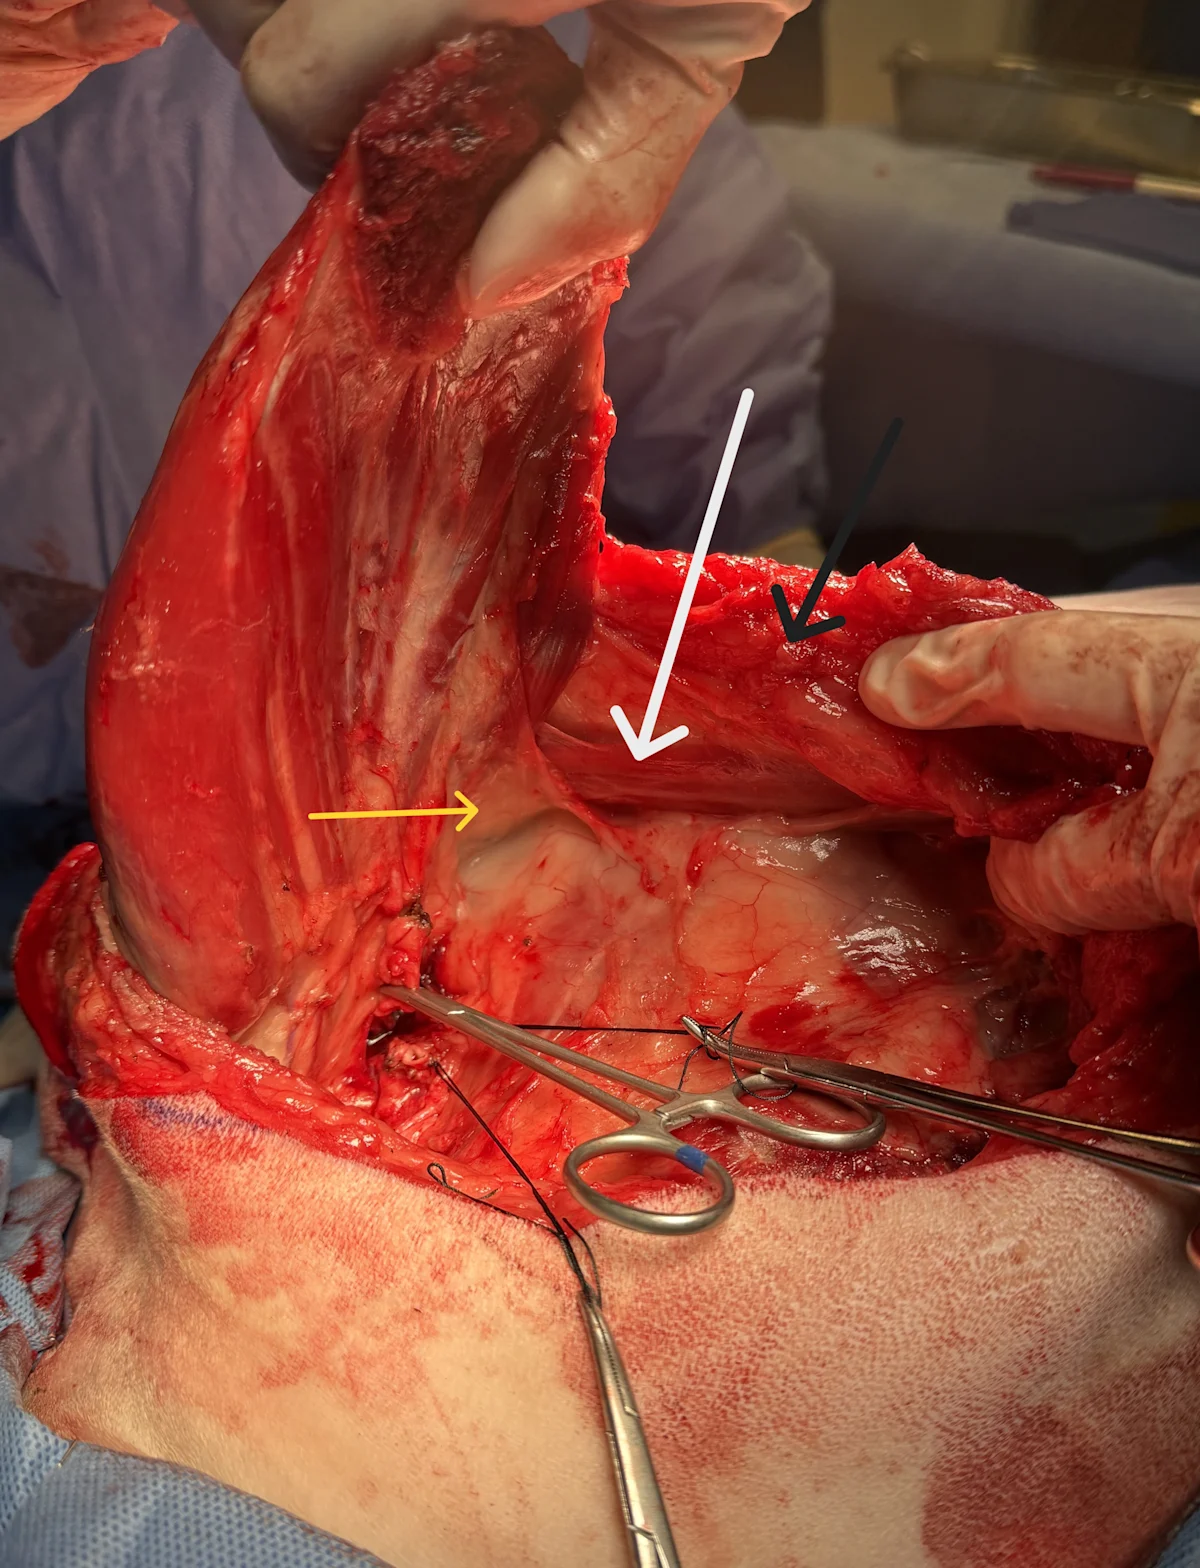
Step 13: Divide the Pectoral Muscles
Move back to the other side of the dog (the ventrum). Lift the limb to expose the medial aspect of the thoracic limb. Isolate the superficial (white arrow) and deep (black arrow) pectoral muscles, and incise the pectoral muscles close to their insertions on the proximal humerus. Remove the limb.
Cranial is to the right of the image.
Author Insight
Care should be taken to not lose sight of the ligated axillary artery and vein pedicles.
Step 14: Close the Incisions
Begin closure by apposing the pectoral muscles (A; white arrow) to the scalenus muscle (A; black arrow) to protect and cover incised nerve bundles and ligated vessel stumps (A; yellow arrow). Next, from dorsal to ventral, close the cranial and caudal trapezius bellies together, and continue the continuous closure line to include the omotransversarius to the latissimus dorsi. Close any remaining muscle planes as needed. Attempt to manipulate skin edges to evenly distribute the incised edges and reduce dog-ear formation (B).
Begin subcutaneous closure with several equally spaced simple interrupted tacking sutures to evenly distribute skin edges for a cosmetic result. Close the subcutaneous layer with a simple continuous pattern. Close the skin with a continuous appositional pattern (eg, simple continuous, Ford interlocking) or an interrupted pattern (eg, cruciate) (C). A wound drain is not necessary in most patients.

To help ensure a secure closure, appose muscles by taking tissue bites primarily of the strong fibrous layer surrounding cut muscle bellies. Be sure to invert severed muscle edges and cover these edges with fascia. If the severed muscle edges are exposed, lymphatic fluid tends to seep into the subcutaneous space, which can cause seromas. Attempt to close muscles without tension. Strive to use an atraumatic technique, and attempt to eliminate dead space and motion of tissue layers to avoid other factors related to seroma formation.
Postoperative Care
Exercise should be limited until suture removal at 10 to 14 days. Some patients benefit from mild wound compression with an elastic body suit or conforming soft bandage. Cold compresses appear to help reduce mild wound edema postoperatively for up to 3 days (5 minutes, every 8 hours). Appropriate oral analgesics (including NSAIDs in patients with no contraindications [eg, renal disease]) should be administered for the duration of the recovery.
What happens if a client can’t afford surgery or cannot come to terms with amputation as treatment?
Remember that even if a decision seems cut and dry to us as veterinary professionals, clients may choose not to follow our recommendations for a number of reasons, such as:
Financial limitations, which cannot be predicted or determined from our position outside the family
Emotional associations, like a prior negative surgical experience
Caretaker burden, for clients who are already caring for other humans or pets
Cultural factors, like being raised to see animals as working assets rather than members of the family
… and many more that vary with each individual family and patient.
For more on practicing nonjudgmental spectrum of care, visit our Spectrum of Care center.