Small Intestinal Resection & Anastomosis
Sandra Schallberger, DVM, FVH, DACVS, University of Florida
Bryden J. Stanley, BVMS, MACVSc, MVetSc, DACVS, Michigan State University
The goal of resection and anastomosis of the small intestine is to remove an irreversibly injured or abnormal segment of intestine, contain contamination, and rejoin the open bowel ends in a manner that will optimize healing and restore luminal and mural integrity.
Indications for this procedure include neoplasia, perforation, dehiscence, necrosis, and severe infection.
There are numerous successful methods of intestinal anastomosis. This article focuses on hand-sutured repair.
Technique
Meticulous technique is critical for successful outcomes.
The bowel should be kept moist and warm at all times, and the jejunal festoons handled gently.
Intestinal viability is commonly assessed by clinical parameters, such as peristalsis, vascular pulsations, and intestinal color (pink vs blue, black, or gray). If viability is questionable, only healthy bowel should be included in the anastomosis.
Generous margins (> 5 cm) of normal-appearing intestine should be included in the resection of any intestinal masses. Around 75% to 80% of the small intestine can be resected before permanent adverse effects are seen (ie, short bowel syndrome).
Sutures
Many suture patterns for intestinal anastomosis have been investigated over the years. In small animals, a single-layer, snug, appositional suture technique is now preferred. This can be either an interrupted or continuous pattern, and it is essential that all bites engage the strength-holding layer, the submucosa.
Antibiotics
Perioperative antibiotics are recommended as an intravenous bolus at induction and every half-life until the end of surgery. A first-generation cephalosporin or ampicillin is sufficient in uncomplicated cases. If peritonitis is present, a second-generation cephalosporin or combination fluoroquinolone and synthetic penicillin can be administered. In these cases, intravenous antibiotics should be continued after surgery and adjusted according to the results of culture and sensitivity testing.
Related Article: Surgeon's Corner: Visceral Biopsy Technique
Related Article: Surgeon's Corner: Enterotomy
Step-by-Step: Small Intestinal Resection & Anastomosis
What You Will Need
This procedure can be done without specialized instrumentation but is best facilitated with DeBakey tissue forceps, Doyen intestinal forceps, large laparotomy sponges, surgical suction, warmed fluids, good lighting, and a surgical assistant.
Use synthetic, monofilament, absorbable or nonabsorbable suture material for anastomosis. Fine material, such as 4-0 or occasionally 3-0, with a swaged-on taper or taper-cut needle should be chosen.
Step 1
Place patient in dorsal recumbency. Clip and prepare the area from mid thorax to caudal to the pubis, and laterally to the flanks. Use water-impermeable draping materials.
Perform a generous ventral midline celiotomy, incising from xyphoid to pubis. First explore the abdominal cavity thoroughly and systematically, including the entire bowel length to avoid missing multiple lesions. If bowel perforation is detected, delay exploration to repair the defect and reduce contamination.
Author Insight
Crushing of the bowel ends can be minimized by grasping just the serosa of the bowel with the tips of the forceps. Note that the forceps on the left are handling the bowel by just grasping the serosa (correct), whereas the forceps on the right are grasping the full thickness of the bowel (incorrect).

Step 2
Identify and exteriorize the affected segment of bowel, along with 15 to 20 cm of normal bowel orad and aborad to the segment to be resected. Use several layers of moist laparotomy sponges to isolate (“pack off”) this bowel from the rest of the abdomen. The superficial layer acts as a receiving towel for a foreign body or accidental spillage. If small gauze squares are used, they should be accounted for after the surgical repair.

Step 3
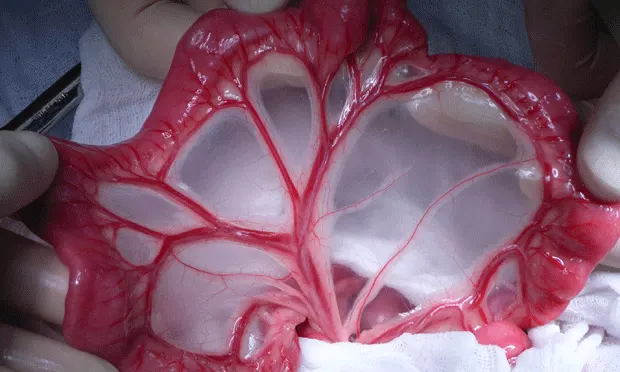
As shown in A, ligate and transect the arcadial vessels that supply the affected segment of intestine (a). Also ligate and transect the terminal arcade vessels on either side of the planned intestinal transection (b). Transect the mesentery, leaving adequate mesenteric tissue to facilitate closure of the defect after completion of the anastomosis (c). The terminal vessels may need to be ligated blindly due to the presence of fat (B).


Step 4
Manually milk the contents from the bowel segment and occlude the lumen orad and aborad with noncrushing Doyen tissue forceps (a) or assistant’s fingers. This is done to prevent leakage of intestinal contents into the surgical site. Avoid crushing the bowel wall or mesenteric vasculature with this procedure. Place crushing forceps (b) just adjacent and inside the proposed transection, leaving at least 2 cm of healthy tissue between the 2 clamps.
These crushing forceps are often placed at a 30-degree angle to the perpendicular, with the antimesenteric aspect away from the lesion. The angled transection ensures adequate perfusion of the antimesenteric border and obtains a larger luminal diameter for suturing (see Luminal Disparity).

Author Insight
Luminal Disparity
Anastomosis with moderate luminal disparity can be accommodated by using different transection angles (Figure 1). Marked luminal disparity can be corrected by incising longitudinally on the antimesenteric aspect of the segment with the smaller lumen (Figure 2).

Different transection angles to accommodate moderate luminal disparity; crushing clamps (A), noncrushing clamps (B), ligatures (C)

The lumen of the bowel on the left (jejunum) is smaller than the lumen of the bowel on the right (colon). To accommodate for this disparity, the antimesenteric aspect of the smaller bowel segment has been cut longitudinally to create a larger lumen, and facilitate even approximation of bowel ends for anastomosis.
Step 5
Using a surgical blade, sharply incise the intestine along the outside of the crushing forceps (A). Note that the intestinal mucosa tends to evert after transection (B). Sharply trim the everted mucosa with Metzenbaum scissors to facilitate apposition (C).

A
Step 6
Approximate the 2 ends by placing a simple interrupted suture at the mesenteric border first. Accurate suture placement in this area is difficult due to the presence of fat within the mesentery. Place a second suture at the antimesenteric border. Leave the tags long and use them as stay sutures for manipulation. Mild tension on these suture tags helps approximate the bowel ends, eliminates minor luminal disparity, and aids suture placement.

Step 7
Suture the bowel ends together using a single-layer, snug, appositional suture pattern, either interrupted or simple continuous (shown). Bites should be about 3 to 4 mm apart and 3 to 4 mm from the cut edges. Engage the submucosa in every suture bite—it is the holding layer for the intestinal wall.

Author Insight
Mucosal Eversion
A modified Gambee suture pattern can be used to minimize mucosal eversion.

Step 8
Before releasing the luminal occlusion, the integrity of the suture line can be tested by moderately distending it with an injection of sterile saline. If leakage is present upon gentle manipulation of the anastomosis, place an additional simple interrupted suture to close the gap.

Step 9
Close the mesenteric defect with simple continuous sutures (A). Irrigate and suction the abdomen with copious amounts of warm sterile saline to reduce contamination and warm the abdomen. If the affected area of bowel can be completely exteriorized and packed off, as described in step 2, then local irrigation of the repair away from the abdomen is performed. After thorough lavage and suction, loosely wrap the anastomosis site with omentum (B).

A
Author Insight
Accurate placement of the mesenteric sutures is essential. If the mesenteric border is difficult to see clearly, preplace 2 or 3 single interrupted sutures.
Change contaminated instruments and gloves before abdominal lavage and closure.