Pelvic limb lameness is a common presentation in dogs, and performing a thorough orthopedic examination that includes gait, standing, and recumbent evaluations, as well as a sit test (if the patient is compliant), is essential.
Gait Evaluation for Pelvic Limb Lameness
Pelvic limb lameness is often easiest to identify when watching a dog walk from the side or rear. Abnormal gait characteristics include a hip hike (ie, hips move upward) when weight is transferred to the lame leg, a hip drop (ie, hips move downward) when weight is transferred to the sound leg, shorter stride length, and abnormal placement of the foot relative to the body (eg, placing the sound leg directly under the body and the lame leg more eccentrically [ie, away from midline]).1 Although an obvious hip hike or drop may not be apparent with bilateral lameness, gait abnormalities may include a hip sway, bilateral short-strided gait, or visible attempt to shift weight onto the thoracic limbs (Figure 1).

Severe bilateral pelvic limb lameness in a dog. Weight is shifted onto the thoracic limbs by walking with an extended neck and head, crouched thoracic limbs, and a raised tail.
Standing Evaluation for Pelvic Limb Lameness
Muscle atrophy, joint effusion, and standing joint angle can be evaluated during standing evaluation. Prior to palpation, visual examination can aid recognition of typical manifestations of common orthopedic conditions (eg, common calcanean tendon tear, hip luxation, patellar luxation; Figure 2). Careful direct palpation of the limbs allows further identification of abnormalities. Standing examination also allows concurrent assessment of the pelvic limbs to evaluate for symmetry.

FIGURE 2A
Dropped hock and curled toes in the right pelvic limb consistent with a partial tear in the common calcanean tendon
Recumbent Evaluation for Pelvic Limb Lameness
Recumbent examination allows thorough palpation of individual long bones and joints to further localize pain. The limbs are typically evaluated from distal to proximal because joints located more distally are easier to isolate. Long bones should be carefully palpated, and firm palpation of soft tissue should be avoided. Each joint should be evaluated for crepitus, range of motion, effusion, pain, and instability (CREPI). Although joint effusion is often easier to feel during standing examination because weight-bearing pressurizes joint fluid toward the periphery of the joint, evaluation for effusion should still be performed while the patient is recumbent.
Performing the examination in the exact same manner each time can help ensure no clinical abnormalities are missed. Although all limbs should be evaluated, the lame leg can be assessed last to aid in patient compliance.
Step-by-Step: Orthopedic Examination to Localize Pelvic Limb Lameness in a Dog
What You Will Need
Long, nonslip, well-lit walkway free of obstacles and distractions
Trained handler
Smartphone or other video recording device (optional)
Lift table (optional)
Step 1: Evaluate the Gait
Observe the dog for evidence of lameness, and confirm the affected limb(s) as a trained handler walks and trots the dog back and forth and from side to side on a long, nonslip, distraction-free walkway.
Author Insight
Recording the dog walking and/or trotting and watching the video in slow motion may help identify subtle signs of lameness.
Step 2: Evaluate the Natural Stance
Observe how the dog stands naturally.
Author Insight
Dogs with pelvic limb lameness may place the lame limb eccentrically (ie, farther from midline), have visible muscle atrophy of the thigh and gluteal muscles, and have more of the metatarsal pad visible compared with the contralateral limb (A). Subjective assessment of muscle symmetry can be performed by using hands to encircle the thigh (B) and comparing the size of the pelvic limbs. A measuring tape can provide more objective measurement of muscle mass (see Suggested Reading).

STEP 2A
Step 3: Evaluate Gross Appearance of the Limbs
Evaluate each joint for standing angle and position, as well as the overall limb for visible deformities and obvious length discrepancies (Figure 2).
Step 4: Assess for Effusion, Thickening, & Pain
Visualize and palpate joints for effusion, thickening (eg, medial buttress of the stifle; A, arrow), and pain. Palpate the patella to determine whether it is in the correct position (rather than medially or laterally luxated). Palpate the common calcanean tendon for abnormalities, including swelling or defects in the tendon (B).

STEP 4A
Author Insight
The tarsus has minimal soft tissue coverage, making evaluation of effusion in this joint relatively straightforward. Palpation of both tarsi simultaneously allows for assessment of mild effusion (asymmetry in the joints). Stifle effusion is easiest to palpate around the area of the patellar ligament and results in a palpably indistinct ligament. Increased soft tissue coverage over the hip makes palpating coxofemoral effusion difficult.
Step 5: Perform a Sit Test
Perform a sit test by asking the dog to sit voluntarily and observing pelvic limb position.

Author Insight
Dogs with stifle or hock disease may have a positive sit test (ie, sit with one or both knees extended or slightly externally rotated). Sit test findings should be correlated with orthopedic examination findings, including direct palpation of the joints.
Step 6: Position the Patient for Recumbent Examination
Place the patient in lateral recumbency.
Author Insight
A lift table should be used if possible because it can provide better ergonomics for the clinician and assistant compared with the floor.
Step 7: Examine the Pes
Examine the digits by moving the joints through full range of motion and palpating the phalanges. Examine the pes for broken toenails (A), wounds, draining tracts (B, arrow), dermatologic pathology, and other evidence of foreign bodies or trauma.

STEP 7A
Step 8: Palpate the Metatarsal Bones
Palpate the metatarsal bones for swelling, pain, or instability.
Step 9: Palpate the Hock
Palpate the hock for abnormalities (ie, CREPI). Apply valgus force (A, solid arrow) to assess for lateral instability and varus force (A, dashed arrow) to assess for medial instability in both flexion and extension. Palpate the common calcanean tendon as it inserts on the calcaneus (B).

STEP 9A
Author Insight
An intact common calcanean tendon limits the ability to flex the hock when the stifle is extended.
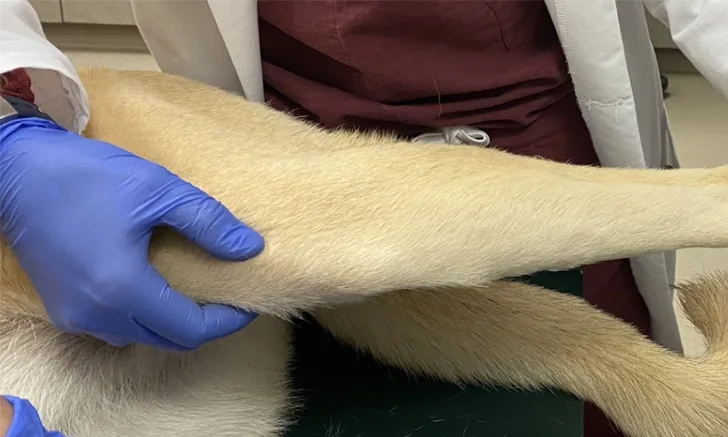
Step 10: Palpate the Tibia
Palpate the tibia for swelling, pain, or instability.

Author Insight
The tibia should be palpated medially because soft tissue coverage in this area is minimal.
Step 11: Palpate the Stifle
Palpate the stifle for abnormalities (ie, CREPI). Evaluate for effusion around the patellar ligament. Assess for collateral ligament instability by applying varus (dashed arrow) and valgus (solid arrow) force to the stifle with the joint in full extension. Fully extend the stifle to assess for pain associated with early cranial cruciate ligament disease.

Author Insight
Careful localization of pain to the stifle (rather than the proximal tibia or distal femur) is important, as certain bone tumors are common in these locations.
Step 12: Assess the Cranial Cruciate Ligament
Evaluate integrity of the cranial cruciate ligament. Assess for cranial drawer using the patella, lateral fabella, tibial tuberosity, and fibular head as landmarks (A). Place fingers or thumbs on bony landmarks rather than soft tissue, and assess for cranial drawer in extension and partial flexion. Examine for tibial thrust by placing the limb in a normal standing position and flexing the hock to mimic weight-bearing forces while keeping the stifle relatively stable (B).

STEP 12A
Author Insight
Cranial cruciate ligament disease without evidence of instability can include early partial tears and chronic partial or complete tears with a large amount of fibrous tissue around the joint. Absence of cranial drawer and tibial thrust therefore cannot rule out cranial cruciate ligament disease.
Step 13: Assess for Patellar Luxation
Evaluate for medial patellar luxation by extending the stifle, internally rotating the foot, and applying medially directed pressure to the patella (A). Assess for lateral patellar luxation by partially flexing the stifle, externally rotating the foot, and applying laterally directed pressure to the patella (B).

STEP 13A
Step 14: Palpate the Femur
Palpate the femur for evidence of swelling, pain, or instability.

Author Insight
Femoral palpation is easiest on the lateral aspect between muscle bellies.
Step 15: Palpate the Hip
Evaluate the hip for abnormalities (ie, CREPI). Confirm correct location of the femoral head within the acetabulum by palpating a triangle among the wing of the ilium, greater trochanter, and ischiatic tuberosity. Range of motion should include extension, flexion, abduction, internal rotation, and external rotation.

Step 16: Perform an Ortolani Test
Perform an Ortolani test to assess for hip laxity; provide sedation if necessary. Position the hip and stifle at 90 degrees, and place one hand on the caudal lumbar spine for support with the other hand on the stifle (A). Adduct the stifle, and place dorsally directed pressure along the femur (B). Maintain the dorsally directed pressure, and begin to abduct the limb (C). Observe for a visual and palpable thud that occurs when a subluxated hip reduces into the acetabulum.

STEP 16A
Author Insight
Absence of a positive Ortolani sign does not always indicate normal hip conformation. Dogs with dysplastic hips may not have a positive Ortolani sign due to significant periarticular fibrosis or dorsal acetabular rim wear.
Step 17: Assess for Iliopsoas Pain
Palpate for pain associated with the iliopsoas by applying gentle pressure to the tendon of insertion where it attaches to the lesser trochanter of the femur.

Step 18: Palpate the Hemipelvis
Palpate the hemipelvis for instability, swelling, and pain. Perform a rectal examination to further evaluate for instability, swelling, or asymmetry of the pelvic canal.

Listen to the Podcast
Dr. Barnes joins the podcast to share more of her knowledge about pelvic limb lameness and gait examinations.