Obtaining a Skin Biopsy for Histopathologic Evaluation
Gail A. Kunkle, DVM, Diplomate ACVD, University of Florida
Lisa Akucewich, RN, DVM, Diplomate ACVD, University of Florida
Step-by-Step: How to Collect a Skin Biopsy
What You Will Need
Disposable 6- and 8-mm biopsy punches
Lidded container containing 10% buffered formalin• 2% lidocaine• 3-ml syringe, 22-gauge needle
4 x 4 sponges
Broken tongue depressor or small square cardboard• Suture
Small forceps
No. 10 or 15 scalpel blade and handle
Suture scissors
Small, sharp scissors, such as iris scissors
Before beginning, be sure that the patient's blood will be able to clot. Thoroughly investigate any potential lack of clotting ability.
Step 1
If the hair over the biopsy site is long, trim gently or clip to one-quarter inch. Be sure to avoid trauma to the skin.
For skin biopsies collected for histopathology, aseptic technique is not employed because the surface is often very important in defining the diagnosis. When a skin biopsy is performed for culture and sensitivity testing, it is done in a similar manner but with aseptic surgical technique.
Do not scrub or disinfect the sample site before taking the biopsy. Surface crusts, scales, type of keratin, and any organisms or parasites are an important part of the biopsy and should be preserved. Hairs should be visible so that the pathologist can orient the specimen and section it correctly.

Step 2
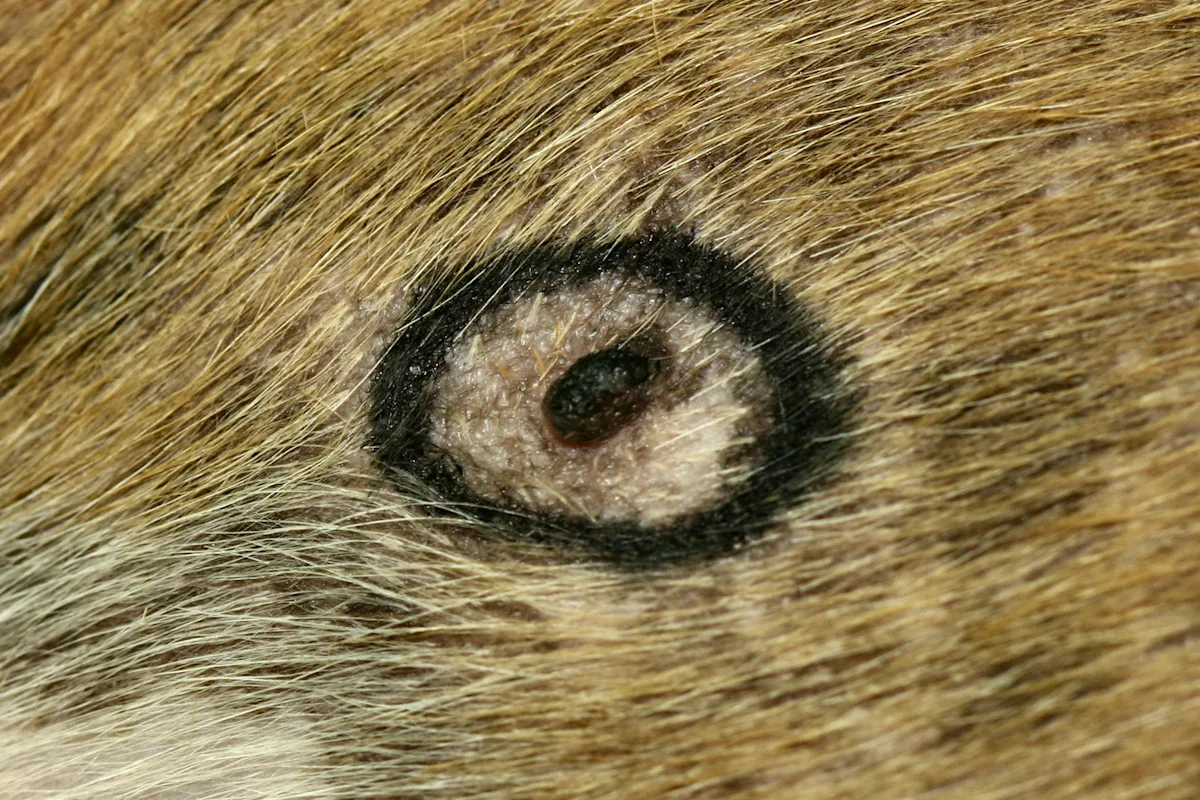
Mark the lesions to be sampled by circling them with a black marker.
If your dermatopathologist prefers the line-marking technique, draw a 2- to 3-cm line with an indelible extra-fine-point marker directly on the skin, parallel to the direction of hair growth. If you are using this technique, position the punch so that the line is centered.
Step 3
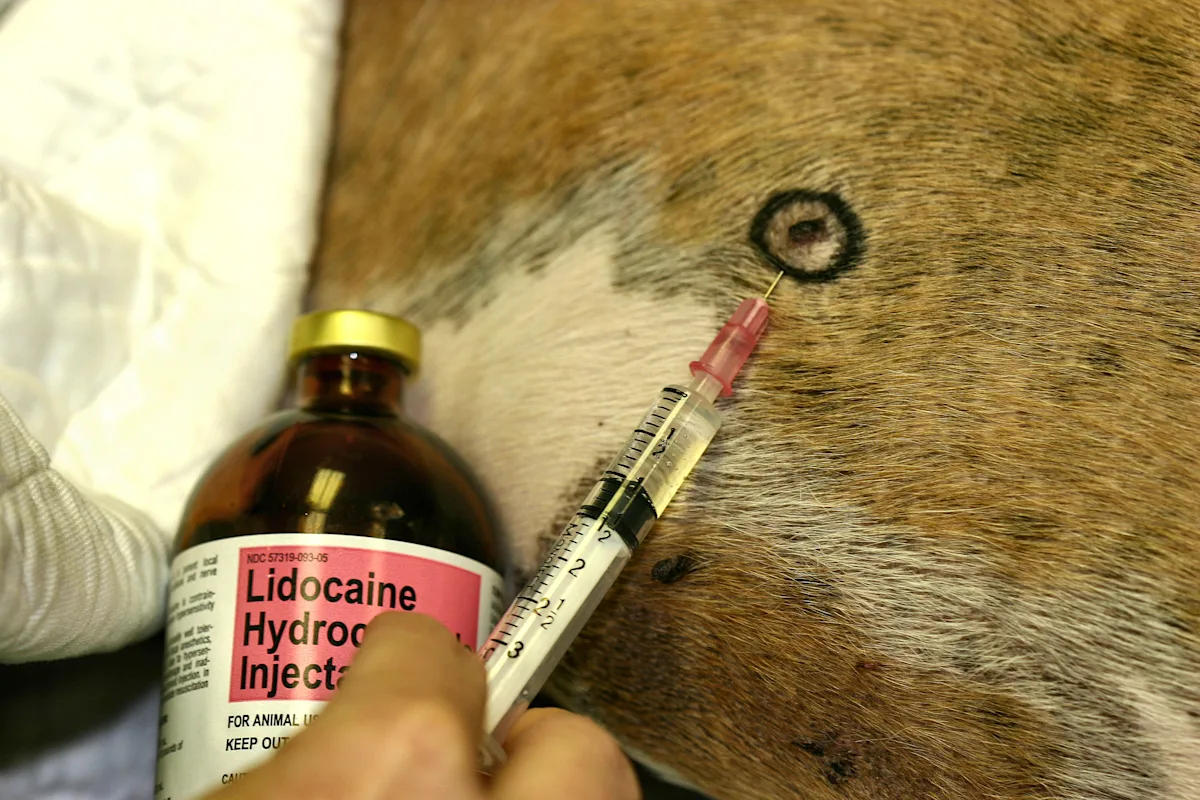
Local anesthesia (lidocaine 1% to 2%) is usually sufficient for biopsy collection. Sedation or general anesthesia may be required for lesions of the mouth, head, and feet. Lidocaine can be buffered with sodium bicarbonate (8.4% NaHCO3 at a 5:1 ratio) to reduce the pain associated with local anesthetic infiltration. Do not exceed 1 ml of 2% lidocaine/10 lb body weight.
Inject local anesthetic subcutaneously by introducing the needle into an area slightly removed from the collection site. Infiltrate the area under the biopsy site; generally 0.5 to 1 ml per site is sufficient. Take care not to inject the anesthetic intradermally because this will distort the findings.
Step 4
For collection of most biopsies, use a disposable 6- or 8-mm biopsy punch. Discard after collecting two or three samples-the punches dull quickly and attempting to reuse them several times will lead to damaged specimens. Smaller 4-mm biopsy punches can be used for samples of the pinnae or mucocutaneous surface.
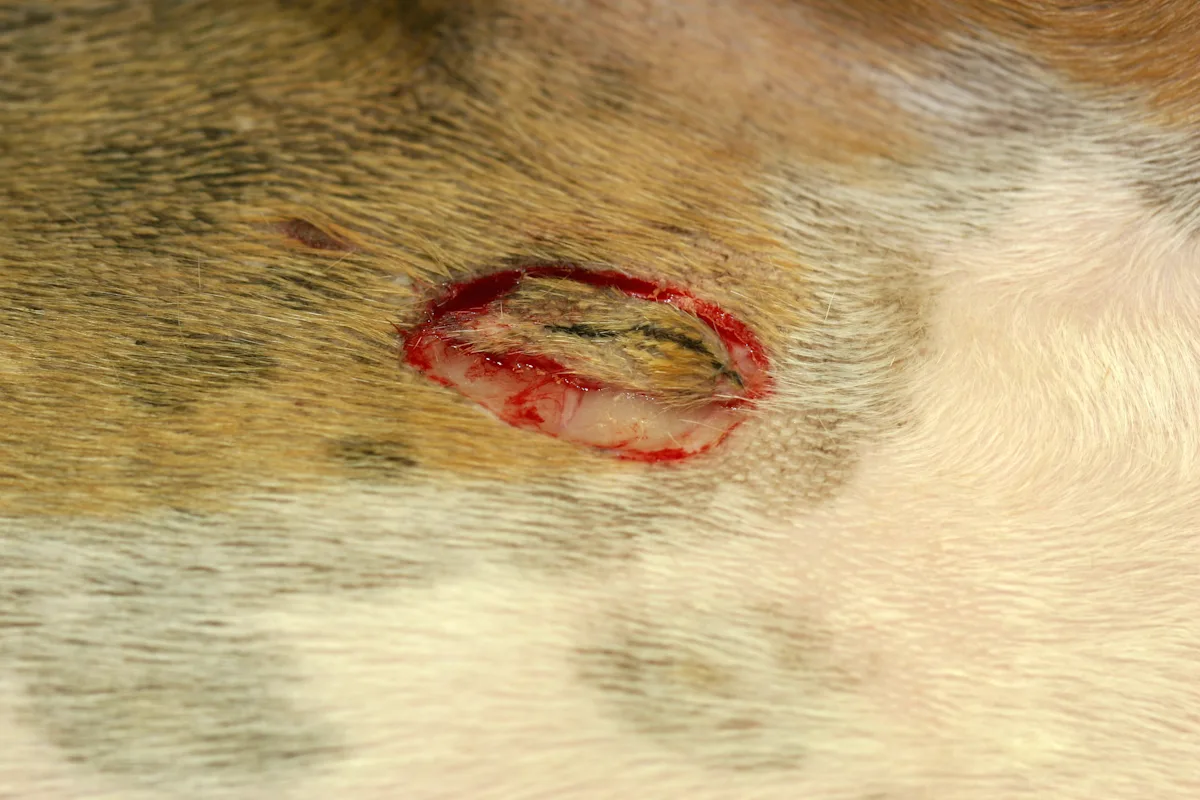
Hold the skin around the biopsy site taut with the thumb and forefinger. Place the punch vertically skin so that the area containing the lesion is centrally located inside the punch. Using moderate pressure, rotate the punch in one direction into the skin, generally up to the hub of the biopsy punch or until a pop is felt as it reaches the subcutis. Hemostasis may be required at this point. Apply gentle pressure with a sponge and try not to crush the lesion. Avoid cautery because it alters the tissue.

Step 5
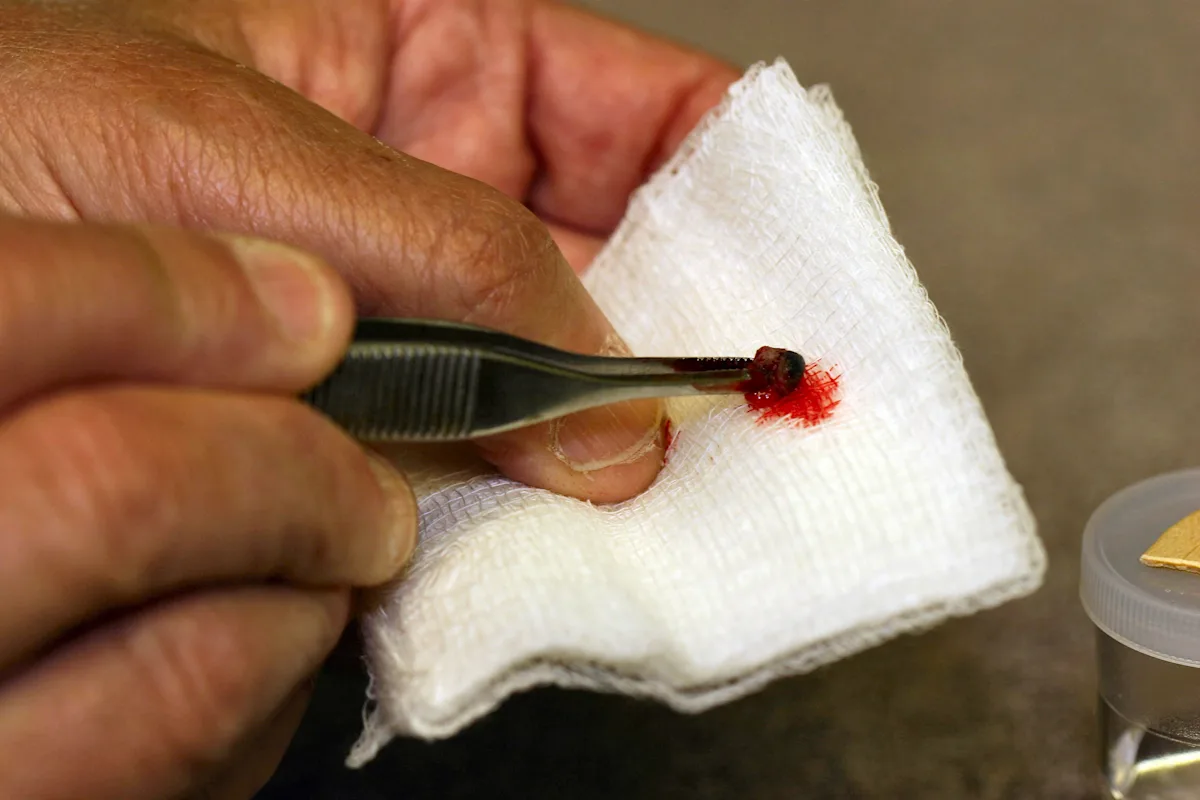
Use tiny forceps or a 26-gauge needle to gently lift the specimen pedicle so that it can be cut from the underlying adipose tissue. Use small, sharp scissors or a blade to cut away the bottom of the specimen.
The specimen should be lifted carefully with forceps from its deepest portion to avoid crushing the dermis or epidermis. Manipulation of the tissue with instruments or by rough handling (squashing) is a leading cause of artifacts.

Step 6
Use a scalpel to collect wedge-shaped excisional biopsies, which are often needed for nodules or deeper lesions. A scalpel may be used to obtain a sample at a junction of normal and abnormal tissue. In this case, you must state the orientation of the biopsy for the pathologist because the specimen will be cut in half longitudinally-abnormal tissue should be found at one pole and normal tissue at the other. A scalpel can also be used to make an elliptical incision to obtain vesicles or bullae. A 1-cm ellipse generally provides sufficient tissue for the pathologist.
Step 7
Remove the specimen and blot the blood from it.
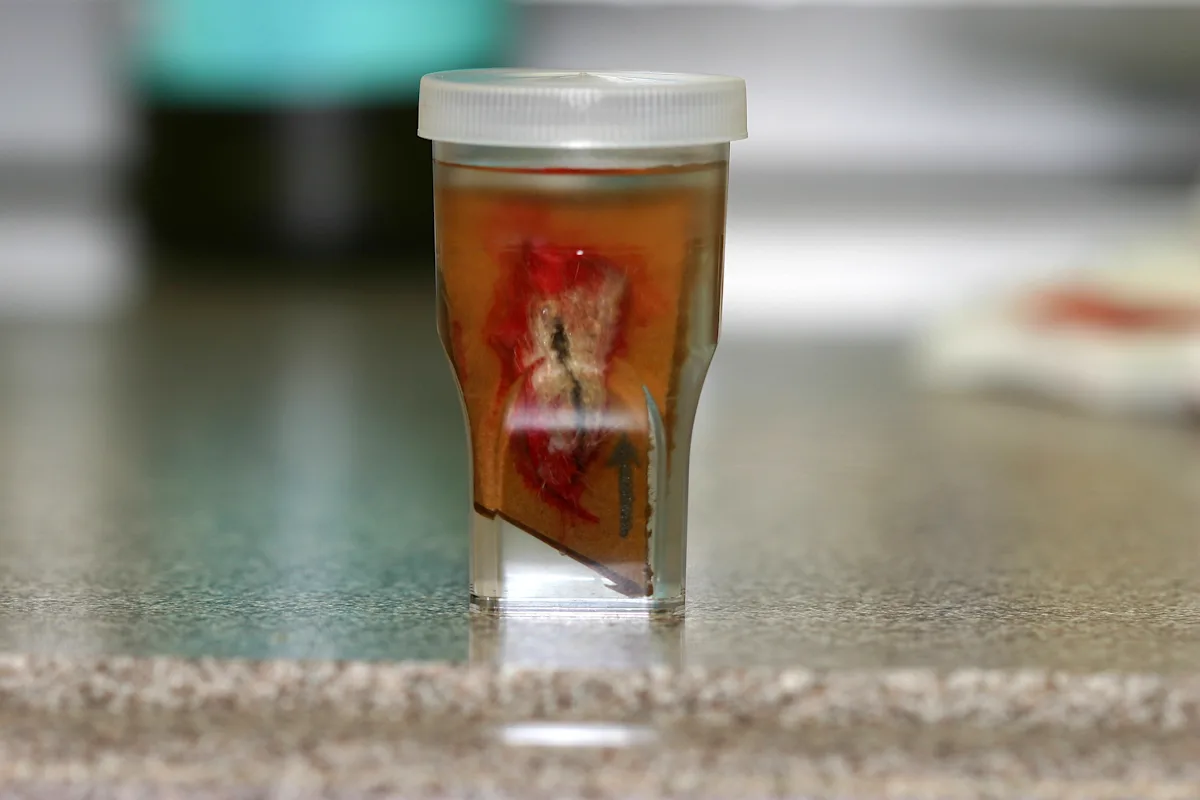
If you are not using the line method, place the tissue specimen on a piece of wooden tongue depressor or cardboard for a few seconds so that the adipose surface adheres to the flat surface and the epithelial surface is clearly oriented on the top of the tissue. Specimens are placed on wood or cardboard to prevent curling and for orientation.
Curling of the tissue is a specific concern for excisional biopsies, which may twist and wrinkle during fixation. Draw an arrow in pencil or permanent marker on the cardboard to illustrate the direction of hair growth for the pathologist to facilitate optimum orientation of the specimen. Use the line method mentioned previously if that is your pathologist's preference.
If you are sampling an area where you believe examining the transition of abnormal to normal skin is important, be sure to use a diagram or carefully identify your selection.
Step 8
Place the biopsy in 10% neutral buffered formalin soon after removal. Tissue placed in formalin becomes a uniform color, and erythema and lesions are not easily seen. In most cases, the sample will remain attached to the cardboard.
Most biopsy sites should be sutured closed.
If you are collecting samples that are clearly different, place them in separate containers and note this fact. For submission, provide the pathologist with the anatomical location, the type of lesion (primary, secondary), history, and differential diagnosis.
Procedure PearlProper technique along with proper selection of lesions helps ensure ideal results from your dermatopathologist. Provide representative samples of various types of lesions, a list of biopsy sites, distribution, history, and your differential diagnoses.
Providing a drawing or orientation of specimens and/or digital images of lesions may be helpful.
If you are collecting samples that are clearly different, place them in separate containers and note this fact.