Multiple Punctate/Grid Keratotomy for Indolent Corneal Ulcers
Ken Abrams, DVM, DACVO, Veterinary Ophthalmology Services, Warwick, Rhode Island
Indolent corneal ulcers occur in several species and are extremely common in dogs, most often in aged patients as well as the boxer breed. Synonyms for indolent corneal ulcers include superficial corneal erosion, recurrent erosion, boxer ulcers, and refractory corneal ulcers.1-3
In this disease, the corneal epithelium sloughs off of the cornea, often leaving ragged epithelium along the edges of the ulcer (Figure A). The cause of this superficial erosion is unknown; however, it may be related to age or breed and is often spontaneous. While many clients suspect that a particular incident may be related to the start of these ulcers, the ulcers are often spontaneous and the suspected cause usually coincidental.

Treatment Options
Healing is extremely slow, often taking weeks to several months. Numerous treatment options have been described with varying success, indicating that there is no perfect solution to expedite healing.
Treatments have included bandage contact lenses, collagen shields, lamellar keratectomy, third eyelid flap, cyanoacrylate adhesive, conjunctival graft, debridement, and medical treatments with hypertonic saline, epidermal growth factor, fibronectin, aprotinin, and glycosaminoglycan.4,5 One of the easiest, least costly, and most successful minor surgical treatments is multiple punctate keratotomy (MPK) or its variant, grid keratotomy. The procedure can be performed with topical anesthesia in the awake or sedated patient and has a reported success rate of 75% in dogs. MPK was originally described for human use in 1986 and the mechanism of action is still unknown.6-8 This procedure should be performed only in dogs with indolent ulcers; it should not be performed in cats due to postprocedural complications.
Related Article: The Concept of Corneal Protection
Related Article: Corneal Cytology & Culture Collection
Step-by-Step: Multiple Punctate/Grid Keratotomy
What You Will Need
Wire eyelid speculum (I prefer the Barraquer wire speculum)
Dry, cotton-tipped applicators
Topical proparacaine, 0.5%
Small-toothed forceps
Focal light source (eg, transilluminator or focal room light)
Magnification (eg, binocular loupe)
21- to 23-gauge hypodermic needle


Step 1: Sedation & Anesthesia
General anesthesia is not necessary but application of topical proparacaine is crucial for adequate corneal anesthesia. In addition, in most cases I elect to sedate the patient with medetomidine (Domitor; Pfizer) at half the recommended dose (approximately 350 µg/m2 IV), resulting in a relaxed patient during the procedure.
Proparacaine 0.5% is the preferred topical anesthetic because tetracaine often stings upon application. When applying proparacaine, place a drop on the cornea, wait about 30 seconds, and then apply another drop. Additional proparacaine can be applied later if the patient still seems to be able to feel the procedure as evidenced by lid or body motion.
Procedure Pearl
Proparacaine 0.5% is the preferred topical anesthetic because tetracaine often stings upon application.
Step 2: Restraint & Application of Speculum
Crucial to the technique is an assistant able to predict any impending patient motion. The assistant skillfully restrains the patient's head and if he or she senses that the patient is about to move, warns the doctor to stop and allow the patient to settle. Note that the assistant pictured has one hand on top and one alongside the head, enabling the detection of even slight motion in the patient (A). Even when the patient is sedated there may be some minor head motion that the doctor should anticipate during critical times of the procedure.

Once the patient is relaxed in sternal recumbency, either awake or sedated, and topical anesthesia applied, the wire speculum is placed to hold open the eyelids. It is often helpful and possible to "catch" the third eyelid in the lower arm of the wire speculum to keep it out of the way during the procedure (B). Note in this patient (and in subsequent figures) the vascularization indicating partial healing response. While the speculum keeps the lids open during the procedure, you may also need small-toothed forceps to stabilize the globe (holding it by the limbus).

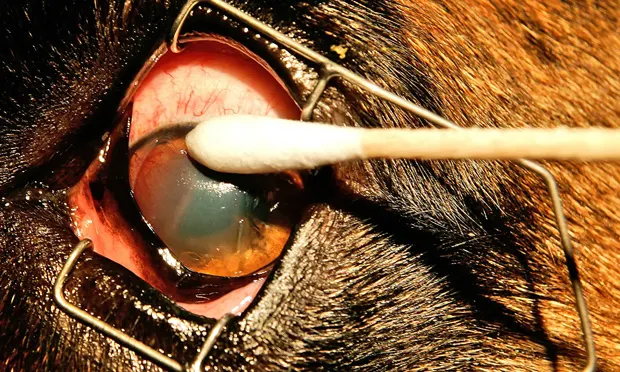
Step 3: Epithelial Debridement
Although many debridement techniques have been described using various instruments and chemical solutions, I prefer to use dry, cotton-tipped applicators. Once the patient is calmed or sedated, the cornea anesthetized, and the wire speculum inserted, use the applicator to debride along the edges of the erosion, pushing along the edge from central to peripheral (A and B). In Figure B, note the lip of loose epithelium about to be removed by the applicator.


Once the applicator is wet, use a fresh one, which will allow the epithelium to better adhere to the surface of the tip. Don't be tentative about the force required to debride: normal epithelium will stay fixed to underlying stroma, while any abnormal epithelium will be removed by the applicator. Many times an erosion does not appear large during initial fluorescein staining, but once you begin to debride the epithelium, a significant amount of loose epithelium is removed, occasionally all the way back to the limbus. Continue using dry applicator swabs until all loose epithelium has been removed.
Step 4: Variations on a MPK Theme
Two basic styles of keratotomy can be performed: the punctate keratotomy or the grid keratotomy. Choosing one or the other is a matter of surgeon preference.
Punctate Keratotomy
First, stabilize the globe, if necessary, with small-toothed forceps in your nondominant hand. Hold the hypodermic needle (21- to 23-gauge) in your dominant hand between your thumb and index finger and rest the back of that hand on the patient's face, usually below the eye along the muzzle. This position gives you the most comfort and stability as you are applying the needle to the cornea and, if the patient has any subtle head motion, your hand will move with the motion.
Next, apply the needle to the ulcerated areas, holding it at approximately 30° off perpendicular to provide added assurance that the needle will not perforate the cornea. In rapid motions, apply several "taps" throughout the ulcer. Apply just enough pressure with each tap to see the cornea barely flattening in the treated area, indicating that the needle has penetrated only as deep as the anterior stroma (A). In this figure, note the slight indentation or "dimpling" of the corneal stroma near the 1 o'clock position.

As the corneal vessels ooze during the procedure, use a dry, cotton-tipped applicator to clean your surgical field.
Grid Keratotomy
Alternatively, you can create several parallel horizontal and then vertical lines in the formation of a tic-tac-toe board with the grid keratotomy method. The punctate method requires only a split second contact with the cornea, whereas the grid method requires longer contact time. I often use both methods in a given patient, using the grid method when I am confident that the patient is totally relaxed and the punctate method if the patient begins to move its head.
Keep the keratotomy marks very close together until the entire erosion has been treated, continuing into normal epithelium by just a fraction of a millimeter (B). The figure shows a completed keratotomy with both grid and punctate marks and also the early attempt at healing with vascularization.

Procedure Pearl
Both punctate and grid keratotomy methods can be used in the same patient.
Step 5: Postoperative Treatment & Expectations
Once the keratotomy is complete, the speculum is removed and sedation is reversed with atipamezole (Antisedan; Pfizer, www.pfizer.com). An Elizabethan collar is optional but should be used in any patient that attempts to rub its eye.
Postoperative medications include a triple antibiotic solution or ointment Q 8 to 12 H and optional pain management such as an oral nonsteroidal antiinflammatory and topical, compounded nalbuphine 1.2% or morphine 1% Q 8 to 12 H.9
As the epithelium heals there will often be an intense vascular response, especially in certain breeds such as the boxer (Figure). I inform clients that the eye may become "ugly" red (like hamburger), but that the ulcer is healing and the patient will begin to keep the eye open with less squinting. The client should be informed that even after the current ulcer is healed, many patients are prone to getting future erosions in the same or opposite eye.

Unless there are any concerns on the client's part, a follow-up exam should be performed in 2 to 3 weeks. Most owners will report that the patient became more comfortable in a matter of days to a week following the procedure