Managing Degloving & Shearing Injuries
Bonnie Grambow Campbell, DVM, PhD, DACVS, Washington State University
Degloving and shearing (ie, deep degloving) injuries typically occur when an animal is pushed or dragged by a moving vehicle.1-4 The distal limbs are affected more frequently than other parts of the body, with the most common site of injury being the medial tarsus/metatarsus.1,2 Various amounts of skin, subcutaneous tissue, neurovascular supply, muscle, tendon, ligament, and bone are sheared away by frictional forces. The structures that remain may be lacerated or damaged by crushing forces. In addition, debris and bacteria are embedded in the wound. Joint instability and joint capsule penetration are common, as are concurrent injuries in other parts of the body.1-3
Outcome
Despite their often severe appearance, the prognosis for shearing wounds is very good with proper care. In a study by Beardsley and Schrader,1 91% of dogs with healed shearing wounds were clinically normal or had only minor functional abnormalities, even dogs that sustained extensive tissue loss and orthopedic damage. In most cases, primary wound closure is not an option due to loss of soft tissue and inability to convert the contaminated wound to a clean wound during initial treatment. Owners should be advised that treatment may require multiple surgeries and prolonged open wound management.1,2
Pretreatment Considerations
Patient stabilization and immediately life-threatening injuries take priority over initial wound management. For example, patients with massive blood loss or hypovolemia often need fluid or blood product infusion to improve their cardiovascular status before sedation or anesthesia can be contemplated. To protect wounds while more urgent problems are being managed, they should be covered with a sterile bandage as soon as possible.
Wound assessment may require a local anesthetic, sedation, or general anesthesia. When possible, the patient’s neurologic status should be assessed before anesthetic agents or sedatives are administered.
Step-by-Step: Managing Degloving & Shearing Injuries
What You Will Need
For All Cases
Sterile surgical instruments and supplies (including gloves)
Clippers
Sterile water-soluble gel
Surgical skin scrub
Lavage solution in IV fluid bag with administration set and 16- to 22-gauge needle
IV bag pressure cuff
Analgesics
Sedatives and/or general anesthetic
Moisture-retentive dressings (specific dressing selected is based on the amount of wound exudate and the phase of wound healing)7
Bandage material
For Some Cases
Splint, cast, or external skeletal fixator
Orthopedic implants
Doppler ultrasound probe
Stents (eg, suture and IV tubing, red rubber catheter, buttons)
Stent tighteners (eg, hemoclips, split-shot fishing sinkers)
Step 1
Place a generous amount of sterile, water-soluble gel in the wound to trap hair clippings. Clip widely, both for cleanliness and to identify smaller injuries masked by hair. Also shave flaps of skin overlying the wound. Clean intact skin with an antiseptic scrub, but do not allow scrub material to seep into the wound.
Author Insight
Persons treating degloving and shearing wounds should wear gloves, even during clipping and initial wound evaluation.
Step 2
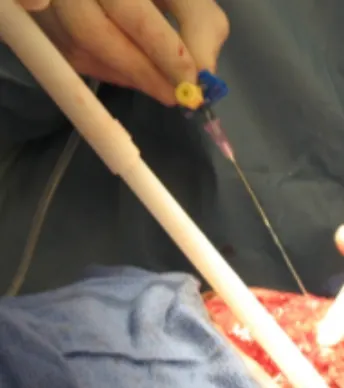
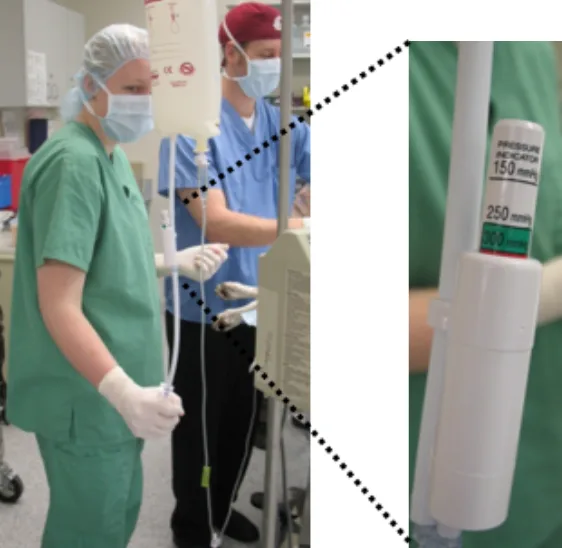
Lavage the wound to flush out debris, decrease bacterial counts, and rehydrate tissues. Effective lavage requires a large volume of fluid at a pressure of 7 to 8 psi. This is most reliably achieved with a 16- to 22-gauge needle on a standard intravenous drip set attached to a liter bag of fluid pressurized to 300 mm Hg (A, right, and B, below).5 Larger fluid volumes do not compensate for inadequate pressure. Use of a stopcock allows sterile control of fluid flow.
The use of tap water is acceptable initially for removing surface dirt; however, it should be followed by lavage with a sterile, nontoxic solution (not scrub, which harms tissues), such as normal saline, 0.05% chlorhexidine solution (add 25 mL of 2% chlorhexidine to 975 mL of sterile saline or sterile water), or 0.1% to 1% povidone-iodine solution (add 10 mL of 10% povidone-iodine to 990 mL of sterile saline for 0.1% or add 100 mL of 10% povidone-iodine to 900 mL of sterile saline for 1%).
Author Insight
Bulb syringes, squirt bottles, and syringes without needles do not provide adequate lavage pressure.
Step 3
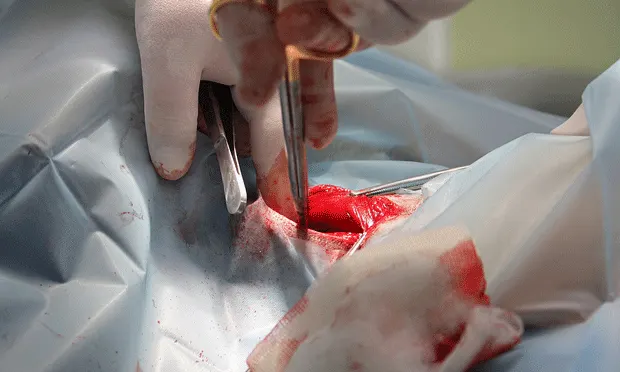
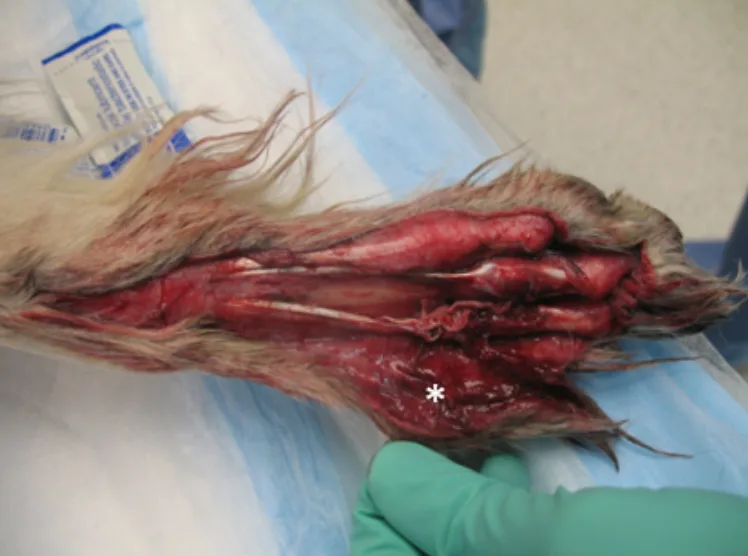
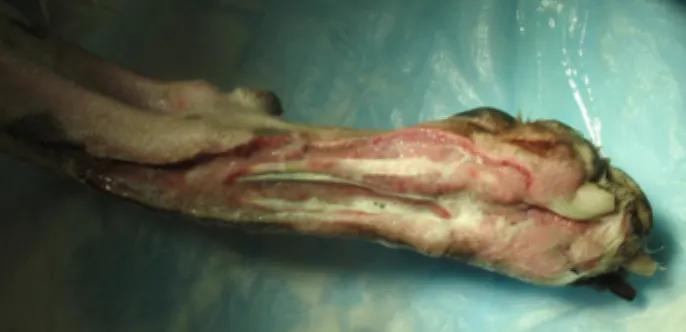
Determine whether each anatomic structure in the area is unharmed, damaged, or missing. Assess tissue viability by evaluating its degree of attachment, color, texture, temperature, bleeding, and sensation. (A) In this shear injury, a flap of skin has been folded back (asterisk) to reveal transected branches of the common digital extensor tendon. Diagnostic differentials for pale color, cold temperature, and/or lack of bleeding from cut surfaces include hypovolemia, vasoconstriction, or lack of viability; thus, hypovolemia and hypothermia should be treated before a decision about tissue viability is made. (Here, the tissues were viable despite the pale color and lack of bleeding surfaces [B].)
Place a Doppler ultrasound probe on the palmar/plantar side of the metacarpus/metatarsus to assess distal blood flow. Assess sensation by pricking or pinching tissues with a hypodermic needle or hemostat. Lack of sensation may be due to transient neurapraxia or permanent nerve damage. Limbs with extensive neurovascular and/or tissue damage may require amputation; however, this decision should be delayed until after treatment of shock and confirmation that such damage is permanent.
Author Insight
Place a long monofilament suture tag in the peritenon or epineurium of transected tendons or nerves that will later be anastomosed. The tag allows you to find the end if it retracts into deeper tissue.
Step 4
Surgically debride the wound using aseptic technique. Remove necrotic tissue, as it incites inflammation, blocks granulation, and increases infection risk. If the viability of a given piece of tissue is unclear, it may be left in place to give it time to declare (ie, show for certain whether it is viable) as long as the tissue is superficial enough to allow reassessment and resection during bandage changes.

Step 5
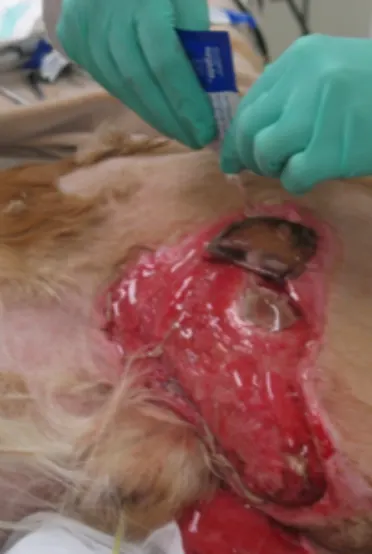
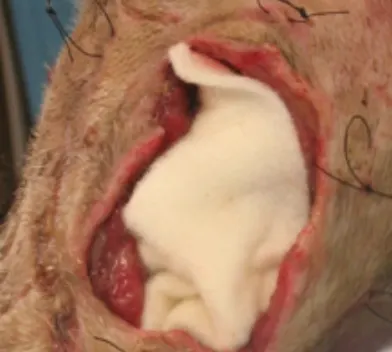
Treat the area as an open wound until it is free of contamination, all tissues are clearly viable, and a tension-free closure can be achieved (these conditions rarely exist after initial debridement and lavage). Place an appropriate moisture-retentive dressing to support ongoing debridement of the wound by white blood cells. Good dressing choices include calcium alginate (A, left) for a highly exudative wound, polyurethane foam (B, below) or hydrocolloid for a wound with moderate exudate, and hydrogel for a dry wound. Pack or cut the moisture-retentive dressings to fit the wound without overlapping surrounding skin, and cover the area with an absorptive padded bandage (C, below). Perform serial lavage and surgical debridement until a healthy granulation bed forms. The frequency of bandage changes and serial lavage and debridement will depend on the severity of contamination and tissue damage as well as the type of dressing used.
Negative pressure wound therapy is also a valuable means of managing exudate and stimulating healing (D, below). Surgical forage (making multiple perforations into the medullary cavity with a 0.045- to 0.062-inch Kirschner wire) may help stimulate granulation tissue formation over exposed bone.6
Author Insight
The advantages7 of using a moisture-retentive dressing over a wet-to-dry dressing include:
Selective debridement that does not damage healthy repair tissues
Accelerated granulation, epithelialization, and contraction
Prevention of infection
Increased patient comfort
A
Step 6
Wound closure can ultimately be achieved by several different means, including the following:
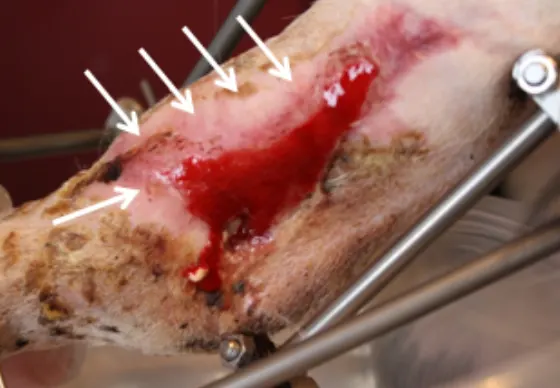
With second intention healing, the wound heals on its own but often results in a thin, pink, fragile epithelium (arrows, A). The loss of significant amounts of tissue can result in a tight, hairless epithelial scar or contracture that limits joint movement (B).
For direct suturing, undermine healthy skin deep to the cutaneous muscle (or, in areas without a cutaneous muscle, undermine the skin deep to all subcutaneous tissue and immediately superficial to the muscle fascia) and close. Avoid causing a tourniquet effect from excess tension.
To stretch the skin, place stents (in this case made from pairs of red rubber tubing anchored with horizontal mattress sutures, C) on both sides of the wound and tighten serially by adding a hemoclip or split-shot fishing sinker between the knot and tubing (D and E, arrows).
Alternatively, loosely place a simple continuous or intradermal pattern of suture in the skin and tighten daily by placing a clip or sinker under the knot at one end.
Create a subdermal plexus flap or axial pattern flap if tissue mobility and wound location allow. Here, a degloving wound on the left lateral thigh of a dog (sustained a month earlier when the dog was inadvertently dragged behind a truck) was treated as an open wound until healthy granulation tissue formed.
The outlined inguinal skin fold flap (F) was elevated and rotated caudally to cover the degloving wound (G).
Place a skin graft on a uniformly healthy wound bed. (H) Day of injury. Granulation bed (I) and meshed, full-thickness skin graft (J) 31 days after moist open wound management.
Author Insight
Surgical wound closure should be delayed until only healthy tissue is present and tension-free closure can be achieved.