Determining lymph node status is important for clinical staging of patients with cancer. Regional lymph nodes drain the region where the tumor is located; the sentinel lymph node is the first lymph node that drains the affected region.
Regional lymph nodes should be palpated for enlargement, asymmetry, and degree of fixation; however, lymph node size is not an accurate predictor of metastasis, as lymph nodes can also be enlarged due to reactivity.1 Additional assessment may be necessary for clinical decision-making. Selection of which lymph node to sample or biopsy should be based on clinical findings and/or lymph node mapping techniques, which can identify the sentinel lymph node preoperatively or intraoperatively. Lymph node sampling and biopsy methods include fine-needle aspiration, cytology, and incisional and excisional biopsies.
Fine-needle aspiration is a simple, noninvasive, and highly specific method to assess for tumor metastasis. Metastasis is confirmed if tumor cells are found. Fine-needle aspiration sensitivity is variable, and absence of tumor cells does not indicate lack of disease, as fine-needle aspiration can miss small deposits of tumor cells in the lymph node. For example, cytology of regional lymph nodes has a higher sensitivity for carcinomas and round cell tumors as compared with sarcomas, melanomas, and mast cell tumors.2
Histopathology is warranted if metastasis is clinically suspected and cytology is negative for neoplastic cells. Incisional biopsy is indicated when excisional biopsy (ie, lymphadenectomy) is difficult to perform due to lymph node size, fixation, or location (eg, near major blood vessels or nerves). Lymphadenectomy is often the preferred method of determining whether metastatic disease is present in a lymph node. Lymph node excision can also decrease tumor burden in patients with metastatic lymph nodes, potentially improving the efficiency of adjuvant therapies and affecting prognosis.
Deciding which lymph node should be sampled or removed can be challenging, particularly in oral tumors or tumors of the head, because of the variable lymphatic drainage.3 Nonselective lymph node excision can be performed when lymph node mapping techniques (eg, bilateral mandibular lymph node centers, bilateral medial retropharyngeal lymph node centers) are not available. If lymph node mapping techniques (eg, methylene blue, indocyanine green, preoperative radiography/lymphangiography) can be performed, the sentinel lymph node can be identified and excised. Information about other anatomic locations is available in the literature (see Suggested Reading).
General Approach
Lymph node dissection can be performed unilaterally or bilaterally, depending on tumor location and presurgical staging results. An incision should be made in the skin directly over the lymph node (if palpable), and a combination of blunt dissection and electrocautery can be used with the goal of keeping the lymph node capsule intact. Cotton-tip applicators can be used for blunt dissection of small lymph nodes or those located along large blood vessels or delicate anatomic structures. To maintain a grip on the lymph node and aid in dissection, perinodal tissue should be gently grasped using thumb forceps, Allis tissue forceps, or a stay suture through the node (depending on its friability).
Gentle dissection and experience with tissue handling are recommended to avoid fragmentation of the metastatic lymph node and potential seeding of cancer cells to surrounding tissue.
The hilar vasculature can be cauterized or ligated.
Complications
Complications include risk for infection, incision dehiscence, laceration of major vessels, nerve damage, lymphedema, accidental removal of the mandibular salivary glands, and seroma of the surgical site.
Complete understanding of regional anatomy and ability to recognize and remove only the affected lymph nodes while handling tissues gently are essential for minimizing complications. If seroma is suspected postoperatively, a warm compress should be applied for 10 minutes to the site several times daily to minimize swelling, and patient activity should be restricted until the seroma has significantly improved or resolved. Seromas should not be drained, as fluid contamination is possible and there is increased risk for infection.
What You Will Need
Scalpel (#10 blade)
Thumb forceps (DeBakey and Brown-Adson)
Allis tissue forceps
Mosquito forceps
Cotton-tip applicators
Absorbable monofilament suture (4-0 or 3-0)
Nonabsorbable monofilament suture (4-0 or 3-0)
Needle holders
Gelpi retractor
Army–Navy retractor (optional)
Lone Star retractor ring (optional)
Electrocautery (optional)
Step-by-Step: Lymphadenectomy
Head & Neck: Mandibular Retropharyngeal Center Approach (Lateral or Ventral)
Step 1
For unilateral lymph node removal, place the patient in dorsal recumbency for the ventral approach or lateral recumbency for the lateral approach.
For bilateral lymph node removal, place the patient in dorsal recumbency.
Step 2
Shave the neck area from the caudal third of the ventral aspect of the mandible to the thoracic inlet and lateral to the jugular groove.
Step 3
Create landmarks at the angle of the mandible and the salivary gland for the mandibular lymph node center (black arrow) and the medial retropharyngeal lymph node (white arrow), respectively.
Author Insight
Aseptic preparation should be routinely performed. Lymph node locations are indicated by Xs in this image.

Step 4
Use the lateral or ventral approach to remove neck lymph nodes. For the unilateral approach, make a 2- to 3-cm incision over the mandibular lymph node caudoventral to the angle of the mandible and cranial to the mandibular salivary gland.
For bilateral lymphadenectomy, make a midline ventral cervical incision from the base of the larynx and midcervical region (A, solid arrow), and identify the ventral mandibular lymph node via palpation (B, dashed arrow).
Author Insight
The angle of the mandible and the salivary gland should be palpable landmarks. For bilateral lymphadenectomy, the same skin incision is used in the midline ventral cervical approach.4

STEP 4A
Step 5
For the ventral approach, gently dissect the subcutaneous tissue until the ventral mandibular lymph node is encountered, just ventral to the facial vein (A). Place a stay suture (B, arrow) on the mandibular ventral lymph node to aid dissection and manipulation.
Author Insight
Care should be taken to avoid inadvertently lacerating the facial vein, as this node lies craniomedial to the bifurcation of the linguofacial vein.

STEP 5A
Step 6
Dissect the ventral mandibular lymph node free from the surrounding tissue. Once the ventral lymph node has been dissected and potentially excised, palpate the focal area to detect the dorsal mandibular lymph node. In some instances, 2 to 3 lymph nodes may be detected, creating a chain of lymph nodes (arrows).

Author Insight
A chain of lymph nodes can be found in normal dogs. It is necessary to palpate for the laterodorsal lymph node after the first lymph node (ventromedial) is removed.
Head & Neck: Medial Retropharyngeal Center Approach (Lateral)
Step 1
For unilateral lymph node removal, place the affected side up with the patient in lateral recumbency for the lateral approach or dorsal recumbency for the ventral approach.
For bilateral lymph node removal, place the patient in dorsal recumbency.
Step 2
Shave the neck area from the caudal third of the ventral aspect of the mandible to the thoracic inlet and lateral to the jugular groove.
Step 3
Create landmarks for the mandibular lymph node centers (mandibular lymph nodes, circles; angle of the mandible, solid arrows) and the medial retropharyngeal lymph node (mandibular salivary gland, dashed arrow). Continue the dissection dorsally to find the medial retropharyngeal lymph node.
Author Insight
The surgical approach in the image is medial to the mandibular salivary gland. A detailed description of the ventral approach to the medial retropharyngeal center is available in the literature.4

Step 4
Identify the mandibular salivary gland, and make a dorsal 2- to 3-cm incision.
Step 5
Laterally retract the right salivary gland (top retractor) and the trachea (bottom retractor) using 2 Army –Navy retractors. Gently pull retractors apart, and palpate medially to the salivary gland for the carotid pulse.
Author Insight
The wing of the atlas can also be felt dorsally.

Step 6
Use blunt dissection (A) to access the space (B; circle) between the mandibular salivary gland and the carotid sheath (B; arrow).

STEP 6A
Step 7
Identify the cranial aspect of the medial retropharyngeal lymph node within the perinodal fat accumulation between the salivary gland and the carotid sheath (A, arrow) ventral to the wing of the atlas. Use nontraumatic DeBakey forceps to pull the perinodal fat with care to avoid damage to the recurrent laryngeal nerve or the carotid sheath. Apply gentle rostral traction to the lymph node, and remove it from the fat via blunt dissection (B).
Author Insight
To prevent damage to the carotid sheath, trachea, or esophagus, do not extend the dissection medially. The medial retropharynheal lymph node is elongated and extends caudally past the mandibular salivary gland.

STEP 7A
Step 8
Complete the dissection on the caudal pole (arrow) of the lymph node.

Superficial Cervical Approach (Prescapular)
Step 1
Place the patient in dorsal or lateral recumbency. Shave an area over the cranial aspect of the shoulder that extends to the caudal third of the neck (cranially) and to the supraspinatus fossa (caudally). After aseptic preparation, drape the affected side into the surgical field.
Author Insight
If manipulation of the limb is necessary, the affected limb should be shaved and draped into the surgical field. If the patient is in dorsal recumbency to avoid changing positions due to a concurrent surgical procedure on the area, the thoracic limb of the affected side should be extended caudally. If the patient is positioned in lateral recumbency, the limb should be positioned at standing angles. The author prefers lateral recumbency with the affected side up to dissect the lymph node.
Step 2
Palpate the lymph node externally, if possible, just cranial to the supraspinatus muscle and under the omotransversarius muscle.
Step 3
Palpate the supraglenoid tuberosity and the greater tubercle. Make a 2- to 4-cm incision cranial to the shoulder, beginning at the shoulder and extending craniodorsally toward the omotransversarius muscle.
Author Insight
The supraspinatous muscle (solid arrow) and the omotransversarius muscle (dashed arrow) should be visualized.

Step 4
Identify the lymph node just medial to and between the omotransversarius and cleidocephalicus muscles. Once identified (sometimes there are 2 LNs), remove as described above.
Axillary Lymph Node Approach
Step 1
Place the patient in dorsal or lateral (preferred) recumbency. If manipulation of the limb is necessary, drape the affected limb into the surgical field.
Step 2
Shave the area in the axilla that extends from the axillar fold (caudally) to the shoulder (cranially) and to the nipples (medially). Abduct the thoracic limb.
Step 3
Caudal to the descending part of the superficial pectoral muscle at the cleft formed by the transverse aspect of this muscle (A, arrow), make an incision parallel to the thoracic limb and lines of tension (B).

STEP 3A
Step 4
Dissect bluntly through the superficial pectoral muscle along its fibers. Locate the lymph node (arrow) in the fat deposit between the brachial and subscapular blood vessels.

Author Insight
The lymph node is positioned between the teres major muscle (laterally), the rectus thoracis muscle (medially), and the deep pectoral muscle (ventrally).
Step 5
Dissect and excise the lymph node.

Author Insight
Careful dissection is needed to avoid damage to the brachial plexus. An accessory lymph node can be caudal to the main lymph node between adjacent borders of the deep pectoral and latissimus dorsi muscle, caudal to muscles of the brachium; if found, this lymph node should be excised.
Pelvic Limb Approach (Popliteal)
Step 1
Place the patient in dorsal or lateral recumbency with or without the pelvic limb draped into the surgical field. Shave a 5- by 5-cm area. Clip the caudal aspect of the thigh and knee to the middle of the stifle and distal thigh laterally and medially.
Step 2
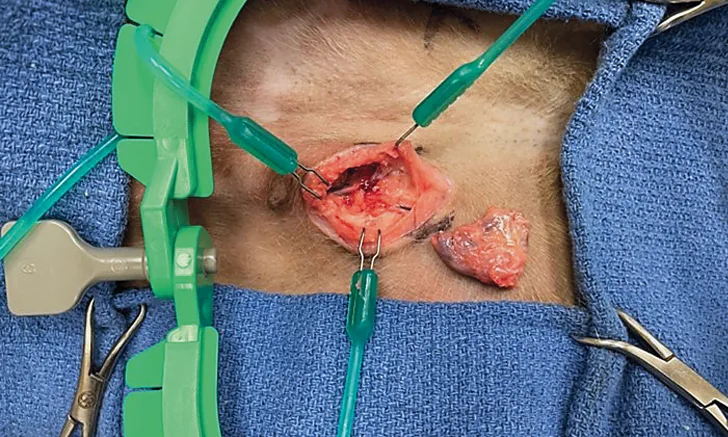
At the caudal aspect of the stifle, identify the space (ie, popliteal fossa) between the hamstring and biceps femoris muscles. Palpate and make an incision (A) over the popliteal lymph node, which is surrounded by fat (B).

STEP 2A
Step 3
Grasp the lymph node gently (A), and bluntly dissect it from the surrounding fat to excise it (B).

STEP 3A
Pelvic Limb Approach (Inguinal)
Step 1
Place the patient in dorsal recumbency with the pelvic limbs abducted. Shave the area that includes the inguinal canal, the last mammary gland, and, in males, the base of the penis.
Step 2
Make an incision caudomedial to the inguinal mammary gland and cranial to the origin of the pectineus.

Step 3
In male and female patients, identify the inguinal lymph node located in the inguinal fat, between the body wall and the medial surface of the thigh (A). Bluntly dissect the lymph node from surrounding tissue (B), and excise it (C).

STEP 3A
Author Insight
In females, inguinal lymph nodes are located deep and caudal to the last mammary gland. In males, inguinal lymph nodes are located between the dorsolateral border of the penis, cranial to the vaginal tunic at the level of the glans bulb. In both males and females, the pudendal external vessels, which are easily observed transcutaneously, are lateral to the single inguinal lymph node or between the multiple cranial and caudal lymph nodes.