How to Properly Apply a Spica Splint
Mirae C. Wood, DVM, University of Missouri
James L. Cook, DVM, PhD, DACVS, DACVSMR, University of Missouri
Although spica splints are used infrequently, they can be a helpful means of external coaptation in patients with selected musculoskeletal abnormalities. Spica splints are most commonly used for temporary immobilization of the shoulder or elbow following open or closed fracture reduction, particularly when surgery is delayed or the patient requires transport before fixation.
Spica splints are rarely used for primary management of humeral fractures because of the availability of more viable treatment options. However, spica splinting may be considered in a young animal with a greenstick fracture of the humerus.
Application
Proper application and management are critical to ensure safe use of the spica splint, so named for the method of attaching the splint to the body by a “spica” or figure-of-8 bandage shape. In dogs and cats, however, the bandage is modified so it is only half of a figure-of-8. During application, the bandage material begins at the digits and continues proximally around the torso. The splint should extend over the scapula (or hip) to the dorsal midline and be secured around the contralateral shoulder or hip. Although the spica splint is most often applied to the thoracic limb, it can be used for reduction of the pelvic limb. However, bandaging the pelvic region can be difficult, especially in male dogs.
Because extensive manipulation is required, the patient should be heavily sedated or under general anesthesia. Additional wounds should be treated appropriately and covered with a dressing before the splint is applied. Although the torso is included in the bandage, tape stirrups should be placed to prevent it from slipping, possibly obscuring assessment of the digits. After the splint has been applied, ambulation may be cumbersome, so appropriate assistance (eg, sling support) should be provided.
Complications & Monitoring
Because spica splints are generally well-padded and used only for a brief period, there is minimal opportunity for complications. Also, because the splint must be secured firmly around the torso, slippage is less common. The patient should still be monitored closely, however, for abrasions or bandage sores in the axillary or inguinal region.
With extended use, joint contracture or loss of range of motion can occur, especially when the spica cast is used for fracture management. During bandage application, care must be taken to avoid compressing the patient’s thorax and compromising respiratory function, especially in patients with preexisting thoracic trauma (eg, pneumothorax, pulmonary contusions).
Step-by-Step: Applying a Spica Splint
What You Will Need
Cast padding
Rolled gauze
Cast material (eg, fiberglass, thermoplastic material) or splint rod
Casting gloves
Bandage tape or self-adhesive stretch tape

Step 1
Place the patient in lateral recumbency with the affected limb uppermost. Wrap adhesive tape stirrups on the medial and lateral aspects of the affected limb, and apply cast padding (4- or 2-inch), beginning at the level of the second and fifth digits. Leave the toenails of digits 3 and 4 exposed for monitoring. Apply the padding tightly, allowing no wrinkles or twists and overlapping the previous layer by 50% with each successive layer.

Step 2
Wrap the padding around the patient’s torso several times, caudal to the contralateral limb and alternating cranially and caudally to the affected limb.

Step 3
Apply rolled gauze in the same manner as the cast padding. To achieve a smooth bandage with uniform tension, apply at least 2 to 3 layers of gauze using even pressure. The gauze compresses and conforms to the cast padding but does not provide sufficient strength to immobilize the joints.

Step 4
Reinforce the bandage with casting material or a splint rod. Conform the material or rod to the bandaged limb from the toes to the dorsal midline. If thermoplastic material is applied, use 4–8 layers, depending on the size of the patient and degree of rigidity required.
Author Insight
Because thermoplastic material (eg, Vet-Lite, runlite.com/vet-lite) can be remolded following application, its use is advantageous in cats and small dogs. In large dogs, multiple layers of thermoplastic material may be required to achieve the necessary rigidity.
To prevent the underlying bandage from becoming wet, place plastic wrap over the gauze before applying the casting material. After the cast material cures, remove the plastic wrap and complete the bandaging process as described.

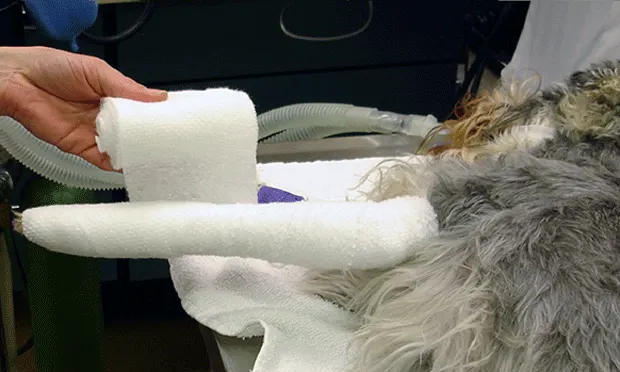
Step 5
Apply another layer of rolled gauze to hold the splint in place (A). Completely cover the bandaging with bandage tape or self-adhesive stretch tape (B). If the splint is constructed properly, the limb and torso are immobilized and move as a single unit.
Author Insight
If the patient goes outdoors, the owner should cover its toes with a protective boot (eg, Medipaw, medivetproducts.com) or an IV fluid bag to prevent the bandage from becoming soiled.

