Step-by-Step Approach to Feline Orthopedic Examination
Wanda J. Gordon-Evans, DVM, PhD, DACVS, DACVSMR, University of Minnesota
Orthopedic disease is common in cats.1-4 The goal of an orthopedic examination is to identify the source of pain and/or lameness; however, this can be difficult in cats.
In dogs, limping is the most common complaint for musculoskeletal disease, and it is easy to ascertain that an orthopedic examination is needed. In cats, the most common presenting complaints for musculoskeletal disease are changes in attitude (eg, being fractious or less playful), poor grooming, urination or defecation outside of the litter box, or the pet owner’s sense of undiagnosed illness in the cat; musculoskeletal disease may also affect mobility and flexibility, contributing to these signs.2,5-7 Inability to induce cats to consistently walk as desired and difficulty differentiating pain from fear or anxiety-related behaviors can also be challenging. Despite these challenges, orthopedic examination is important for diagnosis and establishment of a treatment plan.
Some cats may require sedation or behavior-modifying drugs prior to presentation; anesthesia may be required for staff safety in extreme cases. Although commonly used medications (eg, gabapentin) might not impact examination except in subtle cases, significant sedation or anesthesia may be required if the patient has signs of pain (eg, arousal, increased heart and/or respiratory rate, elevated blood pressure, focal muscle tremors). Examination may also need to rely more heavily on observation of swelling and palpation of abnormalities.
Initially, it is important to observe posture, stance, and ambulation.2 Most cats are not trained to walk on a leash, so the patient may need to be coaxed to walk. Observation of other behaviors may also help localize the problem. For example, cats with hip or back pain may be less willing to jump up on a chair or may attempt to jump and miss, or cats may stand on their pelvic limbs but keep their hips flexed and fully extend their hocks.
During examination, musculature should be palpated for symmetry.2 Muscle atrophy, masses, and/or swelling can provide direction to a specific limb (especially if observation of ambulation was not successful).Cats that tolerate examination can have unaffected limbs examined first, allowing observation of normal reactivity; this can help in detection of subtle reactions attributable to pain.7 However, most cats only tolerate examination for a short period of time, so beginning with the unaffected limbs may not be prudent in all cases.
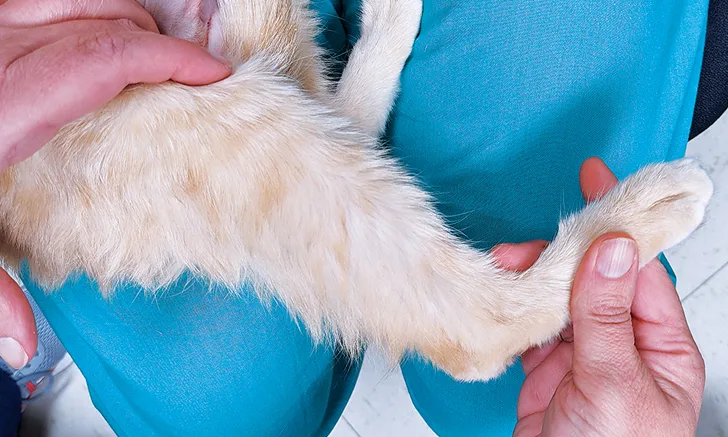
It is important to start at the distal aspect of the limbs and work proximally. Constant contact should be used, starting from the torso to the digits, as this can be less aversive than just reaching for the digits. Cats are less stressed and may be more cooperative when in a comfortable location or position (eg, reclining, standing, being held by the owner). Cats that fold the limbs under the body can have the chest or pelvis supported while the thoracic or pelvic limbs, respectively, are examined (Figure 1).

Cat with elbow flexion. The chest is supported, the elbow is flexed, and the shoulder is maintained in a neutral position.
When examining a joint, spreading pressure over a wide area with multiple fingers or a palm can decrease the effect of pressure on bones and soft tissues, isolating the joint as the potential source of pain. Otherwise, very focal pressure may cause pain at the gripping point, which can confound assessment of joint pain. Normal range of motion and locations for palpating swelling are presented in the Table.
Table: Normal Landmarks for Effusion & Range of Motion
Assessment of the Shoulder, Hip, & Lumbar Region
Shoulders and hips cannot be palpated for effusion because of muscle coverage, and difficulty with isolation can make assessment challenging. For example, when the hips and shoulders are extended, the stifle and elbow are also extended, respectively, and the hips or shoulders are no longer isolated (Figure 2). This may make pain isolation especially difficult in the pelvic limbs when assessing for hip dysplasia, as the hips may not be the only source of pain.8 As the hips are extended, the lumbosacral aspect of the back is also extended, and a pain response may be solely or partially attributed to osteoarthritis in the lumbar spine.

Cat with hip extension. Simultaneous extension of the hock and stifle can be seen.
Back and hip pain can be differentiated using a combination of multiple aspects. For example, cats with lumbar pain typically do not have pain on flexion or abduction of the hip but do have pain on direct palpation of the back or extension of the pelvis with the hips in neutral or flexed position. Conversely, pain attributed to the hip may be present when the hip is abducted, but this movement will not impact other joints or the back. Similarly, in the forelimb, if the scapula is fixed in position, the humerus can be abducted to an ≈45-degree angle. This movement does not affect the distal joints, unlike extension of the shoulder. The abduction angle should be symmetrical with the opposite side, and excessive abduction may indicate collateral ligament damage.
Instability
Separate evaluation for instability should be performed in cats with swelling, history indications (eg, specific trauma), or unremarkable physical examination. Medial and lateral stress should be used to test instability of the collateral ligaments, except in the hip where collateral ligaments are not present. Palpating the unaffected side can be helpful in distinguishing normal from abnormal movement. The joint angle should be held constant while palpating for collateral ligament instability. Allowing flexion or extension while palpating for varus and valgus instability can make detection of abnormalities difficult; this is easiest in a neutral joint angle. However, the hock may be tested separately in both flexion and extension to determine which ligament is more specifically affected and to ascertain subtle abnormalities. The talofibular ligament is the primary stabilizer in flexion, but the long and short collateral ligaments stabilize extension. Dorsal or palmar/plantar ligament abnormalities can also be detected by stabilizing the tibia or radius and placing pressure on the metacarpals or metatarsals both cranially and caudally.
Cruciate & Patellar Disease
Although cats are not predisposed to cranial cruciate ligament rupture or patellar luxation, occasional prevalence necessitates careful evaluation. A cranial cruciate ligament rupture can be detected using the tibial compression test or the cranial drawer test. Presence of patellar luxation can be detected by applying gentle pressure medially and laterally to determine whether the patella luxates during range of motion; this is easiest in stifle extension and can be performed in flexion in some instances. Cats generally have more patellar movement medially and laterally than dogs; however, the patella rebounds to the correct position when not being held.
Tibial compression test is positive if the tibial tuberosity moves forward in relation to the femoral condyles when the hock is flexed. The cranial drawer test can be used to determine cranial cruciate ligament rupture (ie, cranial drawer) or caudal cruciate ligament rupture (ie, caudal drawer). To determine whether reactions were coincidental (ie, attributable to restraint) or attributable to pain, these procedures may need to be repeated, depending on the severity of pain and clinical confidence in the results.
Step-by-Step: Feline Orthopedic Examination
Step 1
Coax the cat to walk around the examination room. Observe the cat’s locomotion and posture to evaluate for the presence of limping, abnormal gait, weight shifting, mechanical abnormalities (eg, dropped hocks), and/or neurologic disease (eg, lameness, weakness, ataxia). Observe for other clinical behaviors that may assist in lesion localization.

Author Insight
The cat can be filmed at home or in the examination room to help in evaluation of locomotion. Viewing the film in slow motion can help in detection of important nuances in movement that might be overlooked when viewed at normal speed.
Step 2
Palpate the musculature for symmetry, and look for muscle atrophy, masses, and/or swelling that can provide direction to a specific limb. If the cat is tolerating the examination well, examine the unaffected limbs first and observe subsequent behaviors.
Step 3
Start at the distal aspect of the limbs and work proximally. Begin with the digits, and inspect the nails (use gentle dorsal pressure on the digit to extend the nail) and the interdigital skin for injury, swelling, draining tracts, or redness. Flex and extend only the digits while isolating the joints distal to the metacarpophalangeal or metatarsophalangeal joints. If the cat resists, vocalizes, demonstrates aggression, or attempts escape with flexion of all the digits, then isolate, flex, and extend each individual digit in turn.

Step 4
As the examination proceeds proximally, palpate the bones, soft tissues, and joints for pain, swelling, or instability. Press on the distal bone and soft tissue using broad pressure to flex and extend the joints while ensuring the other joints are at a neutral angle.


Author Insight
Palpating the soft tissue and bone prior to assessing joint range of motion can help differentiate the source of the pain (eg, bone vs joint).
Step 5
To isolate the lumbar spine for pain evaluation, with the cat in lateral recumbency, palpate the small divot palpable on the dorsal midline caudal to the L7 dorsal spinous process between the ilial wings or the lumbosacral area (A), and press the feet proximally to flex the hips and extend the lumbar spine (B).


Step 6
If a special examination for instability is indicated, use medial and lateral stress to test instability of the joint’s collateral ligaments for all joints distal to the shoulder or hip. When examining the hindlimb, place the hands proximal and distal to the hock. Stress the medial collateral ligament by introducing pressure up (solid arrows), and stress the lateral collateral ligament by introducing pressure down (dashed arrows). Do not allow the patient to move while in flexion or extension and while the collateral ligaments are being stressed.

Step 7
For suspected cranial cruciate ligament rupture, conduct a tibial compression test or a cranial drawer test. During the tibial compression test, prevent the stifle from flexing as the hock is flexed (A). Rest the index finger on the tibial tuberosity to palpate for cranial movement. Perform the cranial drawer test by placing the thumb of the proximal hand on the lateral fabella and the index finger on the patella (B), then place the thumb of the distal hand on the fibular head and the index finger on the tibial tuberosity, and hold the femur in place while moving the tibia cranially or caudally.


Editor's note: This article was originally published in April 2021 as "Feline Orthopedic Examination."