Fundic Examination
Brett D. Story, DVM, University of Florida
Caryn Plummer, DVM, DACVO, University of Florida
A fundic examination is an important component of a thorough ophthalmologic examination and a complete physical examination. Fundoscopy may seem warranted only when a patient is presented with vision loss; however, the results of a fundic examination can be helpful when determining differential diagnoses and prognosticating. For example, patients presented for potential infectious, immune-mediated, vascular, neoplastic, nutritional, or metabolic disease may exhibit ocular manifestations of systemic disease. Proper examination of the fundus is not an inherently easy skill but, once mastered with practice and patience, is an invaluable tool.
The examination should be performed in a dimly lit, quiet room with an assistant stabilizing the patient’s head near the eye level of the examiner.1,2 The patient should be in a seated position with minimal restraint. To achieve full view of the fundus, pharmacologic dilation of the pupil is necessary; otherwise, visualization of the peripheral fundus is impossible and lesions may be overlooked. The short-acting anticholinergic tropicamide (1%) is the preferred mydriatic agent for diagnostic purposes. One application typically results in mydriasis within 15 to 20 minutes that lasts 3 to 8 hours, depending on the degree of iris pigmentation.3 Examination of the anterior segment should precede administration of mydriatic drugs, which can confound the results of other diagnostic tests or exacerbate lens luxation and intraocular pressure elevation.4-6
Two main techniques are used to evaluate the fundus: indirect and direct ophthalmoscopy. The most thorough examination is achieved via a survey view of the fundus with indirect ophthalmoscopy followed by examination of an identified lesion with the higher magnification used in direct ophthalmoscopy.
Indirect Ophthalmoscopy
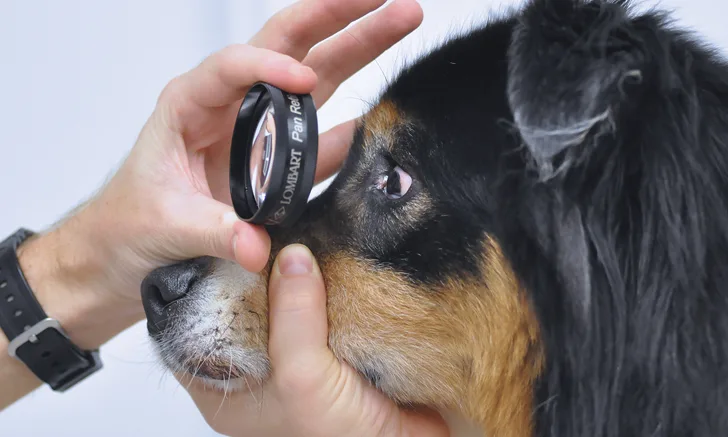
Indirect ophthalmoscopy can be performed via monocular or binocular examination, the latter of which requires a head-mounted light source and permits a greater degree of stereopsis (ie, depth perception). Both methods require a handheld condensing lens to form a magnified image of the patient’s eye. The following discussion describes use of monocular indirect ophthalmoscopy using a Finoff transilluminator as a bright light source. This method provides a more thorough examination of the fundus as compared with direct techniques and is more readily available than binocular examination. When performing indirect ophthalmoscopy, the examiner’s head, the light source, and the condensing lens should act as a unit, pivoting together on an axis (Figures 1 and 2); alignment is of utmost importance. Indirect ophthalmoscopy produces a reversed and inverted (ie, upside down and backward) image and allows a larger, panoramic field of view as compared with direct techniques (Figure 3).2 Magnification is inversely proportional to the diopter strength (ie, focal length) of the convex lens used. A lower diopter strength results in greater magnification with a smaller field of view, whereas a higher diopter strength results in lower magnification but a larger field of view.2 Lenses between 20 diopter (D) and 30D are most commonly used for examining dogs and cats, although lenses can have a wider range (up to 40D). Additional advantages of indirect ophthalmoscopy include a safer working distance from the patient and increased ability to view the fundus through opacities in ocular media.

FIGURE 1A
Correct (A) and incorrect (B and C) techniques for monocular indirect ophthalmoscopy. The examiner’s hand should be stabilized on the patient and the lens held 2 to 4 cm away from and perpendicular to the axis of the pupil. In the images demonstrating incorrect technique, the axis of the lens is not perpendicular in alignment to the patient’s eye and is less than 2 cm in distance (B), and the examiner’s hand is floating and distanced from the patient's eye (C).
Most dogs and cats have a tapetum lucidum, the brightly colored reflective structure located in the choroid that gives the fundus its “eyeshine.” Patients that do not possess a tapetum—usually those with lightly colored or blue eyes—have a red fundic reflection that originates from illumination of the choroidal vasculature. This should not be confused with posterior segment hemorrhage.
Direct Ophthalmoscopy
Direct ophthalmoscopy provides a direct, upright image of the patient’s fundus. The image seen by the examiner is noninverted and magnified 15 to 17 times.1 However, the field of view is much more restricted as compared with indirect techniques due to the higher magnification. Direct ophthalmoscopy enables description and characterization of focal fundic lesions and close examination of the optic disc. Patience is required to complete a thorough examination because a much larger series of vignettes must be acquired to piece together the entire fundus. In addition, visualization of peripheral fundic lesions with direct ophthalmoscopy is practically impossible, particularly if the eyes are not dilated.
A direct ophthalmoscope has many adjustable settings. The rheostat allows the light intensity to be controlled and should be kept low to ensure patient comfort and an accurate view for the examiner. If the pupil cannot be dilated, the patient should be examined in a darkened room and the rheostat adjusted to minimize pupillary constriction. An aperture dial and filter switch on the patient side of the ophthalmoscope allow adjustment of the size, shape, and color of the light beam. The smaller apertures should be used for nondilated eyes and the larger apertures for dilated eyes. The specific filters and apertures vary by instrument, but most include a slit beam for evaluating fundic elevations and depressions, graticule grid for size estimation, cobalt blue light for corneal fluorescein dye excitation, and red-free light for differentiation of hemorrhage (appears black) and pigment (appears brown). A series of concave and convex lenses located on the rotating diopter dial allow both depth adjustment and focus to bring structures at different levels into view (Figure 4). A direct ophthalmoscope may also be used to evaluate the anterior segment of the eye with magnification. The dial must be changed to the positive diopter settings to view the anterior segments (Figure 5). If the examiner’s vision is not emmetropic (ie, ideal vision without focusing deviations or visual defects), the initial dial setting at which the normal fundus is in focus will not be 0. Each subsequent setting must be interpreted in the light of the initial setting.

A direct ophthalmoscope (patient side). Rotating focusing lenses (A), red-free filter (B), large circle aperture (C), light aperture size (D), and slit aperture

Cross-section of the eye. A direct ophthalmoscope can be used to view the structures of the anterior segment with magnification. To bring the anterior segment into focus, the lens wheel should be rotated through the positive (green or black) diopters. With the direct ophthalmoscope placed 2 cm from the cornea, the following structures are usually in focus at the corresponding diopters: cornea +15 to +20; anterior chamber +12 to +20; iris and pupil +12; lens +8 to +12; and vitreous 0 to +10.
Advantages of direct ophthalmoscopy include close evaluation of fundic lesions, accessory features, and lower equipment cost as compared with indirect ophthalmoscopy. Disadvantages include the lack of stereopsis, small field of view, proximity of the examiner’s face to the patient, limited evaluation of the peripheral fundus, and impaired visualization of the fundus through opaque anterior ocular structures (eg, corneal edema, nuclear sclerosis).
What You Will Need
Dilating agent (eg, 1% tropicamide ophthalmic solution)
Focal light source (eg, Finoff transilluminator, high-quality pen light)
Indirect condensing lens (between +40D and +20D)
Direct ophthalmoscope

Step-by-Step: Fundic Examination: Indirect Ophthalmoscopy
Step 1
While sitting or standing an arm’s length away from the patient and holding the light source next to the dominant eye so that the examiner’s head and light source move as a single unit, use the opposite hand to hold and position the lens. Hold the lens between the forefinger and thumb with the flatter surface toward the patient and more convex surface toward the examiner. Position the light beam—keeping light intensity low to avoid obscuring details or disturbing the patient—until a bright reflection from the patient’s fundus is observed.

Author Insights
Lenses may have one etched silver rim indicating the side to be directed toward the patient.
To facilitate examination, the examiner may rest the little finger on the patient’s forehead with the condensing lens held above, ready to drop into place once the reflection has been identified.
Movement of the patient’s eye will frequently result in loss of the fundic image. The quickest way to regain alignment is to step back, find the tapetal reflection, and move close.
Step 2
Locate the tapetal reflection, then place the lens 2 to 4 cm from the corneal surface and perpendicular to (ie, in the path of) the light beam while keeping the remaining fingers in contact with the patient’s head.

Step 3
Hold the condensing lens parallel to the iris with the lens axis in alignment with the pupil axis to maintain a stable fundic image. Ensure the examiner’s head, light source, and condensing lens act as a unit, pivoting together on an axis. If the view of the fundus is lost, remove the indirect lens, re-establish visualization of the tapetal reflection, and replace the lens in front of the eye.

Step 4
Move around, being sure to maintain a constant tapetal reflection, to observe the entire fundus, especially the periphery, and to follow the patient’s eye.

Clinical Skills You’ll Want to Keep
Get this guide in a free downloadable resource, along with guides to 5 more cornerstone skills you'll want to have in your back pocket. From choosing the correct fluid type to performing a neurological examination, Practical Guidance for New Veterinarians is your key to starting practice with confidence.
Step-by-Step: Fundic Examination: Direct Ophthalmoscopy
Step 1
Turn on the ophthalmoscope and set the light to the correct aperture based on whether the eyes are dilated. Rest the brow on the brow rest.

Step 2
While holding the ophthalmoscope in the dominant hand and using the opposite hand to stabilize the patient’s head and keep the eyelids open, use the right eye to look through the instrument and examine the patient’s right eye. Repeat using the left eye to examine to the patient’s left eye.


Step 3
Locate the patient’s fundic/tapetal reflection from approximately an arm’s length distance, then move 2 to 4 cm from the patient’s eye to widen the field of view. Adjust the lens settings so the fundus is in focus.


Author Insight
If the examiner has ≈20/20 corrected vision, the fundus of most dogs and cats will be in focus at the 0D setting. Deviations may indicate pathology; recessed lesions will be in focus at negative diopter settings, whereas forwardly displaced structures will be in focus at positive diopter settings.
Step 4
Identify the optic nerve, then thoroughly examine the remainder of the fundus in quadrants.