Collection & Submission of Surgical Biopsies
Scott P. Terrell, DVM, Diplomate ACVP, Walt Disney World Animal Programs, Orlando, Florida
Overview
Surgical biopsy is used in a wide variety of clinical case evaluations. Collection and submission of surgical biopsies have become such a routine part of clinical practice that techniques that could improve the diagnostic yield are sometimes forgotten or ignored. This article provides basic guidelines to ensure your specimen reaches the pathologist in good condition and with the information necessary to provide you and your client with the most accurate evaluation possible.
Step-by-Step: How to Collect and Mark Tissues
Collecting Tissues
The surgeon should be considering pathologic evaluation of a tissue even before making the initial incision. For tissues that require evaluation of surgical margins, specimens with regular shapes and margins are easiest for the pathologist to evaluate. Elliptical, oval, and round tissue resections are best when possible. Avoid making extraneous incisions into the tissue to be evaluated unless they are specifically needed for fixation, as they may lead to distortion of the tissue.
Marking Tissues
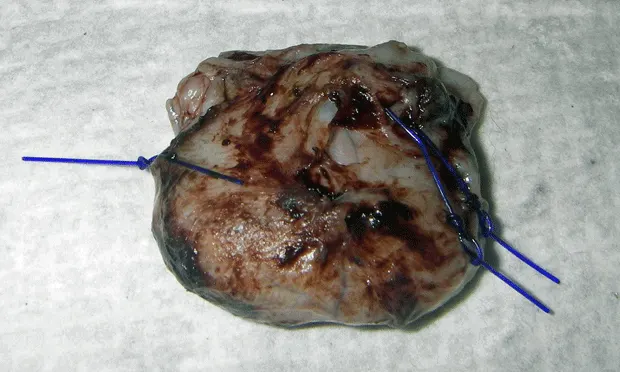
If submitting multiple skin biopsies or masses, identify each site by marking or by submission in its own individual container. Mark surgical margins and areas of concern and specifically identify them for the pathologist. The two most common marking agents are suture material and surgical dyes. Place a piece of suture or a specific color dye on the area of concern or multiple sutures or dye colors to delineate specific margins. One of my clients uses one suture knot to represent the proximal margin and two suture knots to represent distal margins on masses removed from limbs (Figure 1). Use a similar technique to differentiate left versus right or cranial versus caudal margins. Use additional knots or differing colors of suture to identify other areas of interest. If the tissues are unusually shaped or if small "fingers" of tumor tissue extend toward a certain margin, the clinician should communicate specific areas of interest to the pathologist through placement of sutures or tissue dyes.

Fixing Tissues
Neutral buffered formalin (10%) is best for tissue fixation. Nonbuffered formalin creates tissue artifacts that can hinder interpretation. The traditional rule for tissue fixation has always been to fix tissues in a 10:1 formalin:tissue ratio. Tissue fixation generally requires 24 to 48 hours depending on the size of the tissue. A good rule is that formalin fixes tissue at a rate of 1 mm/hr. Calculations should be made based on the thickest area. A 3 cm mass should take about 30 hr to fix (3 cm × 10 mm × 1 hr = 30 hr). In my experience, it is unnecessary to slice or "bread-loaf" tissues to allow fixation unless you are dealing with large solid masses greater than 4 cm in diameter (Figure 2). For larger tissues, a single incision in the center of the tissue allows fixation and retains tissue architecture for the pathologist.

Procedure Pearl
After allowing 24 to 48 hours for tissue fixation, wrap tissues in formalin-soaked gauze and pour off all excess formalin. This will prevent shipping of large amounts of formalin unnecessarily and the excess formalin can be reused. The gauze will keep tissues damp and preserved for shipment in a small container.
Submitting Forms & Information
The submission request is often the only communication between the clinician asking for an evaluation and the pathologist. Carefully fill out the submission form as completely as possible. Contrary to some beliefs, a clinical history is a vital part of an accurate histopathologic interpretation. Be sure to include the age, sex, and breed of the patient. The most important pieces of historical information for the pathologist in tumor cases are the location, size, and duration of the tumor. Describe specifically where the lesion was on the body. Avoid comparing the size of a sample to food or other items; use a ruler to measure lesions. Describe how long the lesion or mass has been present or how rapidly it has been progressing, if that information is known. A list of rule-outs from your clinical workup may aid the pathologist in addressing specific diagnoses from your differential diagnosis list. Digital photographs or simple line drawings may accompany the submission form to identify areas of concern, explain tissue markings, or describe the location of the tissue on the patient.
Procedure Pearl
The submission request should be placed in a sealed plastic bag separate from the diagnostic specimen container. This prevents damage to the form if small amounts of formalin leak from the specimen container into the shipping package.
Shipping Tissues
Practitioners should be aware that in 2003, the Department of Transportation issued new rules regarding shipment of diagnostic specimens (see Aids & Resources). Fines for violating these rules range from $250 to $27,500. In general, for formalin-fixed specimens shipped by air (which may include U.S. Postal service, FedEx, UPS, and other commercial shipping companies), the following packaging requirements must be followed:1. The primary specimen container must be leak proof and less than 500 ml in volume. The cap or lid of a leak proof container should be wrapped in Parafilm (Parafilm "M"-American National Can) or other similar sealant material to prevent leakage.2. The primary specimen container should be surrounded by an absorbent material (ie, wadded paper or paper towels).3. The primary container and absorbent material should be placed in a leak proof secondary package (ie, sealable plastic bag).4. The primary container, absorbent material, and secondary container should be shipped in sturdy outer packaging (ie, corrugated cardboard box reinforced with tape).5. The outer packing must be clearly labeled "diagnostic specimen." Figure 3 shows all the components needed for proper and legal shipment, including a leak proof container (sealed with Parafilm in this figure), absorbent material (paper towels), and secondary containment (a sealable plastic bag).

Procedure Pearl
Avoid using narrow-mouthed pill bottles or glass bottles for large specimens. Tissues will stiffen during fixation requiring that bottles be cut or broken by the pathologist to retrieve tissues. This is dangerous for the pathologist or technician and can create artifacts in the tissue that might distort margins or areas of interest.

Communication
All too often the pathology submission form and the pathology report are the only communication between the pathologist and the clinician/client. This system may work well in routine cases, but more challenging cases may require additional communication. Even for routine cases, practitioners should closely read the report to ensure that appropriate tissues or tissue margins were evaluated. In a busy pathology practice, dozens or hundreds of biopsy samples may be processed daily and there are opportunities for rare mix-ups.
Procedure Pearl
Try to develop a relationship with a specific pathologist or subgroup of pathologists at your diagnostic laboratory. Over time, you will develop a comfort level for how they interpret cases and it will be easier to discuss unusual or difficult cases with them.
Resist the urge to jump directly to the diagnosis and comment sections of the report. Read the transcribed history that was reported and make sure it was appropriate for the submission. Check the gross description of the tissue submitted to ensure that what the pathologist was interpreting matches what was submitted.
Although most practitioners do not find value in the jargon of the histopathology description, important information may be gleaned from that portion of the report. The description may provide prognostic information (such as mitotic index or presence of vascular invasion), information regarding the severity of disease, or information about the presence or absence of infectious agents. For tumor cases, read the description to ensure that surgical margins were evaluated.
If there are any questions, do not hesitate to call or email your pathologist to discuss the case. Pathologists may provide a unique angle on a case due to their differing experiences.
Processing of Mass Lesions for Margin Evaluation
Most pathologists evaluate 5 surgical margins in a routine mass evaluation (4 lateral margins and the deep margin). Surgical margins are evaluated by making 1 long and 2 shorter sections in the tissue (Figure A). The cuts shown here were made by the pathologist after the sample was submitted. These cuts should not be made by the submitting clinician.•
A longer cross section (Figure B) through the tissue provides visualization of 2 lateral margins (arrowheads) and the deep margin (arrow).
The sections perpendicular to the initial cross section (Figure C) provide access to the two remaining lateral margins (arrowheads) and more of the deep margin (arrows).


