Closed Hip Reduction
Laura E. Peycke, DVM, MS, DACVS, Texas A&M University
Coxofemoral luxation is the most frequently encountered luxation in veterinary medicine. Traumatic coxofemoral luxations cause disruption of the joint’s supportive structures, resulting in damage to soft tissues (such as the round ligament, joint capsule and surrounding musculature) and articular surfaces.
Reducing the hip as quickly as possible:
Minimizes damage to the articular surfaces
Restores nutrition to the cartilage
Decreases formation of muscular contraction and fibrosis
Decreases accumulation of debris within the acetabulum.
Diagnosis
Luxations of the femoral head in a cranial and dorsal direction are most frequently seen, with a characteristically shortened affected limb and a non–weight-bearing lameness in which the hind limb is externally rotated and adducted (Figure 1).

Typical stance of a dog with craniodorsal hip luxation
A physical examination (reflecting loss of the spatial “triangle” between the crest of the ilum, tuber ischii, and greater trochanter) will confirm the diagnosis. Orthogonal radiographs should be performed to evaluate the extent of the injury and provide a baseline for therapeutic decisions.
Indications
Closed reduction should be attempted immediately in the absence of:
Fractures of the acetabulum, including avulsion of the fovea capitis
Femoral head and neck fractures
Advanced degenerative disease secondary to hip dysplasia.
Step-by-Step: Closed Hip Reduction
What You Will Need
One or 2 volunteers
Scissors
Clippers
Sedation and general anesthesia (consider epidural analgesia)
Rope, towel, or sheet
Elastikon (jnj.com)
Cast padding
Telfa or Tendersorb (tycohealthcare.co.uk)
Step 1
The animal should be anesthetized and placed in lateral recumbancy with the affected limb elevated. A rope or towel is placed in the inguinal area and gently pulled dorsally. To provide countertraction, the distal portion of the limb is grasped and gently pulled in the opposite direction. The distraction allows the contracted tissues to stretch and may need to be maintained for some period of time to allow the femoral head to align with the acetabulum.

Step 2
With one hand positioned on the greater trochanter and the other hand positioned distally on the stifle or hock, reduction of the coxofemoral joint can be achieved by externally rotating the limb, during which firm and consistent distraction is applied. Once the femoral head is in the area of the acetabulum, the limb is internally rotated, with the hand on the greater trochanter, pushing caudally and slightly abducted. Firm pressure should be applied to the greater trochanter, as this motion will allow the femoral head to gently “toggle” over the cranial lip of the acetabulum and resume its normal position. It is important to maintain distraction of the limb during this manipulation.

Step 3
Once hip reduction is suspected, firm pressure should be applied to the greater trochanter while vigorous range of motion of the hip is performed. This action assists in the displacement of soft tissues and reduces hematoma formation in the actabulum. Hip reduction is best assessed by:
Palpation of landmarks (ilial crest, tuber ischii, greater trochanter)
Measurement of the width of the space between the greater trochanter and tuber ischii
Restoration of limb length.
Comparison to the contralateral side may offer an additional guideline.

Step 4
Once hip reduction is obtained, the joint is moved through full range of motion (especially extension and external rotation) to assess stability. Clipping the limb can occur earlier in the reduction process (if desired), but in any case, promotes better efficacy and care of the Ehmer sling.

Step 5
Multiple strips of Elastikon are cut at this point. These strips should be long enough for application from the metatarsals (including a stirrup) to the dorsum while the limb is in a flexed position.
Step 6
Application of the Ehmer sling begins by placing layers of cast padding around the metatarsals; then adding multiple strips of Elastikon, starting as a stirrup distally and ending proximally across the dorsum. The limb should be firmly flexed and pressure maintained on the greater trochanter, since the limb is abducted during sling placement.

Care should be exercised to position the Elastikon as “deeply” into the inguinal area as possible. While placing these strips, an assistant can help by distally stretching the skin over the stifle. Once the strip is secure, the skin is released and allowed to “spring” back to its normal position, effectively allowing the strips to sit tightly in the inguinal area.
Step 7
Stirrup formation begins distally with the Elastikon strip engaging the medial portion of the thigh through the inguinal area and onto the back. A space equal to the size of the index finger should be allowed.
Author Insight
In the case of luxations of greater duration (2 to 5 days), overcoming contraction and fibrosis of soft tissues is critical. Distraction of the limb, using a rope or sheet wrapped in the inguinal area, and countertraction of the limb should be done prior to attempts at hip reduction.


Step 8
Repeat the process of strip placement until the flexed position is stable (typically 3–5 Elastikon strips). As the Elastikon strips are added distally, they should be distributed along the length of the metatarsals. This helps with distribution of pressure along the limb and decreases the chances of constriction and swelling in the distal extremity.


Step 9
To reinforce the Ehmer sling and encourage maintenance of reduction with external rotation of the hock, apply Elastikon strips, beginning at the metatarsal, around the dorsum and abdomen, and ending on the back in a belly-band fashion.

Step 10
Once adequate reinforcement has been applied to the Ehmer sling, orthogonal view radiographs should be taken to confirm that the hip is being maintained in reduction. The finished product may appear overwhelming; however, proper support is required to ensure that the limb is secured in a flexed and slightly externally rotated position.


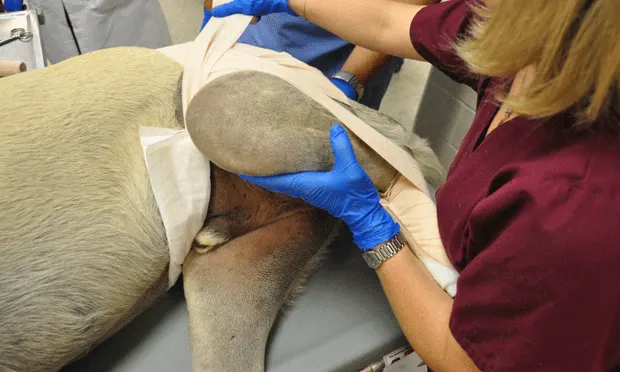
In male dogs, to protect the skin from excoriation and to deter urine saturation of the bandage, a nonstick bandage (Telfa or Tendersorb) may be placed between the bandage and skin lateral to the prepuce.

Pay attention to any swelling in the paw and metatarsal area. Massage of the paw stimulates venous return and alleviates minor swelling; additionally, release cuts performed in the metatarsal portion of the bandage may also help reduce swelling.
Step 11
In the case of ventral luxations, the femoral head can often be manipulated back into the acetabulum by applying lateral and cranial pressure on the greater trochanter with one hand and traction against the ischium with the other hand. If the reduction proves to be stable, hobbling the rear legs together for a period of 10 days should allow sufficient time for soft tissues to begin to fibrose and heal.
Post Procedure Period
Reports of closed hip reduction indicate success in approximately 50% of cases. Though reduction maintenance in hip luxations can be difficult, close monitoring of the bandage every 3 to 4 days is critical for fibrosis and hip stabilization to occur. At this time, the hip can be checked to ensure that reduction is being maintained.
There are various recommendations for bandage placement duration; however, the minimum amount of time for Ehmer sling placement is 14 days, if the sling is being tolerated. Upon removal of the Ehmer sling, orthogonal view radiographs should be taken. Kennel confinement is recommended for a period of at least 4 to 6 weeks.
Complications
Potential complications with the bandage include:
Skin excoriation and dermatitis
Bandage slippage
Faulty placement or adherence of the bandage that may cause failure to fully support the limb, resulting in ischemic necrosis of the distal limb.