Anal Sacculectomy
Despite being relatively straightforward, closed and open anal sacculectomy can cause significant anxiety; complications are uncommon when the procedure is performed by an experienced surgeon.1
Anatomy
The anal sacs, located between 4 o’clock and 5 o’clock and between 7 o’clock and 8 o’clock in relation to the anus, are situated between and closely attached to fibers of the external and internal anal sphincter muscles.2 The anal sac duct openings are located millimeters from the mucocutaneous junction of the anus.2
These attachments may be challenging to dissect and must be carefully severed without rupturing the gland or leaving a remnant. Other regional anatomical structures include the pudendal nerve and caudal rectal artery branches, located craniomedial or deep to the anal sac. Indiscriminate or aggressive dissection can damage these structures, resulting in excessive hemorrhage and fecal incontinence.2
Indications
Anal sacculectomy is indicated when uncontrollable presentations (eg, chronic infection, neoplasia) are directly caused by the anal sacs; it may also be requested by owners for pets with chronic impaction or inappropriate anal sac expression.
Presurgical Considerations
Anal sacculectomy should not be performed if the anal sac has ruptured or edema and inflammation are present; localized therapy is preferred until the wound has healed and inflammation resolved.
Localized therapy can include expression of infected contents from the anal sac, flushing with saline, and infusion of a combined antimicrobial–antiinflammatory, as well as aggressive lavage with debridement of necrotic tissue and administration of systemic antimicrobials.
Attempting the surgical procedure before localized therapy can dramatically increase the risk for complications, as the anatomy will be distorted and difficult to identify.
Anesthesia can be supplemented by administration of an epidural agent.3 The author prefers the combination of morphine and lidocaine; this allows for a lower dose of general anesthesia, while the shorter action of lidocaine compared with bupivacaine allows for shorter anesthetic recovery (see Table 1).
Table 1: Anesthetic Options
*Many clinicians prefer preservative-free morphine for epidural injection. Preservative agents in injectable drugs may cause inflammatory changes and adverse effects. Most commonly used epidural medications can be obtained as preservative-free to reduce these potential adverse effects.
Surgical Preparation
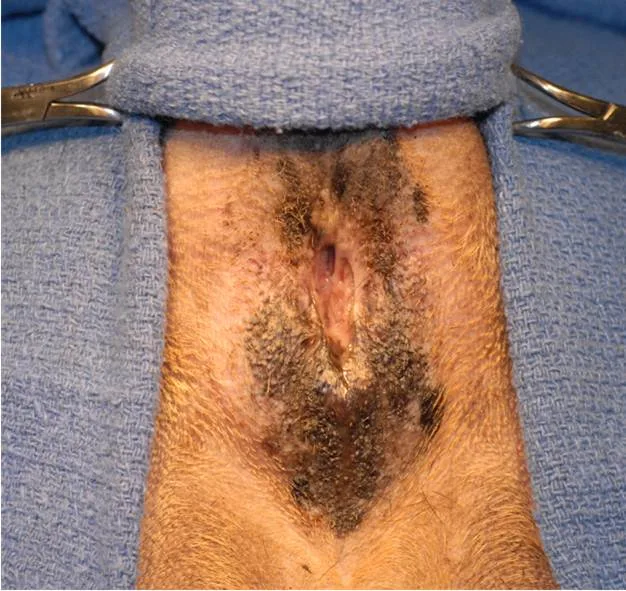
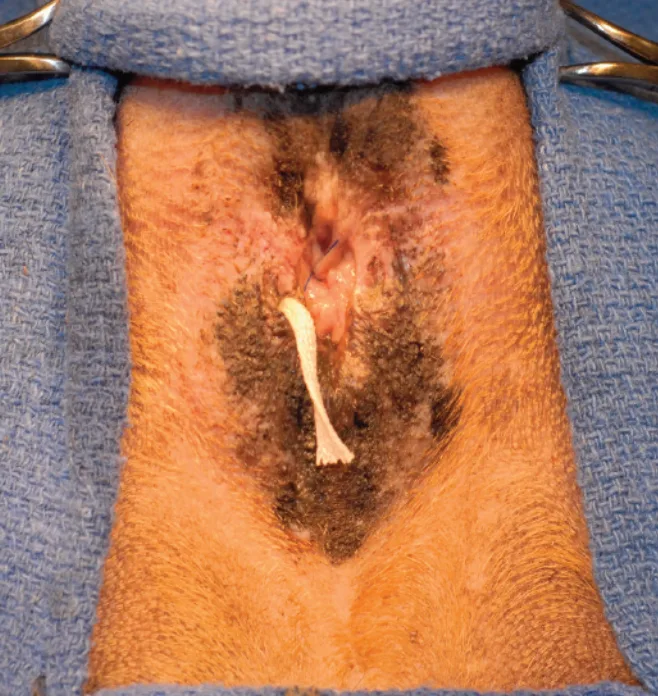
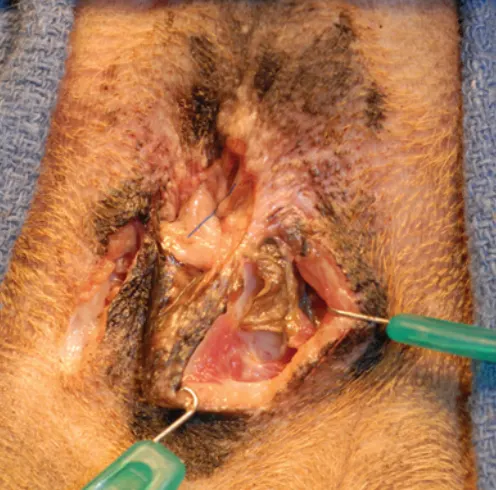
For both closed and open sacculectomy, the patient’s perineum should be clipped, prepared, and draped (Figure 1). To decrease risk for contamination, the anal sacs should be thoroughly lavaged and emptied to remove residual secretions.
The duct openings of the anal sacs (arrows) should be identified by using a probe, small (mosquito) hemostat, or catheter.
The patient should be placed in perineal position with the table tilted slightly to elevate the perineum. A moistened (not wet) piece of gauze can be inserted into the rectum and a purse-string suture used to minimize fecal contamination. The purse-string suture should be placed so it does not prevent access to the anal sac ducts.
Closure
Wound closure is similar for either the closed or open technique.
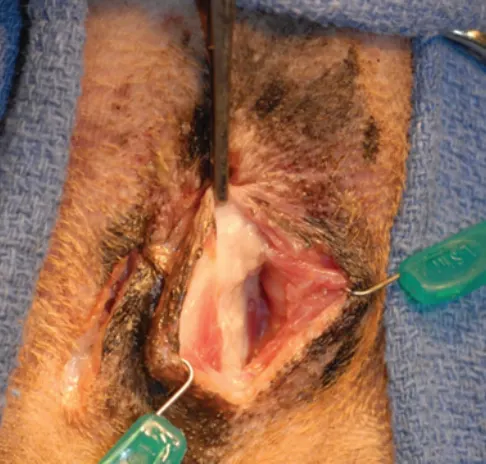
Following wound lavage, the surgical site should be closed in layers using a fine, absorbable monofilament suture. Interrupted sutures can be placed in a manner that buries the knot. Accurate apposition of the separated and transected muscle fibers of the sphincter muscle and closure of deep SC tissue can decrease dead space and potential seroma formation.
The skin can be apposed with interrupted sutures (Figure 2), an interdermal pattern, or tissue adhesive.
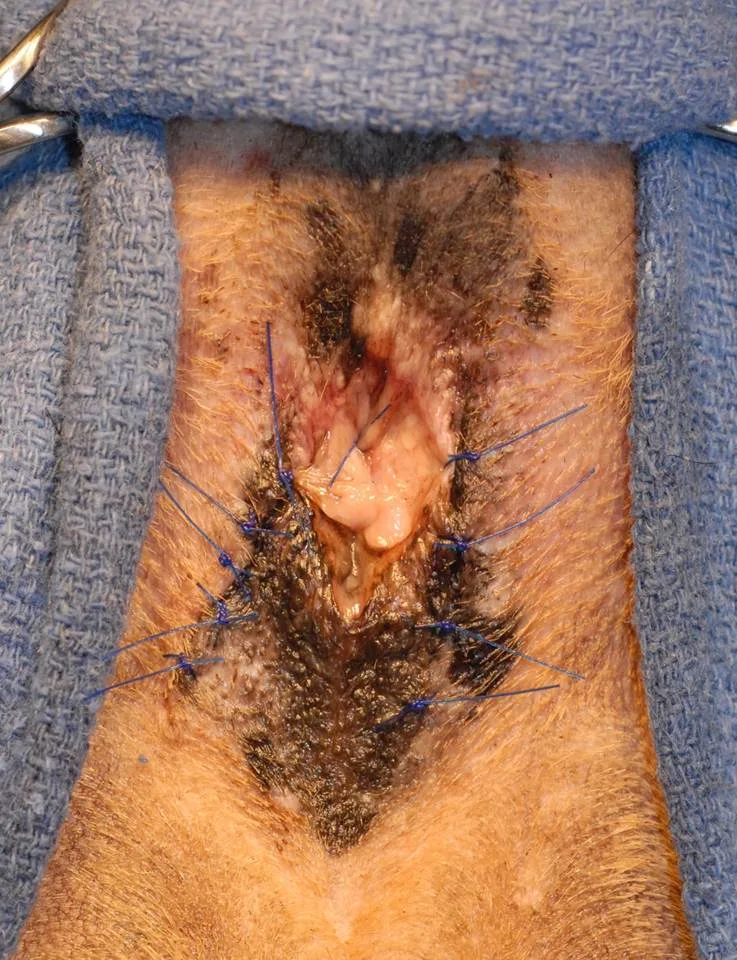
Small, nonabsorbable, monofilament suture for closure is recommended.
When using skin sutures, the suture tags should be cut with a very short tag on the medial aspect (closest to the anus) while the lateral tag is left long. This closure technique can minimize irritation of sensitive mucosa by the suture tags and facilitate suture removal. Skin sutures should not be placed too tightly, as doing so could precipitate self-inflicted trauma.
The purse-string and gauze, if used, are removed and the perineal area cleansed before recovery from anesthesia.
Careful postoperative monitoring is critical. Incisions should be evaluated for discharge, swelling, and pain. The perineum should be gently cleansed if there is soiling. An Elizabethan collar should be placed and patients should be discouraged from scratching or scooting on the perineum.
Complications
Common complications associated with anal sacculectomy include pain, self-trauma, and dehiscence1,4-6; however, more significant complications may occur (see Table 2, Potential Complications).
Although anal sacculectomy can be a straightforward procedure, it is not necessarily quick. Impatience may contribute more to surgical complications than does any other factor.
Table 2: Potential Complications
Step by Step: Closed Anal Sacculectomy
What You Will Need
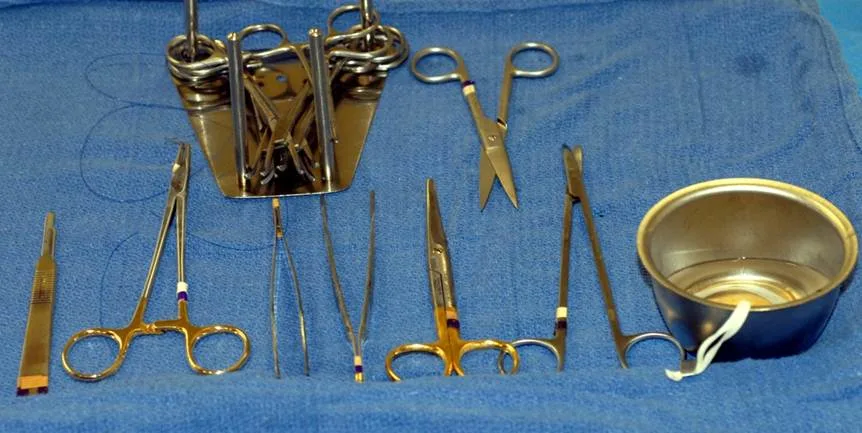
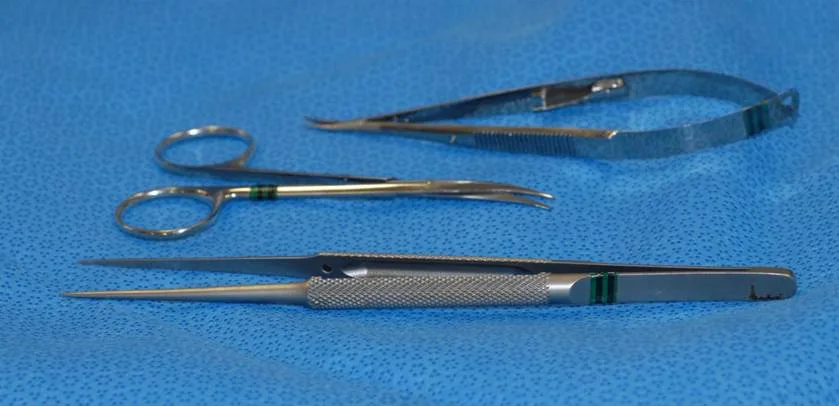
Small, delicate surgical (eg, ophthalmologic) instruments are recommended to benefit proper tissue handling, careful dissection, and maintenance of meticulous hemostasis. Blood may obscure dissection planes and cause unnecessary tissue trauma. In addition to a routine surgical pack, the following instruments can be useful:
Thumb forceps
Iris or tenotomy scissors
Needle holders
Ring retractor or Gelpi perineal retractor
Step 1
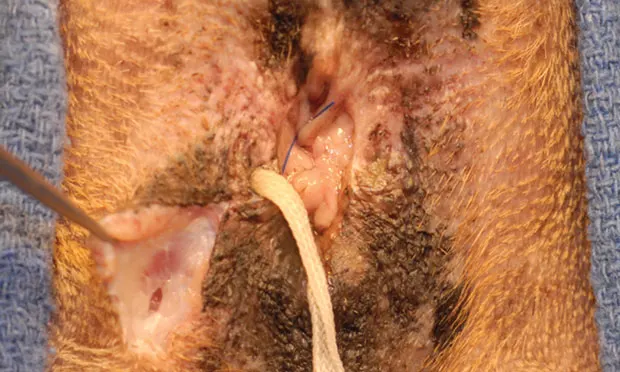
For closed anal sacculectomy, insert filler material into the anal sac to delineate it during dissection. In this case, moistened umbilical tape was introduced to distend it; other options for distending the anal sac include polymethyl methacrylate, triple antibiotic ointment (or similar products), or paraffin.
Paraffin, especially useful for a beginning surgeon, is liquefied in boiling water and infused into a cleansed anal sac. The paraffin will solidify at body temperature, making the anal sac easily discernible.
Author Insight
Products that can be infused into the anal sac to solidify can make the dissection more apparent when performing the closed procedure.
Step 2
Center a small incision (2–3 cm) over the tip of the probe and radiating outward from the anus. Making the incision along the long axis of the anal sac rather than a dorsal-to-ventral incision is recommended.
Once the skin is incised, separate SC tissue using sharp, blunt dissection. Separate fibers of the external anal sphincter muscle using the same technique. Skilled dissection can reduce hemorrhage and minimize damage to the sphincter muscle.
Careful use of a bipolar electrosurgical unit can control hemorrhage and improve visualization. Monopolar electrosurgery is not recommended, as it may increase potential for complications.
Keep the wound bed moist and clear by judicious use of warm lavage of 0.9% saline. Do not add antiseptics to the lavage. Frequent lavage can also improve visualization by washing away accumulated blood.
Step 3
As the dissection continues, palpate the tip of the instrument (or other material) placed into the lumen of the anal sac. Doing so serves as a guide while splitting fibers of the external anal sphincter muscle to expose the anal sac.
Tissue hooks from a ring retractor used for retraction to expose the anal sac.
The external surface of the anal sac is a smooth, grayish–brown structure with some of the muscle fibers from the sphincter muscle adhering to the surface.
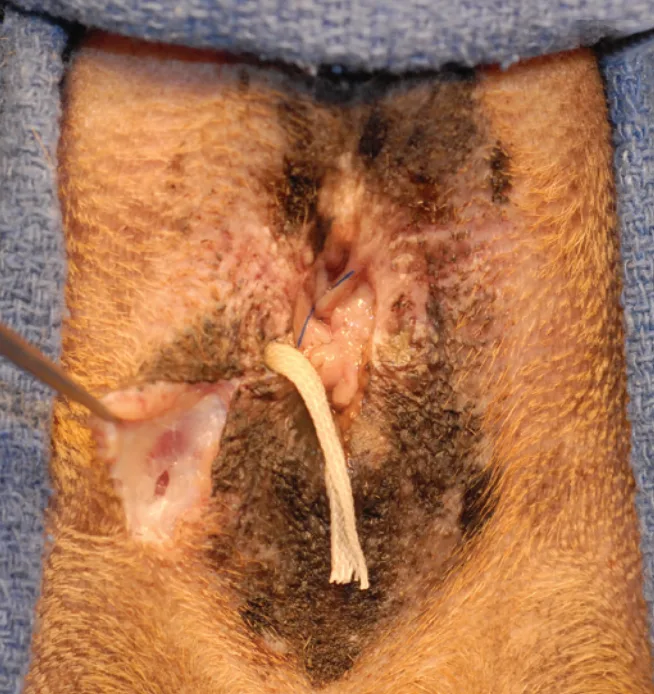
Step 4
Continue careful dissection around the edges of the anal sac. As the apex of the anal sac is dissected free from underlying tissue, (using a Babcock clamp or Kelly hemostat) grasp and elevate the apex caudally and dorsally to permit dissection around the cranial (deep) aspect of the structure.
Keep tenotomy scissors as close as possible to the anal sac without inadvertently incising into the lumen.
Continue dissecting along the backside of the anal sac until the duct is the only remaining attachment.
At this point, either excise the duct of the anal sac in total with a small piece of rectal mucosa or ligate the duct using a fine, monofilament absorbable suture as close to its exit point as possible.

Author Insight
Curved tenotomy scissors can be aligned with the curvature of the sac to maintain close contact between the two. This prevents the plane of dissection from getting into the surrounding tissues, where imprecise dissection can result in complications.
Step-by-Step: Open Anal Sacculectomy
Step 1
For open anal sacculectomy, insert a probe as a guide through the anal duct and into the anal sac. The initial incision is created over the guide and extends into the lumen of the duct and anal sac.
Brief lavage with warm saline is recommended to remove any residual secretion.
Next, gently grasp the edges of the incised anal sac and begin to remove the sac and duct from underlying tissue.

Author Insight
There is more hemorrhage and tissue trauma with the open technique.
Author Insight
Perioperative antibiotics are reasonable for this procedure, but continuing antibiotic therapy may not be necessary unless preexisting infection is present. The most commonly used perioperative antibiotics (eg, amoxicillin–clavulanate, first-generation cephalosporins) have satisfactory activity against common skin bacteria.
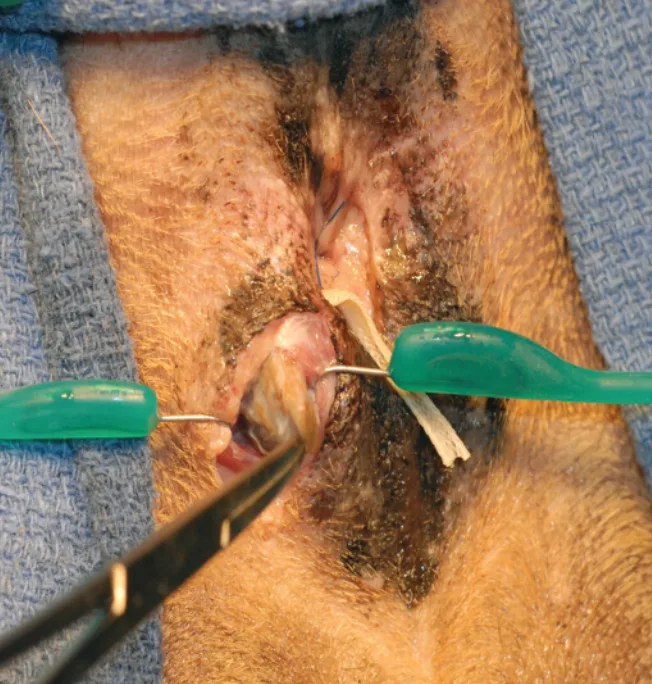
Step 2
In this case, the dissection is only half complete.
Use care when the plane of dissection is extended around to the backside of the anal sac. A combination of blunt and sharp dissection is most effective. As with closed sacculectomy, dissect as close to the external surface of the sac as possible.

Author Insight
The open sacculectomy technique can increase the chance of leaving residual epithelial tissue (anal sac remnants), which is linked to an increase in the frequency of postoperative draining fistulae.
Step 3
After the opened anal sac has been dissected free, lavage the wound bed with warm saline. Carefully evaluate the bed and excised anal sac to ensure the complete removal of any potential tissue remnants; retained epithelial remnants can lead to postoperative complications (eg, abscesses, fistulae).
Histopathologic examination of the diseased anal sac is recommended following removal.

Author Insight
Antibiotic selection for pre- or postoperative therapy should be based on cytologic evaluation, bacterial culture and susceptibility test results, and response to therapy.