Stenosis of the nares is a common characteristic of brachycephalic obstructive airway syndrome (BOAS).1,2 Clinical signs in dogs include nasal discharge, sneezing, snoring, exercise intolerance, excessive panting, and noisy inspiration. Young puppies with stenotic nares may have additional difficulty nursing or eating. Chronic nasal obstruction increases negative inspiratory pressure, which can lead to palate elongation or thickening, mucosal edema, and/or laryngeal collapse.1,2
Increasing Nasal Airflow
Treatment of stenotic nares involves enlarging the openings by reducing the amount of obstructive tissue in the nares and nasal vestibule (ie, the area just inside the nares). The intricate anatomy of the canine nasal planum and concha can complicate this seemingly straightforward procedure.3 Airflow through the rostral nasal airway is directed by the alar wings and alar folds.4 Alar wings are the visible dorsolateral portions of the rostral planum that are covered by hairless, leathery epithelium and contain most of the accessory and dorsolateral nasal cartilages.3 Cartilage may be absent in the rostroventral alar wings in dogs with BOAS.5 Alar folds are rostral extensions of the ventral nasal concha that fuse to the alar wings and are found within the nasal vestibule3; these folds usually are not visible unless a light is shone into the nares, and, even then, only a small portion of each fold can be seen.
Dogs normally flare their nostrils by contracting the levator nasolabialis, levator labii superioris, and orbicularis oris muscles, which dilate the nares by pulling the alar wings further dorsolaterally and the alar folds ventrolaterally, enlarging the airway through the nares and nasal vestibule.3 These muscular functions are often missing in brachycephalic dogs.6 Lack of mobility, loss of cartilaginous support to the wings, and enlargement of the alar folds can all contribute to stenotic nares.
Ala Vestibuloplasty
Treatment of stenotic nares has traditionally involved enlargement of the nasal opening by decreasing the size of the alar wings via wedge or punch resections or alar wing amputation (ie, Trader technique).1,2 Reduction of alar wing size can widen the external nares, but vestibular airflow (ie, flow through the rostral nasal cavity) may still be restricted in dogs with enlarged alar folds.4 Alar fold and alar wing resection (ie, ala vestibuloplasty) produces a greater increase in airway size and air flow in dogs with moderate to severe stenosis and is therefore recommended.7
Anatomy of Alar Fold
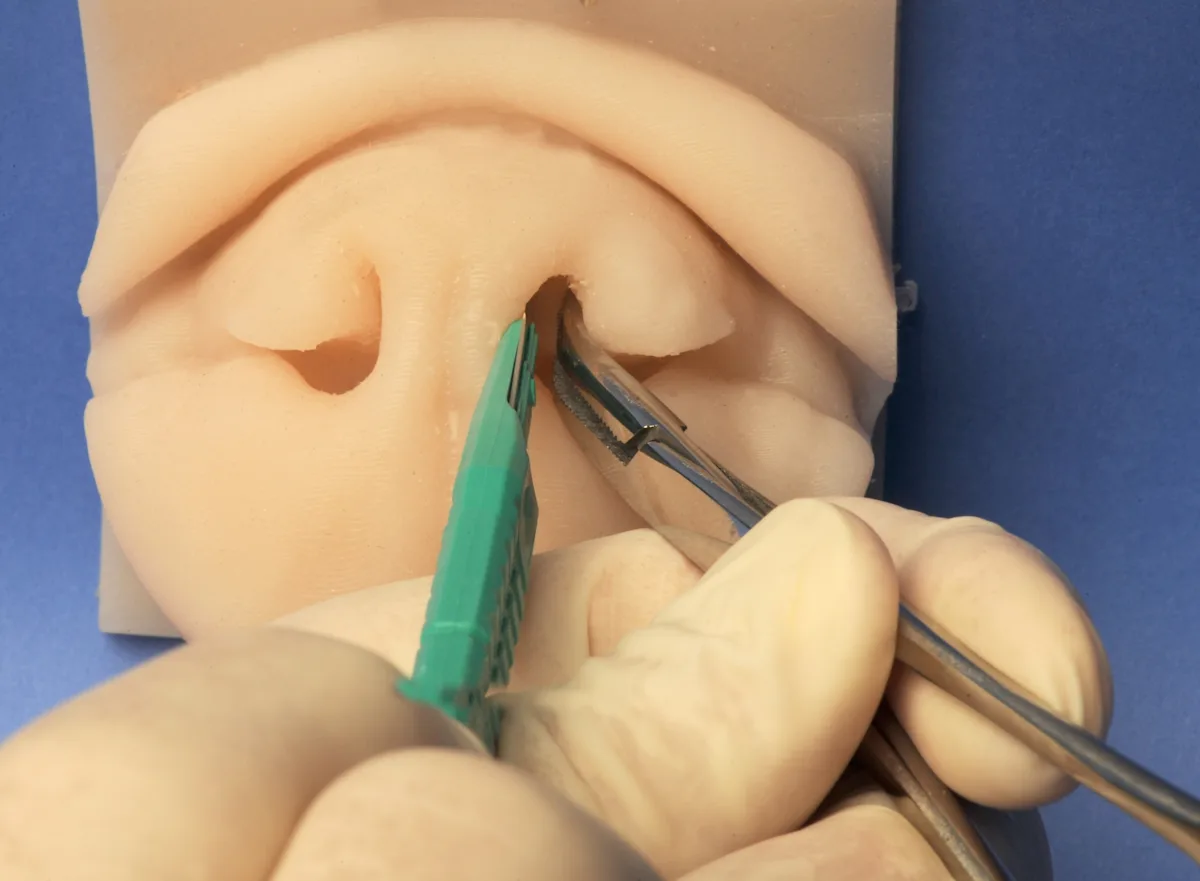
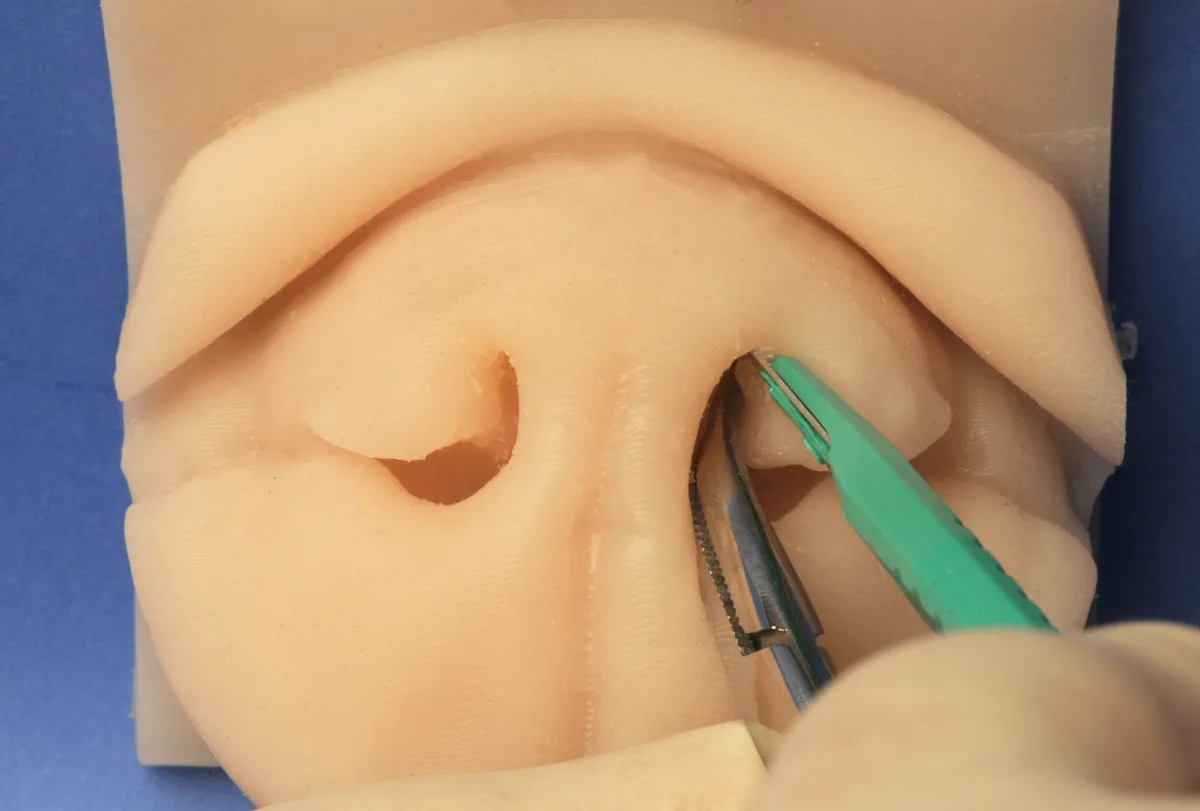
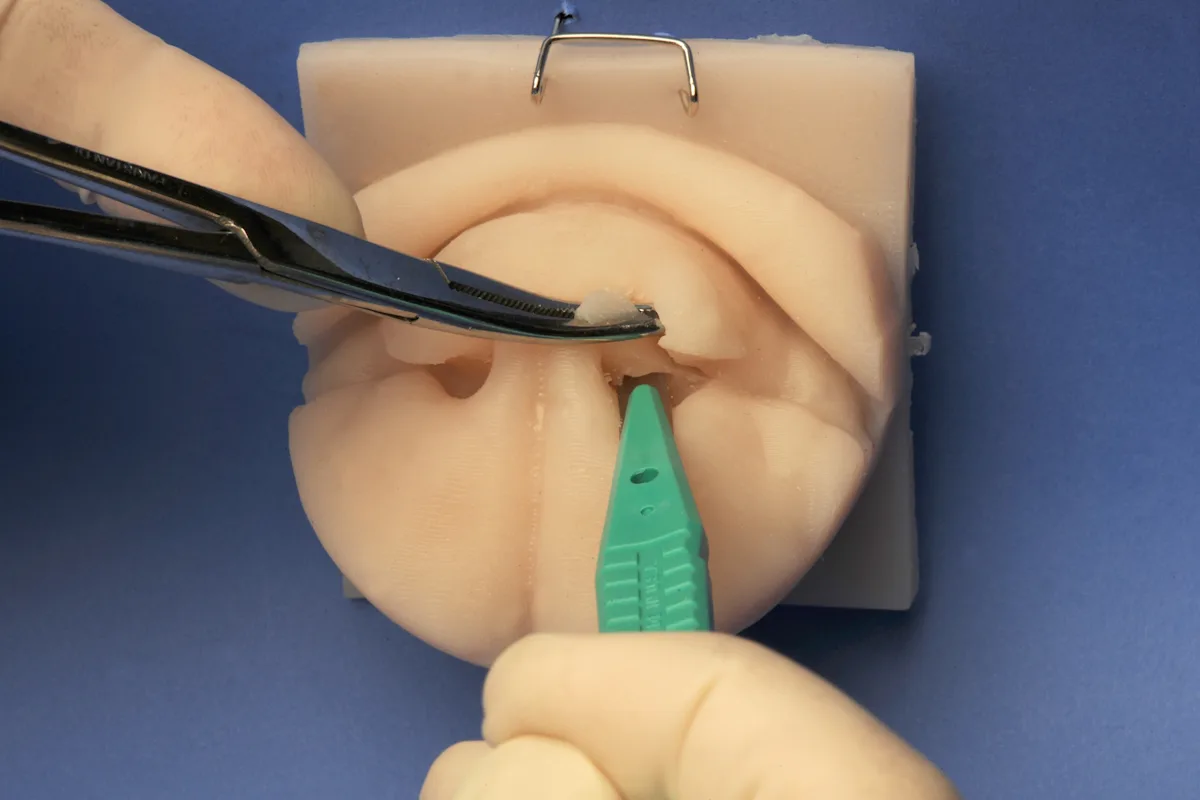
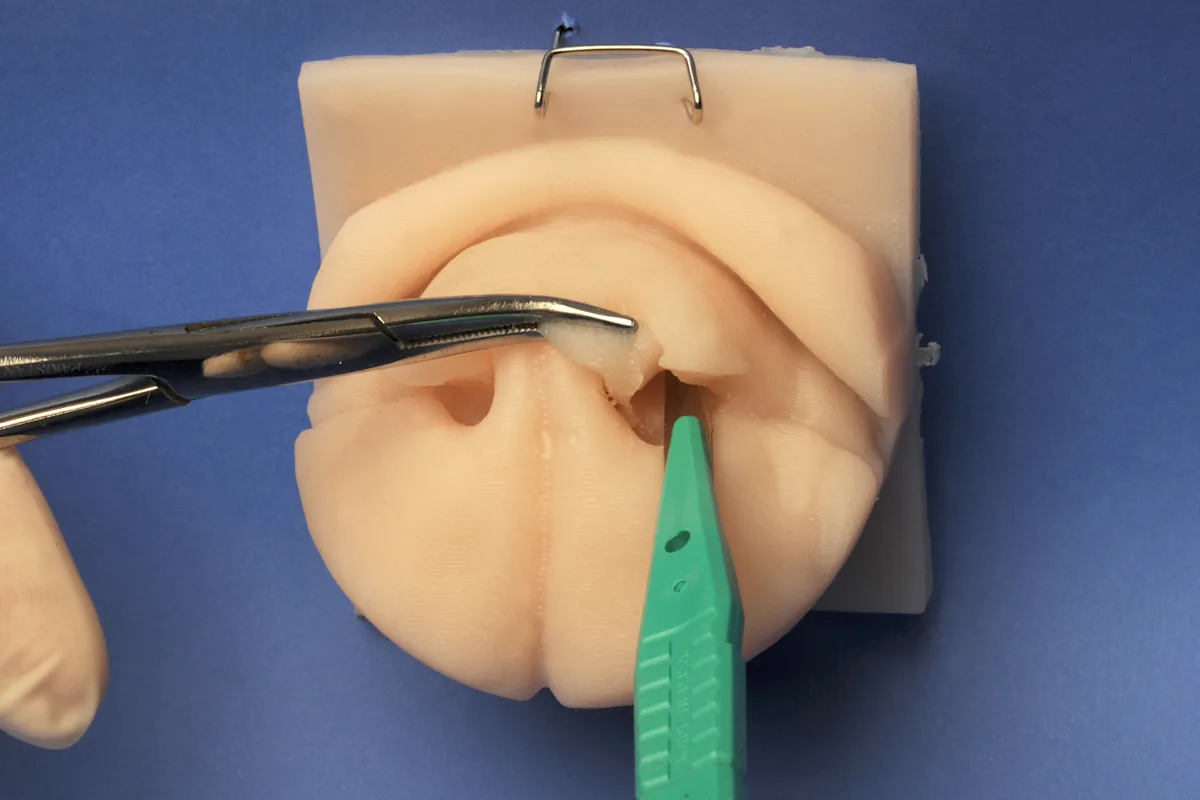
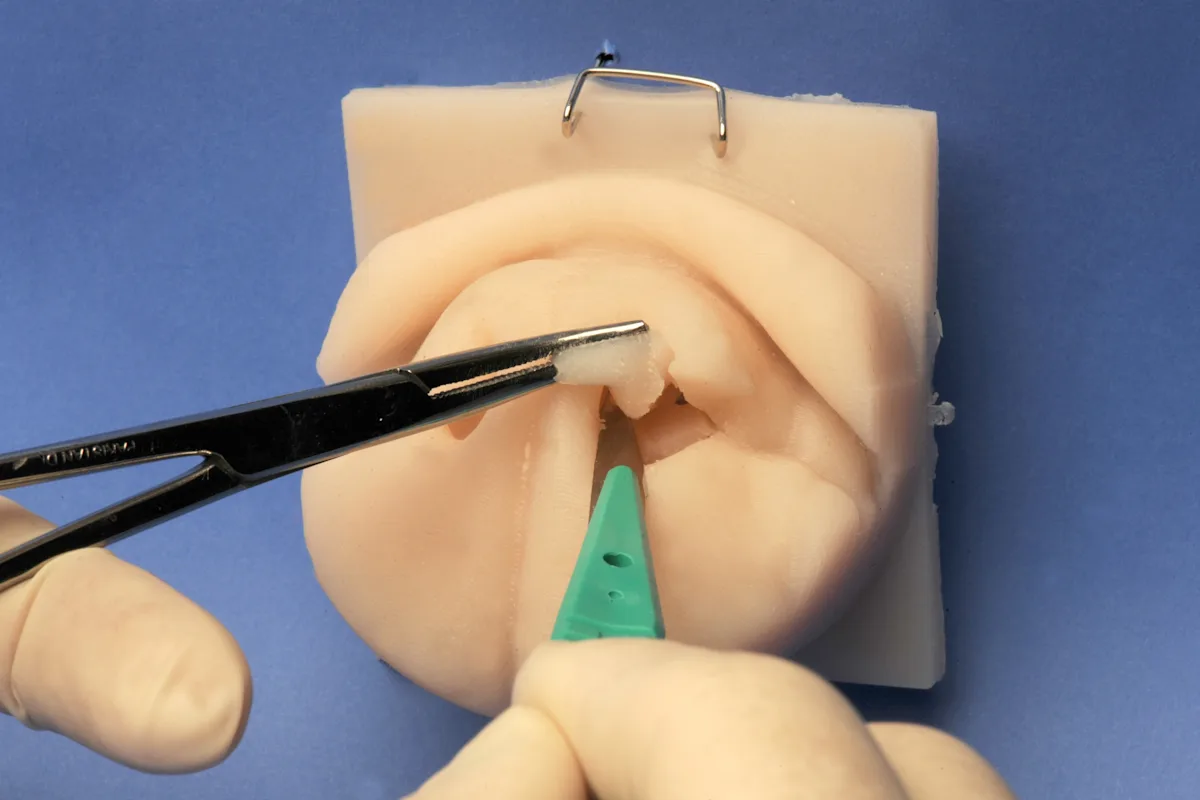
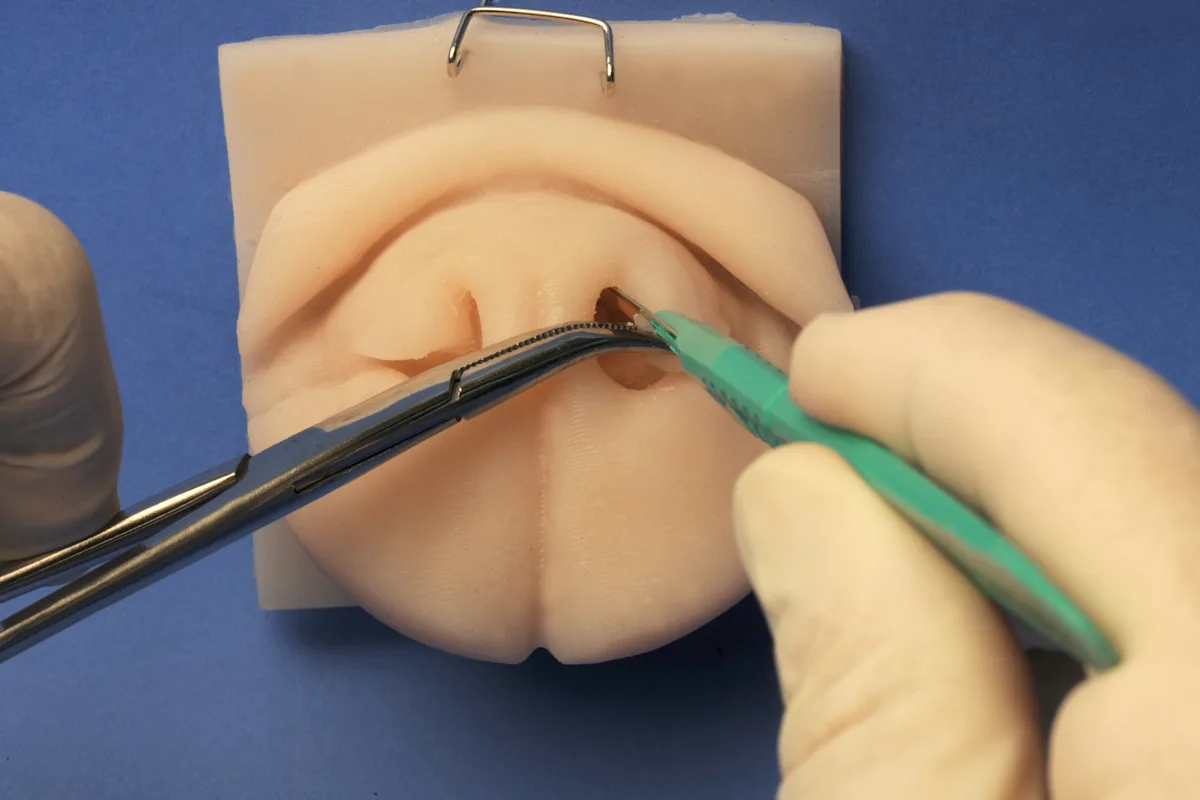
Each alar fold is uniquely attached to at least 3 sites within the nasal vestibule (Figure 1). From caudal to rostral, these include: caudoventral origin off the ventral nasal concha, ventrolateral attachment to the vestibular floor and caudomedial alar wing, and rostral confluence with the ventromedial margin of the ipsilateral alar wing. Although complete anatomic descriptions are not easily found, these attachments are readily visible on CT. Each alar fold has a distinct spiral shape, particularly in brachycephalic breeds, as the fold courses rostrally from the respective ventral nasal concha to fuse with the alar wing. The caudodorsal surface of this spiral is free of attachments and serves as an important anatomical guide during surgery.
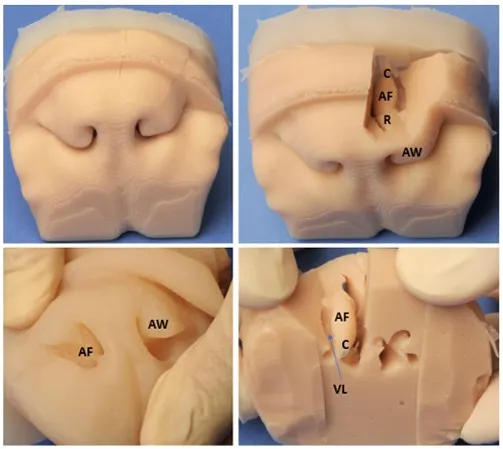
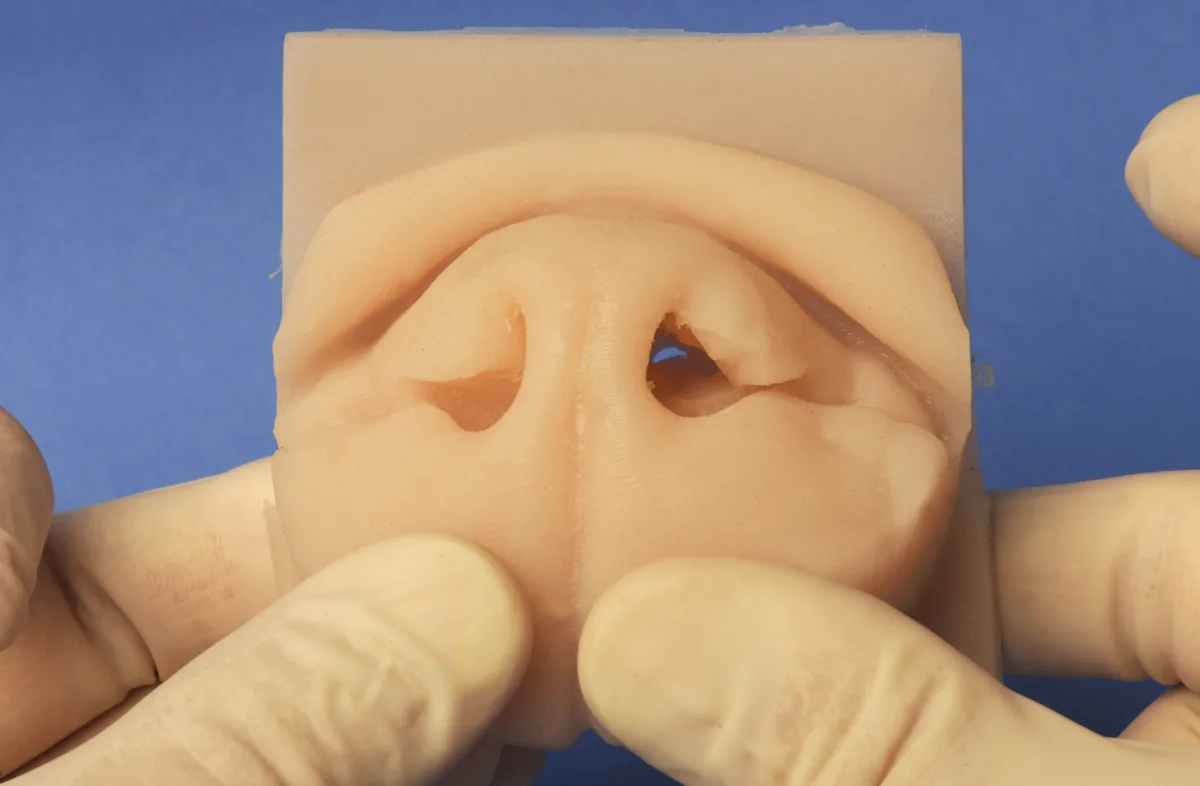
FIGURE 1 Alar fold anatomy demonstrated with silicone nose models. In a dog with stenotic nares, the alar fold (AF) is not visible because of the medially displaced alar wing (AW). The alar fold becomes evident when a portion of the wing is removed from this model. The fold is attached to the ventral nasal concha caudally (C), to the alar wing rostrally (R), and to the floor of the vestibule and caudolateral aspect of the alar wing ventrolaterally (VL). A gap (arrow) is present between the lateral aspect of the alar fold and the vestibular wall; during alar fold resection, the scalpel blade is slid up and over the alar fold and into this gap.
Blood flow to the alar wing is primarily supplied by the lateral nasal artery. A branch of this artery courses rostrally along the lateral muzzle and continues along the free margin of the alar wing until anastomosing with itself at the philtrum.8 A small branch leaves the lateral nasal artery at the alar wing and courses caudal to the alar fold before anastomosing with the sphenopalatine artery within the ventral nasal concha.8
Preparing for Surgery
Ala vestibuloplasty is most often performed with a blade, and significant bleeding is expected after sharp transection. Dogs are thus typically intubated with a cuffed endotracheal tube to prevent aspiration of blood. In addition, the rostral end of the head can be tilted downward to allow blood to flow out of the nose, or the throat can be packed with gauze sponges. Bleeding of cut surfaces can be stanched by packing the enlarged nares with cotton-tipped applicators soaked in a vasoconstricting nasal solution (eg, phenylephrine, oxymetazoline). Most bleeding stops within 5 minutes of packing. Surgical wounds are allowed to heal via second intention.
Step-by-Step: Ala Vestibuloplasty
What You Will Need
Scalpel blades; size dependent on dog (usually #11 or #10)
Curved hemostat or thumb forceps
Cotton-tipped applicators
Vasoconstricting nasal spray
Gauze sponges
Metzenbaum scissors (optional)
Headlamp (optional)
Step 1: Perform CT (if available)
If CT is available, measure the distance between the rostral edge of the nasal planum and the caudal most aspect of the alar fold (Figure 2) to determine the depth to which the scalpel blade must reach.
Author Insight
The cutting edge on a #15 scalpel blade is short and may not be of sufficient length. In most small brachycephalic dogs, the blade tip will need to reach at least 1.5 cm caudal to the rostral planum; therefore, if CT is not available for distance measurement, a #11 scalpel blade should be used.
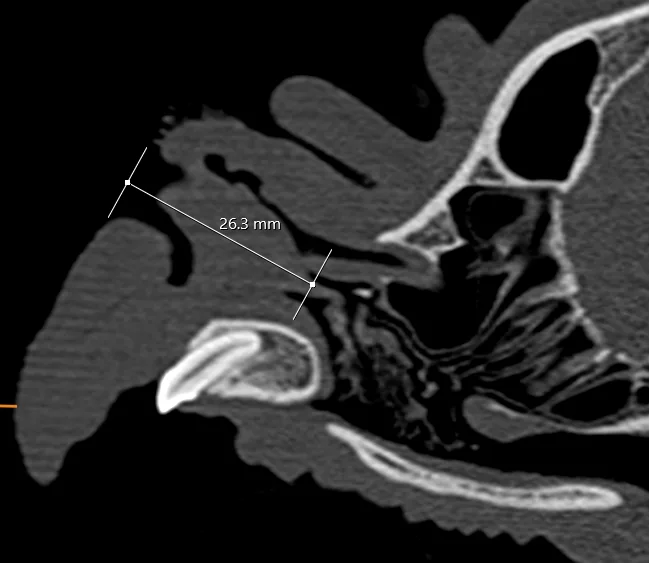
FIGURE 2 Parasagittal CT image of the alar fold in an English bulldog. The alar fold (AF) base is almost 2 cm in length (arrow), and its caudal attachment is 2.6 cm from the rostral surface of the nasal planum (NP). HP, hard palate; MC, maxillary canine; UL, upper lip
Step 2: Prepare Cotton-Tipped Applicators
Prepare the cotton-tipped applicators by soaking the cotton end in a vasoconstricting nasal spray solution.
Step 3: Select Scalpel Blade Size
Select a scalpel blade size that will fit in the vertical component of the external nares.
Step 4: Secure the Alar Fold or Alar Wing
Secure the alar fold or alar wing with a curved hemostat or thumb forceps. To secure the fold, insert the hemostat in the nares and spread the jaws to move the alar wing laterally. Identify the free caudodorsal aspect of the alar fold, and clamp it with the hemostat tips.
To secure the wing, place the hemostat jaws across the caudal, intranasal aspect of the wing from dorsomedial to ventrolateral and squeeze the tissue (likely the hemostat is unable to close). Alternatively, use thumb forceps to manipulate the wing.

Step 5: Insert the Scalpel Blade
Insert the scalpel blade into the nares parallel to the septum with the sharp edge facing dorsally.
Step 6: Position the Scalpel Blade
Sweep the blade dorsal and lateral so the cutting surface travels over the caudodorsal edge of the alar fold into the gap between the fold and the vestibule wall.
Rotate the hemostat or thumb forceps to increase the space for the blade to travel.
Author Insight
This maneuver can be practiced with a flat, thin plastic spatula or piece of narrowed tongue depressor to feel the free caudodorsal edge of the fold.
Step 7: Begin the Initial Transection of the Alar Fold
Once the blade has reached a dorsolateral position, cut ventrolaterally to transect the lateral attachment to the vestibule and the rostral attachment to the alar wing, concurrently resecting the ventromedial aspect of the alar wing.
Retract the alar fold outward while cutting so the rostral lateral attachments are exposed.
Step 8: Reposition the Scalpel Blade
Remove and reinsert the blade into the nares with the blade oriented horizontal and facing lateral.
Author Insight
Alternatively, the blade can be inserted vertically with the sharp edge facing downward (ventral) in the nares adjacent to the septum. The blade can then be swept downward and rotated laterally so it will be horizontally oriented while cutting. This will disrupt any unexpected ventromedial attachments.
Step 9: Continue Incising the Alar Fold Attachments
While continuing to grasp the alar wing or alar fold with the hemostats, cut laterally to connect with the previous ventrolateral cut and transect the remaining ventrolateral attachments. Regrasp the alar fold tissue and pull outward and upward to facilitate the cut.
Step 10: Complete the Transection of the Alar Fold
Retract the tissue from the nostril, and transect any remaining attachments.
Author Insight
These attachments may include the caudal attachment to the ventral concha, some caudal ventrolateral attachments if the blade was not deep enough, and any ventromedial attachment.
The alar fold is a large block of tissue.
Step 11: Trim the Remaining Alar Wing Remnants
Trim the remaining ventromedial alar wing as needed by grasping the free edge with a hemostat or thumb forceps and transecting in a ventrolateral direction with a scalpel blade.
Step 12: Restrict Bleeding
Pack the nares with one or more vasoconstrictor-soaked cotton-tipped applicators.
Cut the cotton-tipped applicators short so the opposite nares can be worked on without interference.

Step 13: Remove the Opposite Alar Fold
Repeat from Step 4 on the opposite side.
Step 14: Ensure No Tissue Remnants are Present at Surgical Sites
Remove the first cotton-tipped applicators after several minutes, and check the size of the nares. If obstructive tissue remains (usually at the caudal attachment to the ventral conchae), grasp the tissue with a hemostat or thumb forceps and transect with blade or Metzenbaum scissors, then place another soaked cotton-tipped applicator in the nares. Check the opposite side.
Author Insight
Use of a headlamp allows easier visualization of obstructive tissue.
Step 15: Initiate Recovery or Additional Procedures
Once bleeding has stopped, proceed with recovery or any other airway procedures.
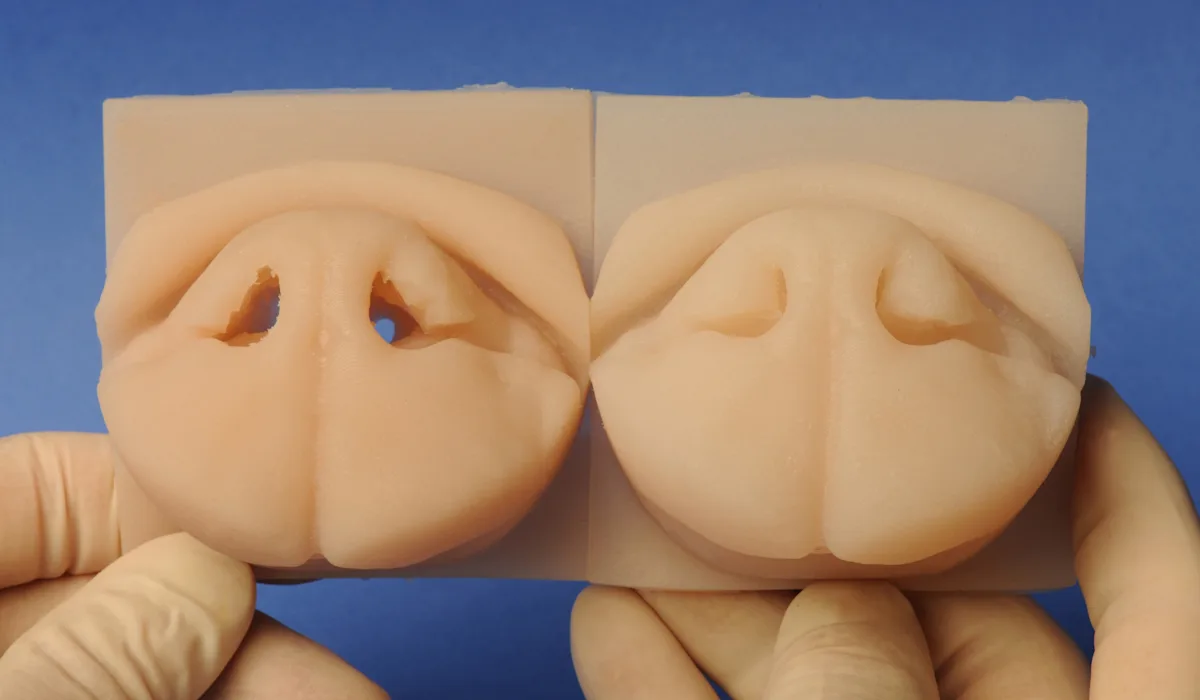
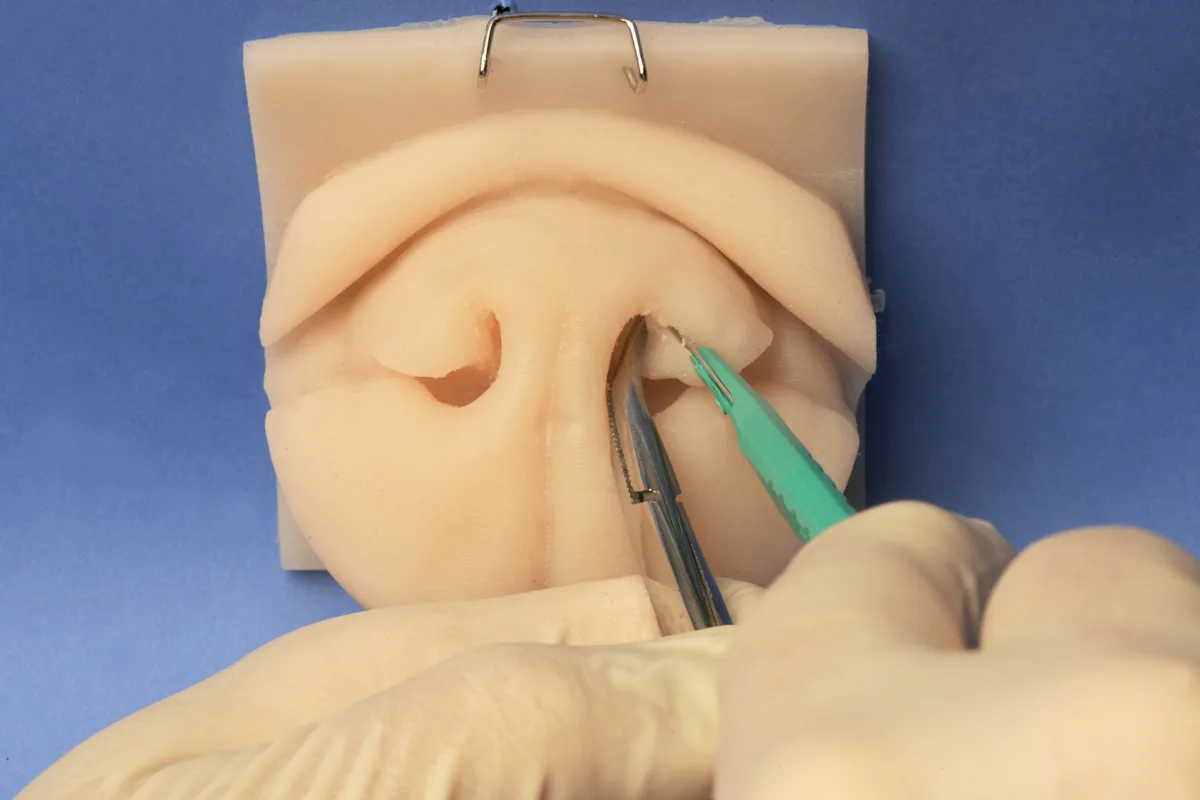
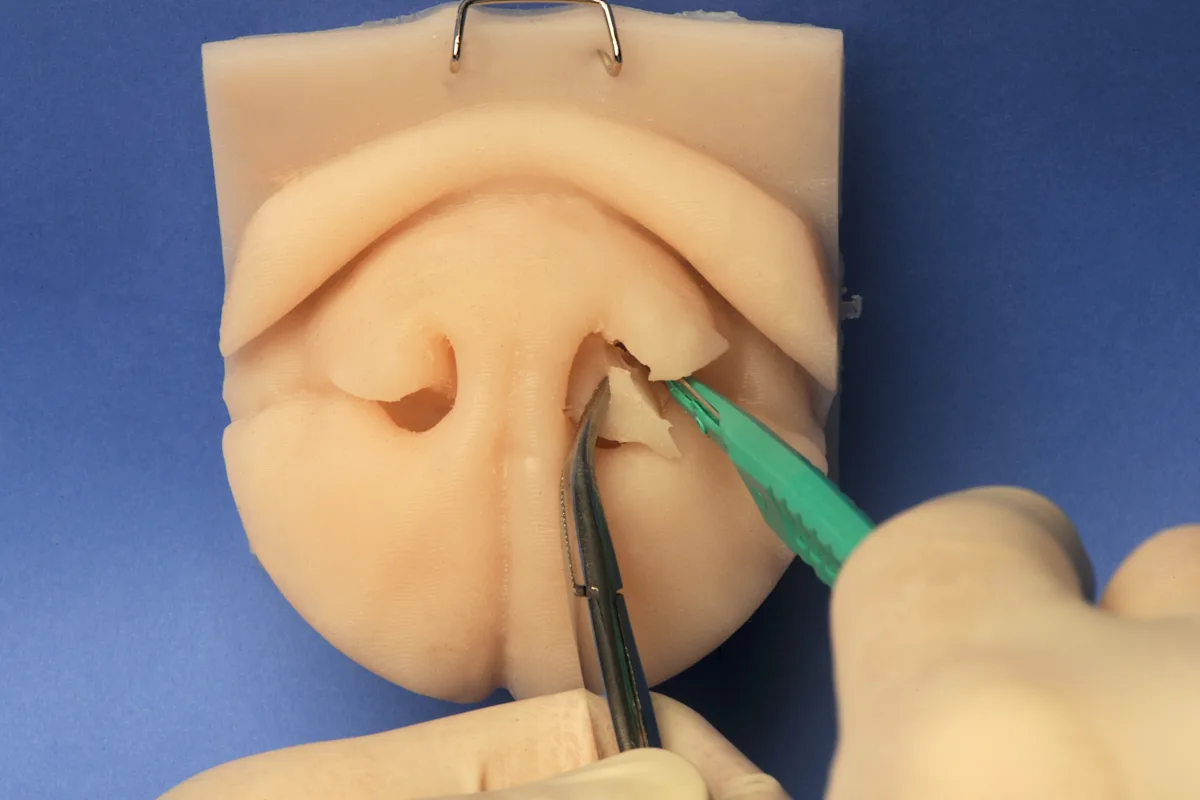
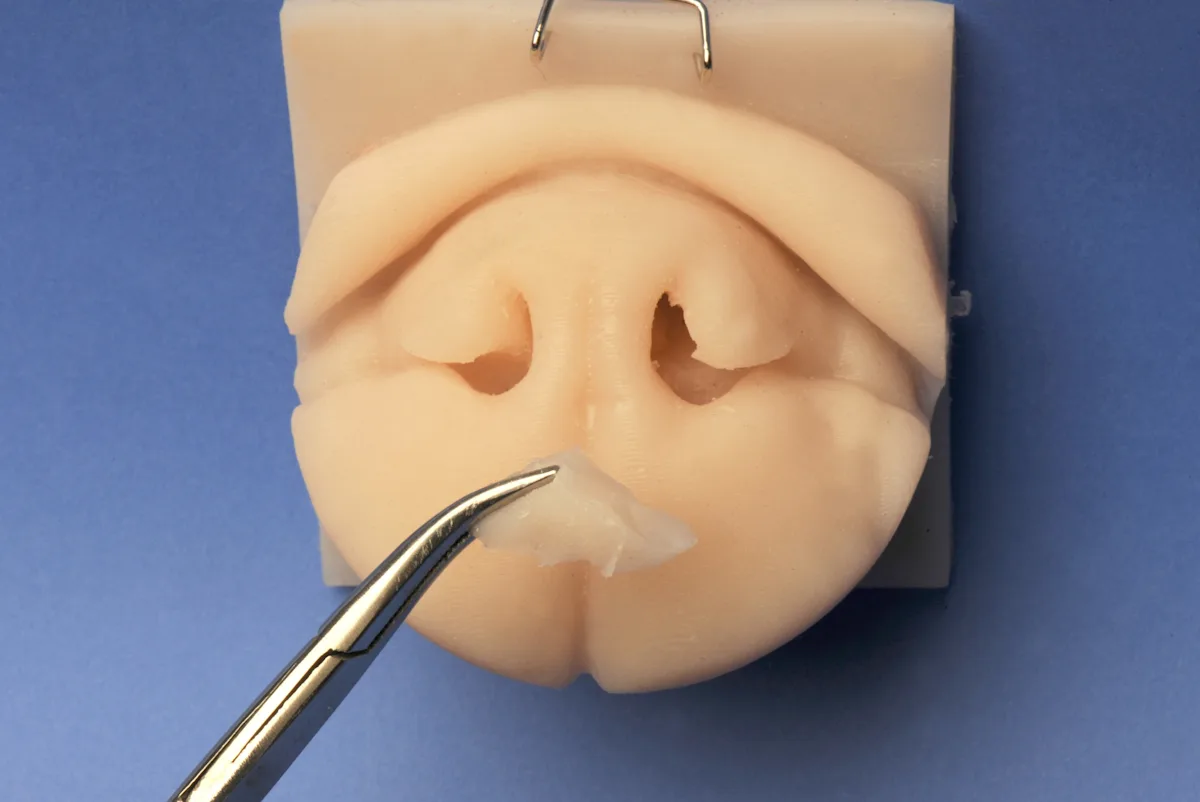
FIGURE 3 Final appearance demonstrating airway enlargement in a silicone nose model of an English bulldog. Left and right sides may be uneven dependent on dog conformation or dominant hand of the surgeon.
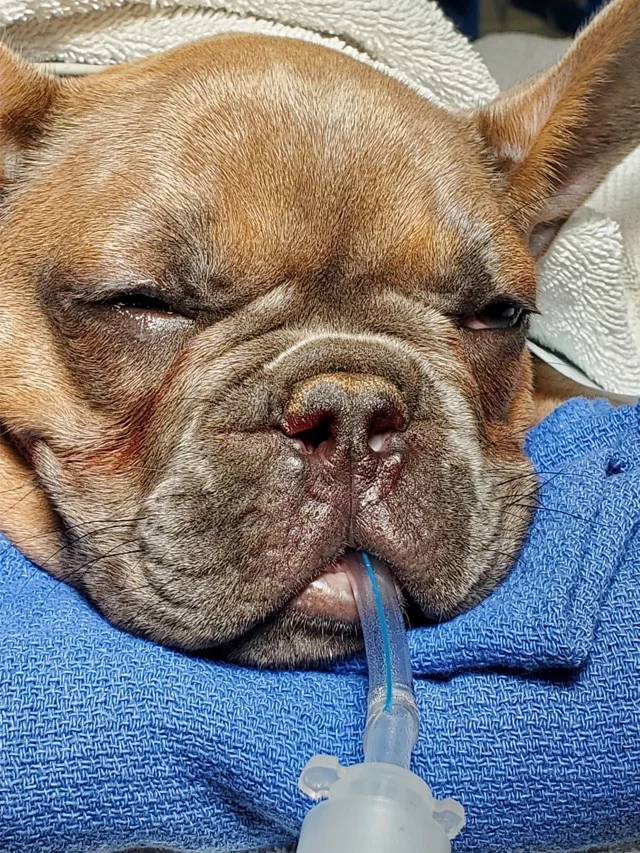
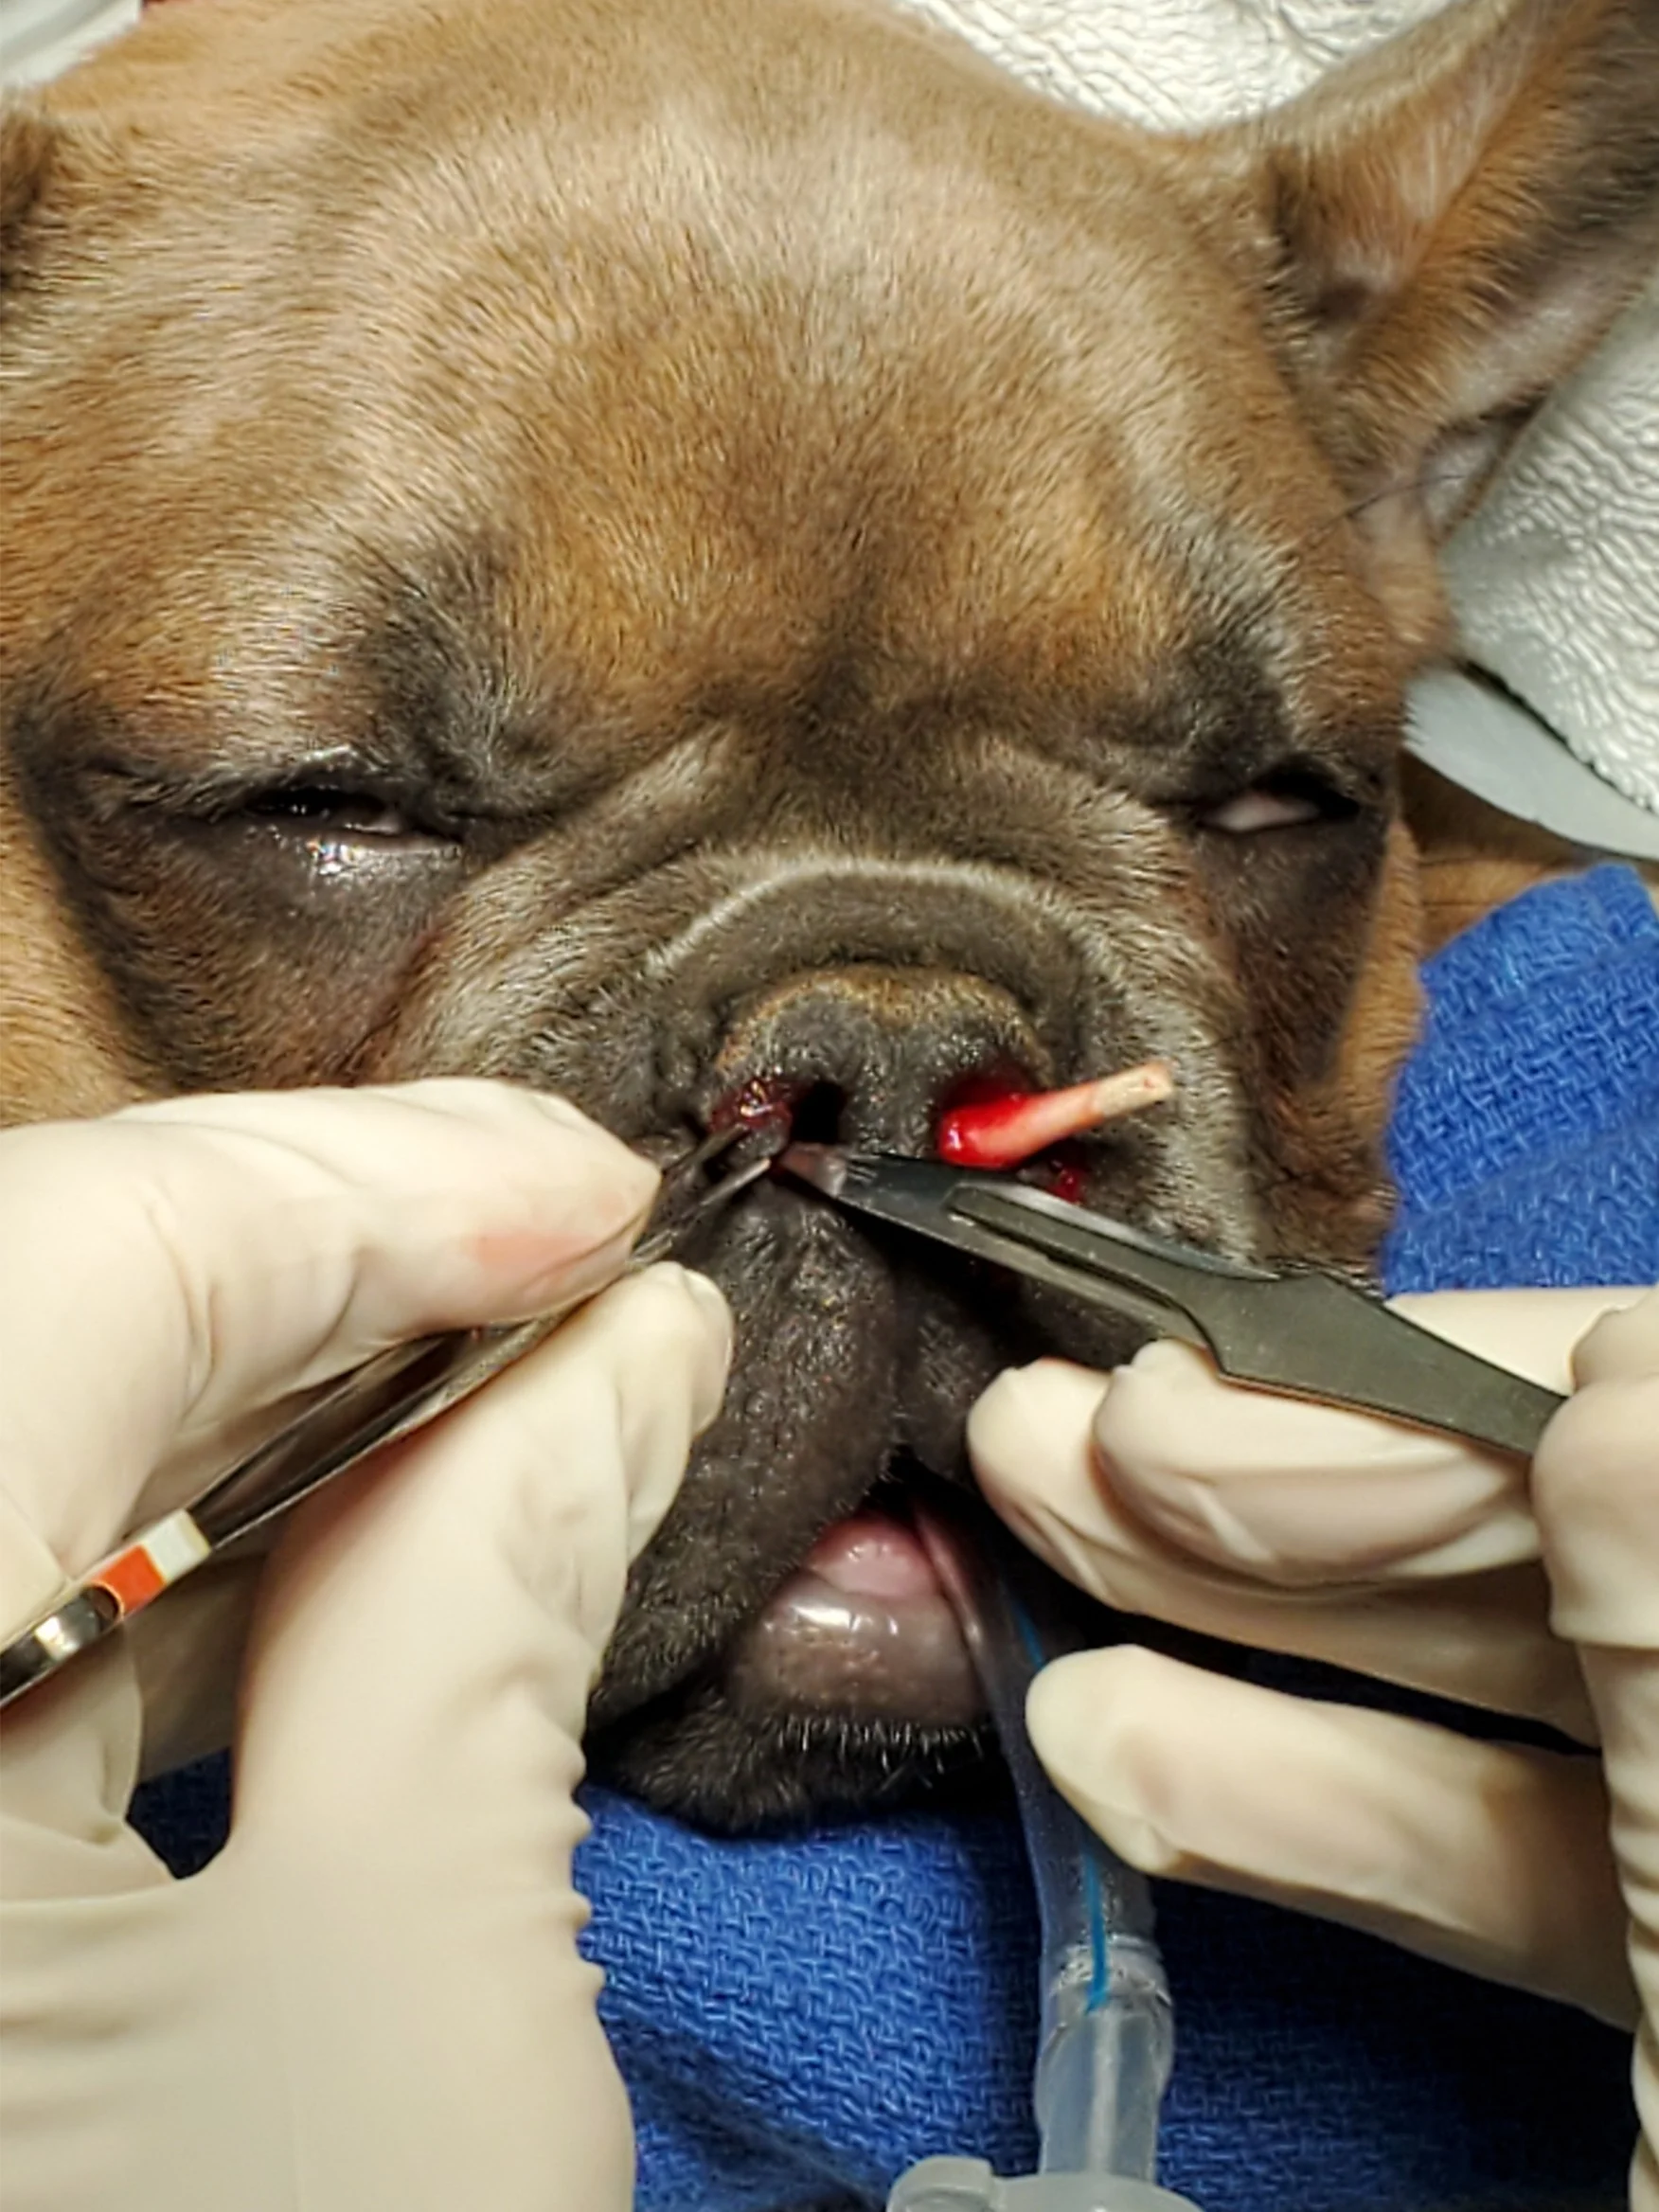
FIGURE 4 Final appearance immediately after the procedure. This dog also underwent staphylectomy and laryngeal sacculectomy.
Recovery
Oxygen and sedation should be administered as needed during recovery. Some bleeding and/or serosanguinous nasal discharge is expected from the nares for several days because the surgical sites are not sutured (Figure 5). A thin layer of petroleum-based ointment can be placed around the nares to decrease crusted exudate in the area and aid in removal. Use of Elizabethan collars is recommended until the sites appear healed. Healing is via second intention, with pigment gradually returning over several weeks.
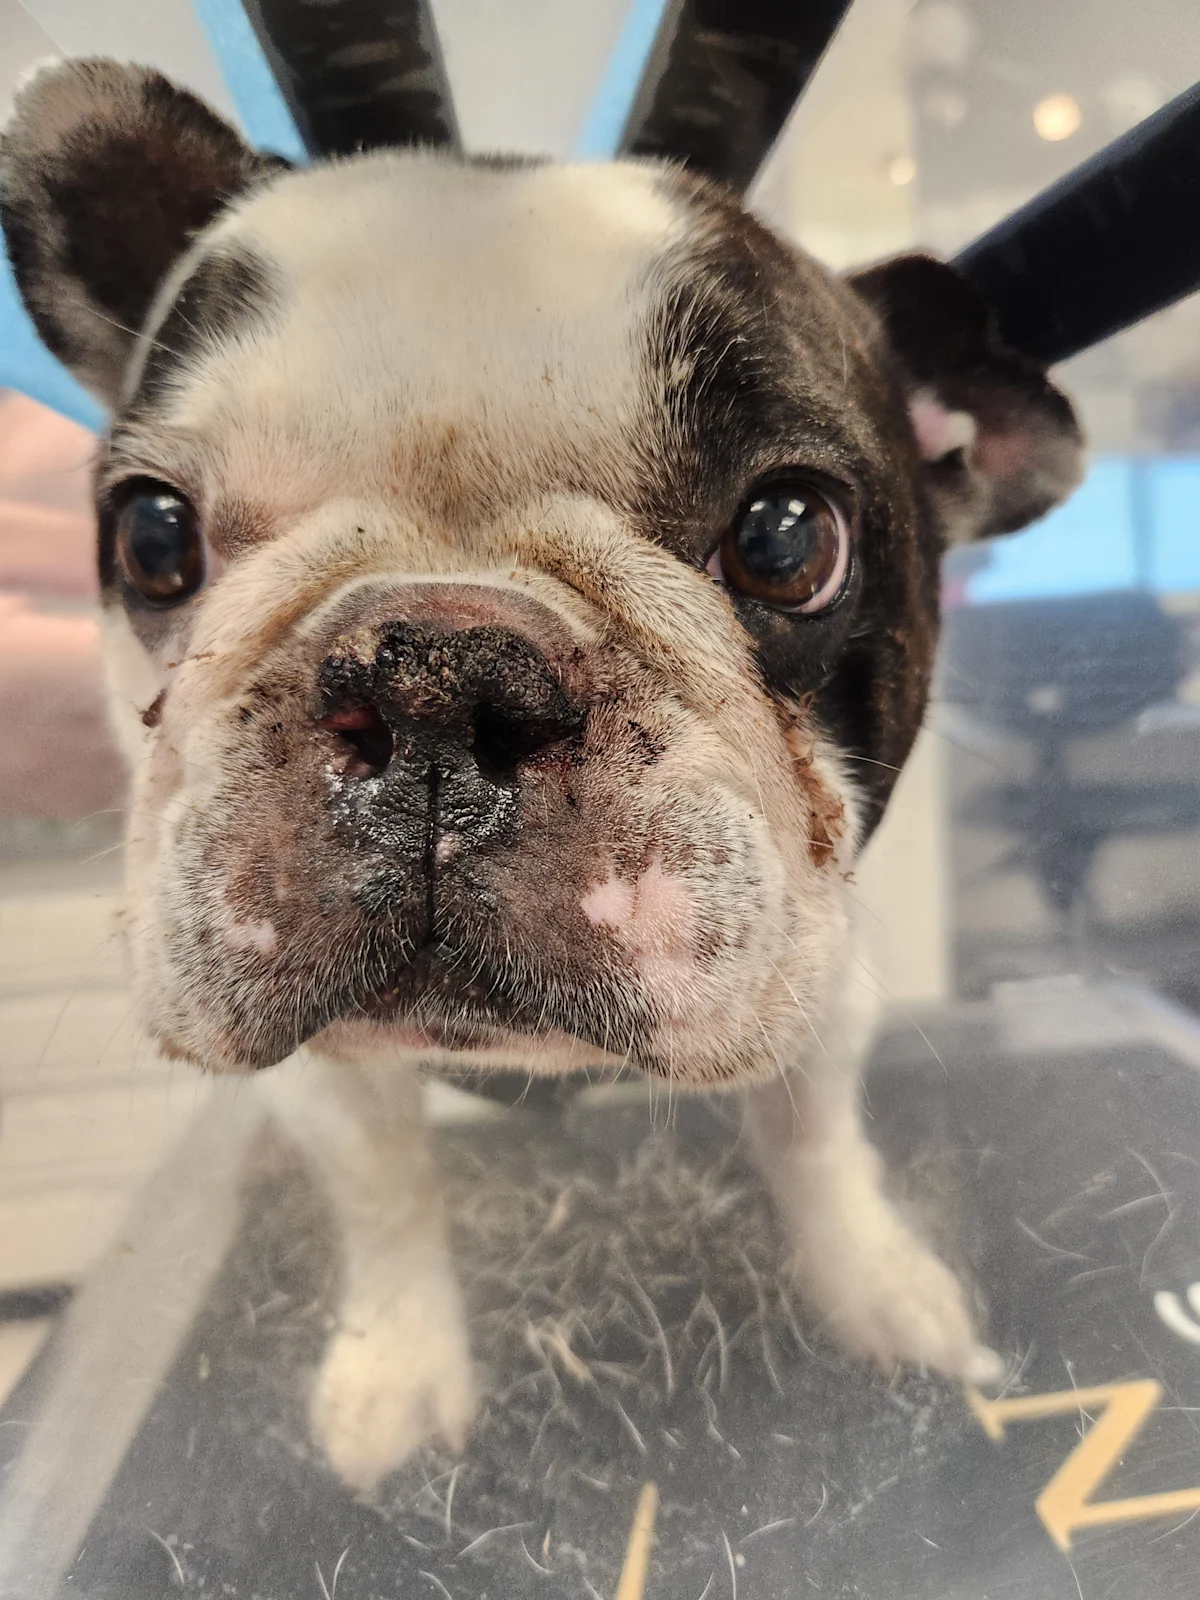
FIGURE 5 Appearance 16 hours after surgery. A mild amount of serosanguinous discharge is common.
Complications
Complication rates of ala vestibuloplasty alone are difficult to determine because most dogs concurrently undergo other procedures (eg, palate and laryngeal saccule resections) for BOAS. In a study of 432 dogs, postoperative nasal discharge was noted in 2% of dogs.9 Asymmetry of the nares is possible because of variations in the amount of tissue resected from each side, but once the site has healed, most pet owners have indicated a good cosmetic result.7,10
Ocular discharge from disruption of the membranous, intranasal portion of the nasolacrimal duct is also possible. In normocephalic dogs, the distal portion of the nasolacrimal duct travels in the base of the alar fold and exits at the rostral end of the fold within the nasal vestibule3; however, almost all brachycephalic dogs have an additional ostium on the proximal segment of the intranasal nasolacrimal duct.11 This accessory opening is medial to the maxillary canine roots and drains tears into the posterior nasal cavity. In most brachycephalic dogs, the accessory opening is the primary route for tear drainage.11