Preoperative Surgical Site Preparation
Michelle Jaeger, CVT, VTS (Surgery), University of Illinois
Patient surgical site preparation is one of the most important skills that operating room veterinary technicians perform in regard to patient care. The goal of surgical site preparation is to reduce infection risk by decreasing the number of normal skin flora present and inhibiting the rapid regrowth of microorganisms.1 Currently, surgical site preparation protocols are not standardized,2 so veterinary team members should adhere to their practices’ accepted procedures when preparing patients for surgery.
While more studies are needed in veterinary medicine to establish protocol standardization and efficacy, following are the basic details for each step of the surgical site preparation process:
Step 1 Clipping
Hair should always be clipped outside the operating room to prevent contamination of the room. Team members should confirm the area to be clipped with the surgeon, including the correct anatomical location or limb, and the margins desired around the proposed incision site. Always use a checklist or a 2-person double-check system to ensure the appropriate site is prepared.
The margins around the proposed site vary depending on the procedure, but generally a minimum of 15cm on each edge of the incision is clipped.3 Clipping hair from an area larger than needed is preferable in case the surgical incision needs to be extended during the procedure. Allowance should also be made for any drains or flaps. For orthopedic procedures, the entire limb is clipped.
Surgical sites should not be clipped before induction because hair removal then renders the sites 3 times more likely to become infected than sites clipped after induction,4 possibly because minor abrasions are made, providing a bed for bacterial growth. Before clipping, cover any wounds with saline-soaked gauze or a water-soluble gel to prevent wound contamination.

Figure 1 Clipping with a No. 40 blade
Photos courtesy of Michelle Jaeger, CVT, VTS (Surgery)
Use electric clippers with a No. 40 clipper blade (see Figure 1.), and clean and disinfect the clippers prior to each use. The clippers and blades should also have routine maintenance, including lubrication. Hair removal is easiest if hair is clipped first in the direction of hair growth and then against the growth pattern for a closer cut. (See Figure 2.) Monitor the blade temperature to prevent clipper burn and use clipper coolant if necessary. Do not use razors, which can cause micro-lacerations that may promote infection.2 Use a vacuum to remove clipped hair from the skin, taking care to prevent suction of skin into the vacuum hose by placing a hand between the skin and the hose. (See Figure 3.)
Step 2 Cleaning
Wear examination gloves and remove gross debris from the surgical site using gauze sponges and an antiseptic solution (eg, chlorhexidine gluconate 4%, povidone iodine). Scrub the site gently until little to no gross debris remains. (See Figure 4.) The use of clean, but not sterile, supplies for initial surgical site cleaning does not affect infection rates when the skin is intact.5

Figure 4 Cleaning the site using gauze, saline, and chlorhexidine gluconate 4%
Photos courtesy of Michelle Jaeger, CVT, VTS (Surgery)
The prepuce should be flushed for 2 minutes with 0.05% chlorhexidine diacetate if included in the surgical field.6 Areas that are difficult to clip and clean (eg, feet) can be soaked in an antiseptic solution such as 0.05% chlorhexidine diacetate, chlorhexidine gluconate 4%, or povidone iodine. According to the Hibiclens website, chlorhexidine gluconate 4% should not be used on the head, face, or genital area, or on wounds involving more than superficial layers of skin. Ear preparation is also not recommended because toxicity that results in deafness can occur if the tympanic membrane is ruptured and antiseptic enters the middle ear.7 Povidone iodine should also be used cautiously around open skin.3 To help decrease risk of contamination, the clipped and cleaned site should then be covered with a sterile huck towel prior to moving into the operating room. (See Figure 5.)
Step 3 Scrubbing
Use sterile equipment, including surgical gloves donned using open-gloving technique, gauze sponges, a stainless steel scrub bowl, and saline, in addition to an antiseptic surgical scrub. (See Figure 6, 7, & 8.) In a comparison of 3 skin preparations, no significant difference was seen between povidone iodine or 4% chlorhexidine with either a saline or 70% isopropyl alcohol rinse in regard to reduction in bacteria. However, more skin reactions occurred with povidone iodine.8

Figure 6 Scrubbing supplies, including sterile saline and a sterile stainless steel bowl with gauze inside
Photos courtesy of Michelle Jaeger, CVT, VTS (Surgery)
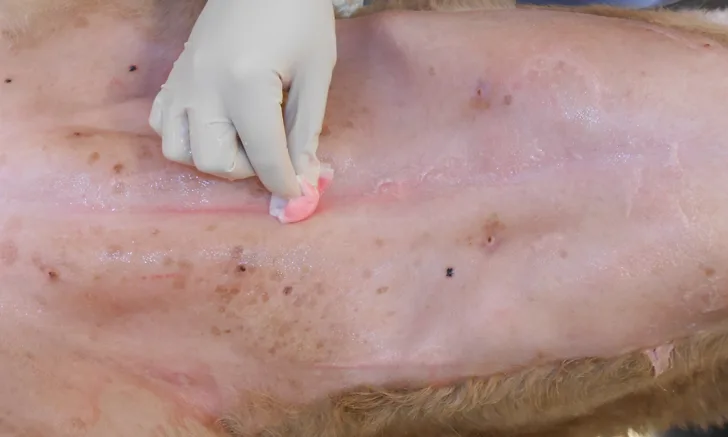
Once the patient is properly positioned, secured to the operating room table, and connected to all anesthetic monitoring equipment, the aseptic scrub can be performed. If using chlorhexidine gluconate 4% or povidone iodine, the antiseptic scrub solution can be applied either directly onto the saline soaked gauze, being careful not to touch the gauze with the tip of the bottle, or applied directly to the patient’s skin. Begin scrubbing at the center of the proposed incision site (see Figures 9 & 10), working outward in a circular target pattern until the edge of the clipped area is reached. (See Figure 11.) Use a gentle motion to produce a lather and avoid irritating the skin. Discard the gauze and repeat the scrub as needed to allow for the appropriate contact time recommended by the scrub solution manufacturer. Contact time following application can vary from 30 seconds to 2 minutes depending upon the antiseptic used.

Figure 9 Scrubbing the surgical site using sterile saline, sterile gauze, sterile surgical gloves, and chlorhexidine gluconate 4%
Photos courtesy of Michelle Jaeger, CVT, VTS (Surgery)
Always work from the inside out and never return to the center of the incision site with the same gauze, as bacteria may be returned to the clean site.1 Some practices alternate each scrub with a saline or isopropyl alcohol rinse, while others apply the antiseptic scrub for the appropriate length of time and then rinse with either saline or isopropyl alcohol. (See Figure 12.) It has been shown, however, that rinsing with 70% isopropyl alcohol decreases the efficacy of the antiseptic scrub.1,8 A final 10% povidone iodine solution spray also can be applied if that antiseptic was utilized for the scrub, or the final application of chlorhexidine gluconate 4% can be left if using that antiseptic.
If contamination is suspected at any point in the surgical scrub, the scrub can be repeated using sterile supplies.
One-step solutions that combine an antiseptic with a rinse (eg, iodophor in 70% isopropyl alcohol) can also be used for skin preparation. These products have been shown to be as effective at reducing skin bacteria as separate antiseptic and rinse solutions, and their use can decrease anesthesia time, which may decrease the risk of infection.9,10
Team Takeaways
1. Create a specific practice protocol for patient preparation prior to surgery, detailing where and how each step is to be performed.
2. Hold regular team training with all team members to review and practice proper patient preparation and aseptic techniques.
Conclusion
Proper aseptic preparation of surgical sites is crucial to decrease the risk of surgical site infections. Adhering to proper technique and practice protocols for clipping, cleaning, and scrubbing surgical sites helps ensure site preparation is performed aseptically. Therefore, the surgical team should ensure all team members are educated on proper aseptic procedures and the need for compliance.
This article originally appeared in the January 2017 web issue of Veterinary Team Brief.