Performing Direct Ophthalmoscopy
DJ Haeussler, Jr, DVM, MS, DACVO, The Animal Eye Institute, Cincinnati, Ohio
An ophthalmoscopic (or fundoscopic) examination evaluates the interior surface of the eye, known as the fundus, and can be accomplished using indirect lenses, a panoptic, or a direct ophthalmoscope. Various lenses can be used for indirect ophthalmoscopy, which gives the examiner a broader picture of the fundus.
A panoptic is a useful instrument that can be used to view the fundus, has a larger field of view than the direct ophthalmoscope, and provides a larger working distance from the patient to the examiner. The direct ophthalmoscope provides an upright, unreversed image that is magnified approximately 15 times when the examiner and patient both have normal focused vision (ie, not myopic or hyperopic).
A direct ophthalmoscope allows the examiner to view the optic nerve head (or disc), tapetum lucidum, nontapetum, and retinal vessels by shining a light through the pupil of the eye (see Glossary); however, it provides only a limited view of the fundus and further evaluation may be required when abnormalities are present. A direct ophthalmoscope is useful when examining depth of lesions within the fundus, as well as obtaining accurate measurements of lesions using the overlying grid feature.
The ophthalmoscope can be useful for diagnosing optic neuritis, chronic glaucoma, and retinal detachments, tears, and degeneration. If a more panoramic view of the retina is desired, such as looking at large retinal lesions or detachments, the examiner should favor an indirect lens. Patient cooperation is essential during examination, and close physical contact between the veterinarian and the patient is required. This article describes how to use a direct ophthalmoscope to examine the fundus.
GLOSSARY
FUNDUS: Posterior aspect of the globe composed of the retina, choroid, optic nerve head, and sclera.
NONTAPETUM: Pigmented ventral portion of the fundus not associated with the tapetum.
OPTIC NERVE: Second cranial nerve responsible for transmitting light and impulses responsible for vision to the brain.
RETINA: Structure located between the most posterior aspect of the vitreous and anterior to the choroid responsible for the neurotransmission of visual stimuli.
TAPETUM LUCIDUM: Highly reflective structure found in many domestic species associated with the choroid in the dorsal aspect of the fundus and responsible for the amplification of light.
What Is a Direct Ophthalmoscope?

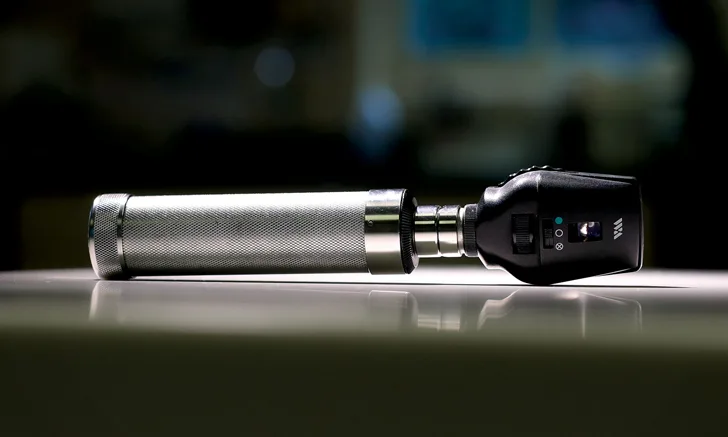
Direct ophthalmoscope
A direct ophthalmoscope is a handheld illuminated instrument, typically with a handle that also serves as the battery pack. (See Figure 1.) Many units are rechargeable and portable. The head of the direct ophthalmoscope contains a light source, lenses, filters, and a viewing aperture. The handle can be rotated to turn the light on and off and also acts as a rheostat for adjusting the light intensity. The lenses allow the examiner to correct for refractive error of the user and the patient. The appropriate lens strength is selected by turning the wheel on either side of the instrument head clockwise to increase the green/positive diopter to focus on structures that are close or counterclockwise to increase the red/negative diopter to focus on structures that are far.
The depth and elevation of lesions can be estimated based on the difference between the diopters needed to focus on the lesions and normal structures. Most direct ophthalmoscopes provide a blue light that can be used to examine the cornea for abrasions and ulcers after fluorescein staining. Multiple apertures (ie, small, medium, large, half) facilitate evaluation of different sized pupils. For example, the small aperture can be used in a bright room when the patient’s pupil is constricted, while the large aperture is appropriate to view a pupil dilated using a mydriatic eyedrop. When a cataract is present, the half aperture allows the examiner to focus on the unobscured portion of the pupil. Many direct ophthalmoscopes also have a slit beam for examining aqueous flare and depth of corneal lesions and an illuminated grid that allows the examiner to measure lesion size.
Steps for Performing Direct Ophthalmoscopy
Examine the patient’s pupillary light reflexes, menace responses, and dazzle reflexes, and ensure that the patient has normal intraocular pressures. If no abnormalities are detected, administer 1 drop of tropicamide in each eye and wait 20 minutes for the pupils to dilate.
Escort the patient to a dim-to-dark room and place on the examination table, if possible. The examiner’s and the patient’s eyes should be at the same level, so consider sitting on a stool that faces the patient with the examiner sitting directly in front of the patient. If the patient is too large to safely restrain on the table, the examination can be performed with the patient on the floor. A team member should gently but firmly hold the patient’s head to keep it as still as possible during examination.
Position the ophthalmoscope so it is resting on the examiner’s brow and the patient’s eye is approximately 25 to 30 cm away from the examiner’s eyes.1 (See Figure 2.) The direct ophthalmoscope should be in the hand lateral to the patient’s eye that is being examined. For instance, if the examiner is examining a patient’s right eye, the direct ophthalmoscope should be in the examiner’s left hand and he or she should open the patient’s eyelids with the right hand. The light should be set to a dim setting and gradually increased for better visualization. The lens should be set to a 0 diopter. Then, evaluate the pupil and tapetal reflexes and lens clarity, and locate the tapetal reflection. Slowly move to within 2 to 4 cm of the patient’s eye.1 (See Figure 3.)

FIGURE 2
Examining a patient with a direct ophthalmoscope. Start 25 to 30 cm away from the patient, sitting down directly in front of the patient and holding the direct ophthalmoscope as shown.
Locate and focus on the optic nerve head by slowly adjusting the lenses using the focusing wheel to select the appropriate positive or negative diopter.1 Examine the optic nerve head carefully, and document its color, margins, and shape. Blurry edges suggest peripapillary edema and are consistent with optic neuritis. (See Figure 4.) Examine and document depth of the cup. A depression greater than normal may suggest damage from chronic glaucoma.

Optic neuritis. Note the blurry margins of the optic nerve head and loss of detail of the retinal vessels as they approach the optic nerve head, consistent with optic neuritis.
Examine the tapetum lucidum and document its color. Hyperreflection (ie, increased reflectivity associated with thinning of the tapetum) suggests degeneration or progressive retinal atrophy, whereas hyporeflection (ie, decreased reflectivity associated with the addition of a substance under the retina) suggests subretinal edema or infiltration of cells (ie, bacterial, fungal, neoplastic). Note the presence of subretinal, preretinal, and intraretinal hemorrhages and obvious retinal detachments or tears. (See Figure 5.)

Retinal detachment and subretinal hemorrhages. Note the ventral retinal detachment and multifocal dorsal subretinal hemorrhages.
Examine and document the nontapetum. Areas of depigmentation indicate choroidal hypoplasia, uveodermatologic syndrome, and variation of normal in some breeds. Note the presence of subretinal, preretinal, and intraretinal hemorrhages and obvious retinal detachments or tears.
Examine and document the retinal vessels. Increased vessel caliber and tortuosity suggest systemic hypertension or hyperviscosity syndrome. Decreased vessel caliber, number, and tortuosity suggest retinal degeneration. (See Figure 6.)

Retinal degeneration. Note the tapetal hyperreflectivity, decreased vascular caliber and tortuosity, and optic nerve pallor. Figures courtesy of DJ Haeussler, Jr, MS, DVM, DACVO
Conclusion
A direct ophthalmoscope provides a magnified image of the fundus, which can aid in the diagnosis of diseases and conditions of the interior surface of the eye. When used in conjunction with fluorescein staining, a direct ophthalmoscope can facilitate examination of the cornea and identify corneal lesion depth and aqueous flare. The direct ophthalmoscope provides only a limited view of the fundus and patient cooperation is very important. Knowing the instrument’s abilities and limitations will greatly enhance the results of the examination.
Take Action
Become familiar with the parts of the direct ophthalmoscope so the patient examination can focus on the fundus rather than operation of the instrument.
Ensure that team members are familiar with proper restraint for an ophthalmoscopic examination.
Document examination findings, including:
Optic nerve head color, margins, and shape
Tapetum lucidum and nontapetum color
Retinal vessel caliber, number, and tortuosity
Retinal degeneration and hemorrhage
Understand the limitations of direct ophthalmoscopy.