Percutaneous Endoscopic Gastrostomy Tube Placement
Katherine Snyder, DVM, Texas A&M University
Percutaneous endoscopic gastrostomy (PEG) tubes are a minimally invasive and highly effective method for providing proper nutrition to dogs and cats. They are most commonly placed in animals with dysphagia, esophageal disorders, or chronic diseases that may require long-term nutritional assistance.
Placement of gastrostomy tubes most commonly involves use of a flexible endoscope, although blind techniques have also been described. The PEG technique is not appropriate for animals with persistent vomiting or ascites or for larger breeds (> 30 kg), but these tubes can provide weeks to months of nutritional support when properly managed.* The following steps describe gastrostomy tube placement using endoscopic guidance.
*In larger breeds, the feeding tube has a tendency to migrate from the stomach and rest in the abdominal cavity, despite formation of a proper stoma. Therefore, these patients have a higher risk of food leakage into the abdomen, resulting in peritonitis. The author feels surgical placement is a safer option in these cases.
Step-by-Step: Peg Tube Placement
Step 1
Tube type and size should be considered before placement is attempted. Size should be based on size of the patient; 16- to 24-French tubes are usually selected. Latex, silicone, and polyure-thane tubes are all available; catheter tip shapes include mushroom, dome, and bumper. Tubes are available individually or in kits that contain placement supplies.

Step 2
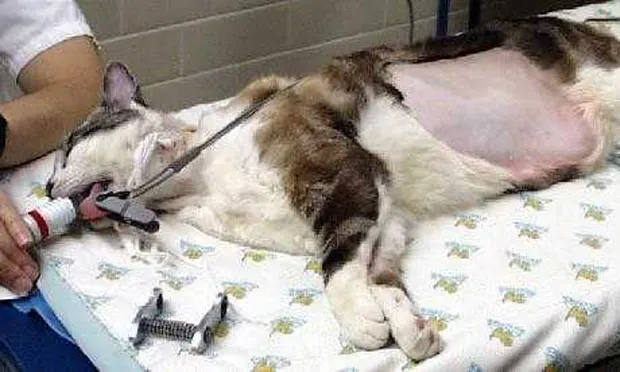
The patient is placed in right lateral recumbency to allow the gastric fundus to contact the left body wall. The skin caudal to the last rib on the left side should be clipped and aseptically prepared.

Step 3
A lubricated endoscope is advanced from the mouth to the stomach, and the esophageal and gastric mucosa thoroughly examined. The stomach should be insufflated so the gastric wall directly contacts the abdominal wall. Underinflation can result in the entrapment of other organs (especially the spleen) between the stomach and the body wall. Overinflation may compromise venous return to the heart. The endoscope is directed toward the left lateral body wall. Externally, endoscopic illumination should be visualized through the body wall if no organ entrapment is present.

Step 4
An assistant should externally indent the body wall just caudal to the last rib by pushing inward with a gloved finger. The endoscopist visualizes the finger impression and evaluates the area for tube placement. This helps select a location that appears appropriate both internally and externally. Internally, the tube is placed far enough from the pyloric antrum to prevent gastric outflow tract obstruction, but not too far caudally. Externally, the tube should exit caudal to the last rib.
Step 5
Once the tube site has been selected, a stab incision is made through the skin using a # 15 blade. With the endoscopist observing, a 16- to 18-gauge over-the-needle catheter (Figure 5A) is inserted directly through the abdominal and gastric walls (Figure 5B).
The stylet is removed and a long suture (if a latex tube is being used) or placement wire (if included in a kit) is passed through the catheter into the gastric lumen (Figure 5C). The endoscopist now grasps this placement suture/wire with retrieval forceps or a snare and pulls it through the esophagus and out the mouth.
Forceps should be placed on the caudal end of the suture to prevent the suture from being pulled all the way through the body wall. The catheter is now removed, and only the suture/wire should be passing through the incision (Figure 5D).

FIGURE 5A
Step 6
If a latex tube is being used, the flared end is cut and the widest part of the tube saved for use as a flange (See Step 10). Then, two V-shaped notches are cut into the nonmushroom end of the tube (Figure 6A).
An 18-gauge needle is passed through the tube just below these notches. The end of the suture exiting the patient's mouth is then passed retrograde through the introduction catheter previously used, a pipette tip, or an open-ended tomcat catheter (Figure 6B).
The suture should continue through the 18-gauge needle, passing through the feeding tube (Figure 6C). The needle is now removed, and the suture can be tied to the tube or passed back through the catheter/pipette and tied at the tip. The tube should be pulled snugly into the catheter/pipette, forming a secure and smooth transition between the tube and the catheter/pipette (Figure 6D).

FIGURE 6A
Step 7
Using a tube with a premade tapered end and loop (Figure 7A) allows you to bypass the previous step. These tubes usually come in kits and also have a placement wire with a looped end.
The loop on the placement wire is passed through the loop on the PEG tube, and the distal end of the tube is passed through the placement wire loop. This locks the 2 pieces together (Figure 7B).


Procedure Pearl
The end of the tube should be followed by the endoscope to verify safe passage through the lower esophageal sphincter and appropriate placement of the tube.
Step 8
The catheter and tube are lubricated and gently guided into the patient's mouth by applying traction on the abdominal end of the suture/wire.
The end of the tube should be followed by the endoscope to verify safe passage through the lower esophageal sphincter and appropriate placement of the tube end directly against the gastric wall (Figures 8A and 8B; these figures show 2 different catheter tip types).
Placing your hand on the body wall around the tube exit site will apply counterpressure to help facilitate safe exit of the tube through the wall (Figure 8C).
The skin incision can be enlarged if needed to allow passage of the tube. However, the incision should be kept small enough to help form a tight seal. Neither internal nor external signs of blanching of the gastric mucosa and skin, respectively, or excessive tension should be observed. These findings raise concern for the development of pressure necrosis. If the incision size is adequate, you should be able to rotate the tube 360 degress once the tube end is properly positioned against the gastric mucosa.

FIGURE 8A
Step 9
The tube is cut to an appropriate length; the author usually recommends 4 to 6 inches from body wall to end of the tube. However, there may be some circumstances where a longer or shorter tube is beneficial (eg, fractious animals, history of pulling tube out). A proper end piece should be placed on the open end of the tube; if a polyurethane tube with a bumper is being used, this step helps seal the air inside the bumper, making it firm and difficult to unintentionally remove. A clamp placed on the tube may help prevent reflux of gastric contents into the tube and possible occlusion.

Step 10
Tubes should exit the body perpendicularly and be secured to the body wall. This is accomplished in a latex catheter by making a flange from the previously cut flared end of the tube. If a kit is being used, it may come with a premade flange or a plastic fixation device that can be placed over the tube to secure it to the body (Figure 10A).
If using a flange made from a latex catheter, take the cut piece and make 2 holes in the walls of the tube that will allow the flange to slide down the tube and contact the body wall (Figure 10B). The flange should provide enough tension to help hold the mushroom tip in place and prevent tube migration into the abdominal cavity, but should not compromise the lumen of the tube. Leave approximately 5 mm between the flange and the body wall to allow for motion and tissue swelling.
Premade flanges or fixation devices should be used according to the manufacturer's recommendations and should not indent the skin. Once the tube is secured and placement verified endoscopically, air is evacuated from the stomach.


Step 11
A light wrap should be placed over the tube and changed daily until the tissue is clean and healed. After this point, the tube can be kept covered by using a stockinette cut into a tee shirt, pet clothing, or human clothing. The tube should not be used for 12 to 24 hours after placement to allow for proper healing. To prevent risk for peritoneal leakage of gastric contents, the tube should not be removed until a stoma has formed, usually 14 days after placement.

Procedure Pearl
To prevent risk for peritoneal leakage of gastric contents, the tube should not be removed until a stoma has formed, usually 14 days after placement.