Lateral Ear Canal Resection in Dogs
Mona Qahwash, DVM, Georgia Veterinary Specialists
Karen M. Tobias, DVM, MS, DACVS, University of Tennessee
Lateral ear canal resection, previously known as the Zepp procedure, can provide several benefits in dogs and cats with nonhyperplastic ear disease. It improves ventilation to the ear canal, thereby decreasing humidity, moisture, and temperature to foster an environment less conducive to bacterial and fungal growth.1-3 It can also reduce secretion accumulation and subsequent otitis externa and/or otitis media in animals with congenital or traumatic stenosis of the vertical canal. In addition, lateral ear canal resection can improve intraoperative visualization and allow resection of small masses of the lateral wall of the vertical canal.1
Patient selection for lateral ear canal resection is critical for a successful outcome.3 The horizontal canal must be patent on otoscopic examination, and no proliferation or calcification of the external canal should remain after surgery.2 Concurrent dermatopathies should be under control at the time of surgery, and owners must agree to continue treating underlying causes of otitis.4 Success rates are below 15% in cocker spaniels because of their underlying skin and ear conditions.4 At the authors’ practices, lateral ear resection is used only for mass removal or to correct congenital or traumatic canal stenosis. The procedure has a high failure rate for other conditions, and owners should be informed that future surgery (eg, total ear canal ablation, lateral tympanic bulla osteotomy) may be needed.
If possible, preexisting septic otitis externa should be treated with appropriate antimicrobials based on canal culture and sensitivity testing before surgery is undertaken. Unless caused by congenital stenosis, otitis media is best addressed before surgery. Alternatively, myringotomy and bulla cleansing can be performed during the procedure if the veterinarian is experienced with these treatments.
Preoperative Preparation
Many veterinarians clip and prepare the entire pinna to facilitate tissue manipulation and maintain anatomic orientation during intraoperative dissection. Skin and pinnae should be cleansed with antiseptic scrub solution; cotton can be temporarily placed in the canal to prevent detergent from reaching the tympanic membrane.
Because of concerns regarding ototoxicity, many veterinarians use sterile saline instead of 0.05% chlorhexidine or 1% povidone–iodine to flush the canal. Ototoxicity appears to be related to antiseptic concentration and its contact time within the round window.5 In several studies of dogs treated with topical otic chlorhexidine preparations, no vestibular effects were noted and brainstem auditory evoked response (BAER) hearing tests remained unchanged, regardless of whether the tympanic membrane was intact.6,7
Because completely removing microorganisms from the canal can be difficult, ear canal resection is usually considered a clean–contaminated or contaminated surgery. However, blood supply to the region is excellent, and infections are uncommon; therefore, prophylactic antibiotics may be unnecessary.
Suture Selection
Suture selection is based on clinician preference. Some veterinarians use 3-0 nonabsorbable monofilament suture in an interrupted pattern to prevent failure of the entire suture line if tension, necrosis, or trauma causes suture failure. Others prefer a continuous pattern of 3-0 or 4-0 absorbable or nonabsorbable monofilament along the pinna margins to reduce surgery time and postoperative accumulation of debris around knots. Incisions apposed with monofilament absorbable suture should be rechecked 10 to 14 days after placement to determine whether suture removal is necessary. Underlying skin and ear issues also can be checked at this time and owner compliance with postoperative treatment verified.
Related Article: Flushing the External Ear Canal
Related Article: Pseudomonas Otitis
Postoperative Considerations
Postoperative analgesics usually include injectable opioids for the first 16 to 24 hours and, if desired, local anesthetic blocks. An NSAID can also be administered if the patient has not received glucocorticoids. Other options for oral pain relief in dogs include tramadol hydrochloride, gabapentin, or acetaminophen combined with codeine. The animal should wear an Elizabethan collar to prevent self-trauma, and treatment of the primary causes of otitis should continue.
Complications
Complications are usually related to poor patient selection; failure to treat the underlying cause of otitis externa; or poor surgical technique resulting in tension, inadequate horizontal canal drainage, suture failure, or stricture formation.2 If dehiscence occurs, the site can be managed as an open wound until inflammation or infection resolves. Failure rates range from 34.9% to 55%.4,8,9 In one study, success rates increased from 45% to 63% when cocker spaniels were excluded, and 80% of shar-peis had good or excellent outcomes.4 Shar-peis were thought to have congenitally smaller canal diameters; lateral ear canal resection would, therefore, be performed to treat the primary cause of otitis (ie, canal stenosis).4
Step-by-Step: Lateral Ear Canal Resection
What You Will Need
#10 or #15 scalpel blade and handle
DeBakey or Adson–Brown thumb forceps
Needle drivers
Mayo scissors
Metzenbaum scissors (optional)
Hemostats or electrocautery (optional)
3-0 or 4-0 monofilament suture
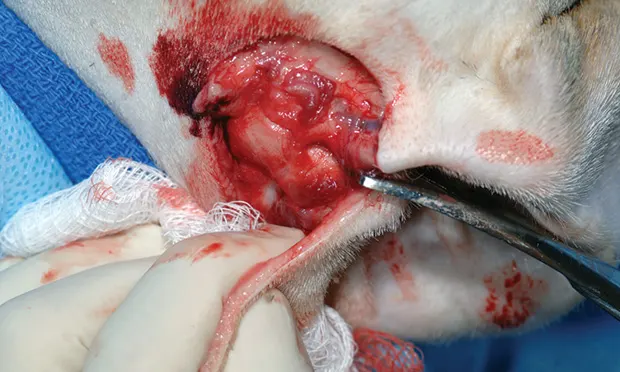
Step 1
Make a U-shaped skin incision (A), starting and ending at the pretragic and intertragic incisures (B), which are adjacent to the tragus, and extending ventrally to the level of the horizontal ear canal.
Author Insight
The ear’s vertical canal spirals inward as it progresses proximally toward the horizontal canal. The distal portion of the vertical canal may contain an indentation (yellow arrow) that distorts the anatomy. The incisures, which define the distal borders of cartilage flap development, are noted.


Step 2
Dissect along the lateral surface of the vertical ear canal (A), keeping the scissors parallel to the canal, until the canal is exposed (B). In some dogs, the parotid salivary gland (blue arrow) covers a portion of the vertical canal (black arrow); transection of these tissues does not cause complications.


Step 3
Begin formation of a drainboard by making 1- to 1.5-cm cuts down the lateral wall of the vertical canal, starting at each of the incisures (A, B); transection begins dorsally at the pretragic and intertragic incisures. Alternate cartilage cuts along each side of the flap (C, blue arrow) while observing the interior of the vertical canal (black arrow) to maintain even drainboard width.
Author Insight
Attention to detail may prevent inadvertent narrowing of the flap or accidental transection of the medial wall of the vertical canal.


Step 4
As the cuts approach the horizontal canal, evaluate the opening by pulling the flap ventrally. If the opening is oval, redirect the scissors to cut the cartilage at the rostral and caudal midpoints of the canal. This produces a round opening that is more likely to remain open.
Author Insight
Additional cuts at the hinges of the flap may prevent narrowing of the new canal.

Step 5
Transect the skin and ventral portion of the cartilage flap to make a drainboard of the desired length.
The excess skin and cartilage have been removed. Note how the canal opening remains circular as the flap is pulled ventrally.

Step 6
Place sutures between the corners of the drainboard and the skin. If the drainboard epithelium is thick, exclude cartilage from the suture bite so the skin edges are apposed. If the new opening is blocked because the flap is not pulled ventrally, remove extra facial skin before placing the corner sutures.
Author Insight
Sutures are placed between the corners of the drainboard and the lateral facial skin first.

Step 7
Place sutures between the hinged (crotch) areas of the flap and adjacent skin; note the relation to the ventral drainboard of the canal (black arrow). Because of the depth of the ear canal, these sutures will include cartilage (A). Make sure the skin is not under tension at these sites; if tension is present, remove the hinge sutures and replace them using facial skin farther proximal along the incision margin (B).


Step 8
Fill in remaining areas with sutures of interrupted or continuous pattern. Place sutures so the epithelium covers exposed cartilage edges.
Apposition of the vertical canal margins and skin using a continuous pattern of rapidly absorbable monofilament suture

Step 9
Trim suture ends short, particularly those pointing inward into the canal epithelium.
