Injury that results in disruption of the continuity of the body structure (ie, wound) is a common cause of emergency presentations.1 Some wound healing techniques (eg, delayed primary closure, secondary closure, secondary intention healing) involve initial treatment of the injury as an open wound (ie, prolonged exposure of subdermal tissues) and are typically used for wounds that are dirty and/or infected, wounds with possible necrotic tissue, wounds that would be under excessive tension with primary closure, and wounds in patients with increased anesthetic risk.
Wound Type
Wounds are typically categorized as clean, clean-contaminated, contaminated, or dirty. Clean wounds are not a result of trauma, have no evidence of infection, and are typically surgical in origin. Most clean wounds can be closed via primary wound closure, depending on the tension. Clean-contaminated wounds are typically surgical wounds of the respiratory, alimentary, or genitourinary tracts or skin wounds with minor breaks in asepsis and can often be closed primarily with or without placement of a drain. Contaminated wounds are mostly traumatic or surgical wounds in which there is a major break in asepsis. Dirty wounds encompass older traumatic wounds, nonsurgical wounds in which a viscus is perforated, and wounds with >100,000 organisms/g of tissue.
Phases of Healing
Although wounds have many possible etiologies, the overarching principles of wound healing are universal. The phases of healing are described as inflammatory, proliferative, and maturation/remodeling. These phases can overlap, and almost all wounds have components in all stages.
Inflammatory Phase (Days 0-4)
Beginning at the moment of injury, trauma to the skin triggers activation of the inflammatory cascade. Grossly, the induced combination of vasodilation and increased vascular permeability renders the area painful, warm, and visibly erythematous and edematous. Debridement begins when WBCs migrate into the wound. Macrophages prepare the wound bed for the next phase via phagocytosis of debris, microbes, and apoptotic cells.2
Proliferative Phase (Days 4-12)
The goal of the proliferative phase is to cover the wound with a healthy granulation bed and recreate preinjury architecture. This phase is primarily dominated by fibroblasts, endothelium, and epithelium and, grossly, is marked by the formation of pink, vascular granulation tissue at the wound surface.2 Microscopic features include fibroblasts, macrophages, collagen, and a dense capillary bed.
Moisture Importance & Concerns
Ensuring adequate moisture during the inflammatory and early proliferative phases can foster autolysis of damaged tissue, aid leukocyte migration, encourage local preservation of cytokines and growth factors, enable contact of systemically administered antibiotics with the wound bed, encourage epithelialization, decrease scar production, and decrease pruritus and pain.15 The degree of wound moisture, however, is an important consideration, as excessively moist wounds can increase the risk for development of folliculitis, maceration of healthy wound borders, and bacterial colonization that can lead to clinical infection.10 Excessively moist wound environments can be avoided with adequate debridement, appropriate choice of dressing, and bandage change schedules tailored for individual wound production.
Maturation/Remodeling Phase (up to 12-18 months)
Maturation is the longest phase and ensures the return of tissue integrity. Collagen fibers mature from type III to type I, optimizing tissue strength and stability.2,3
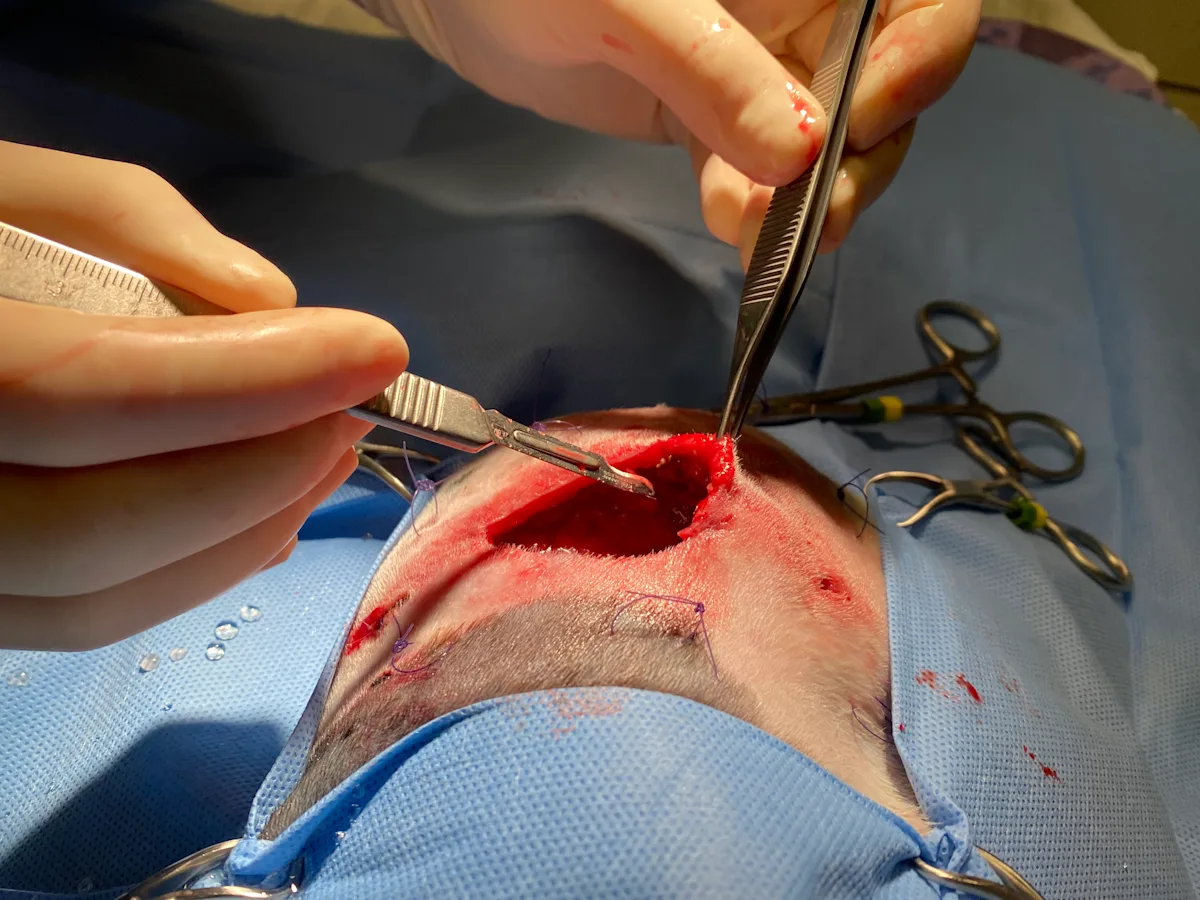
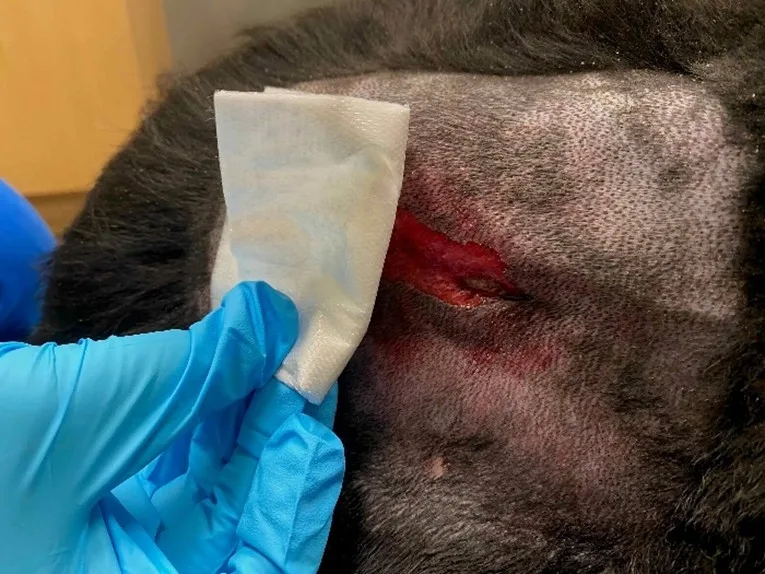
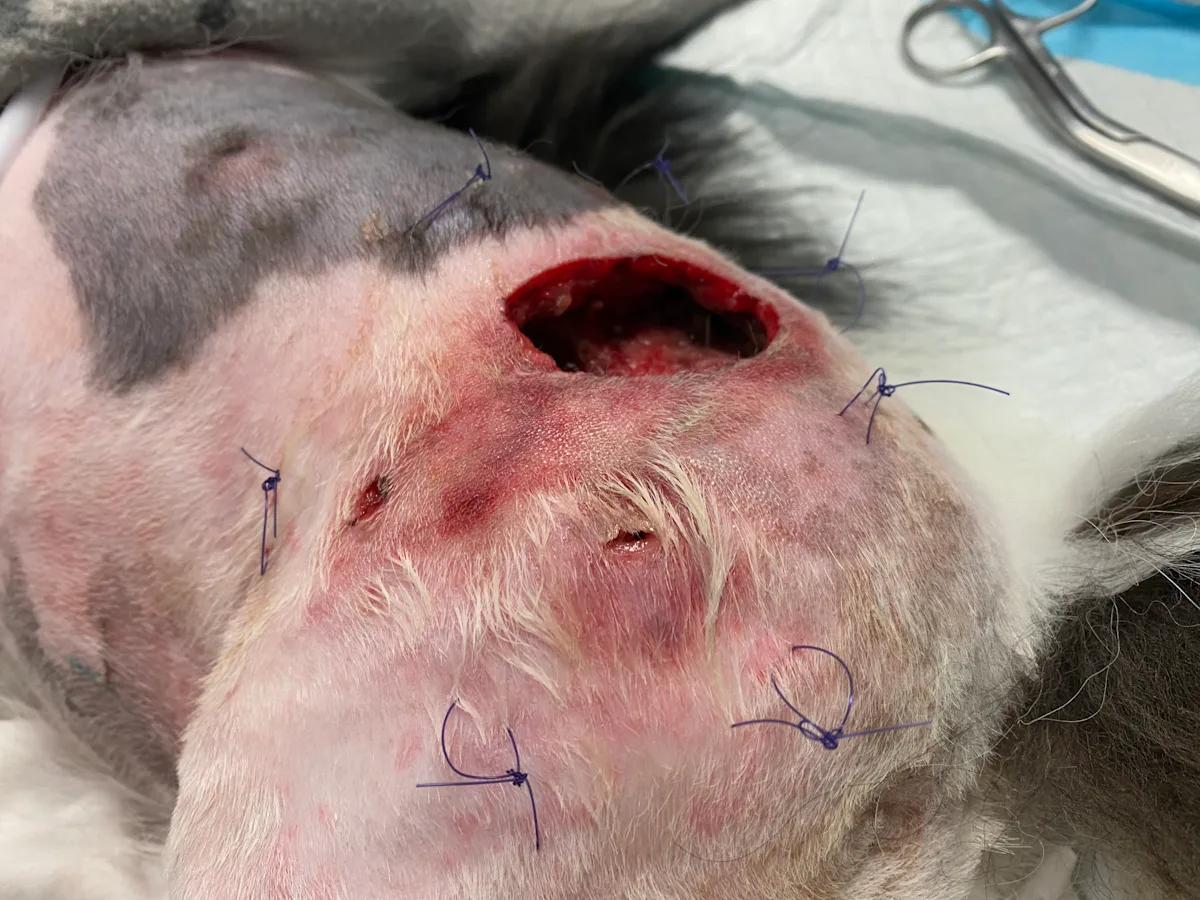
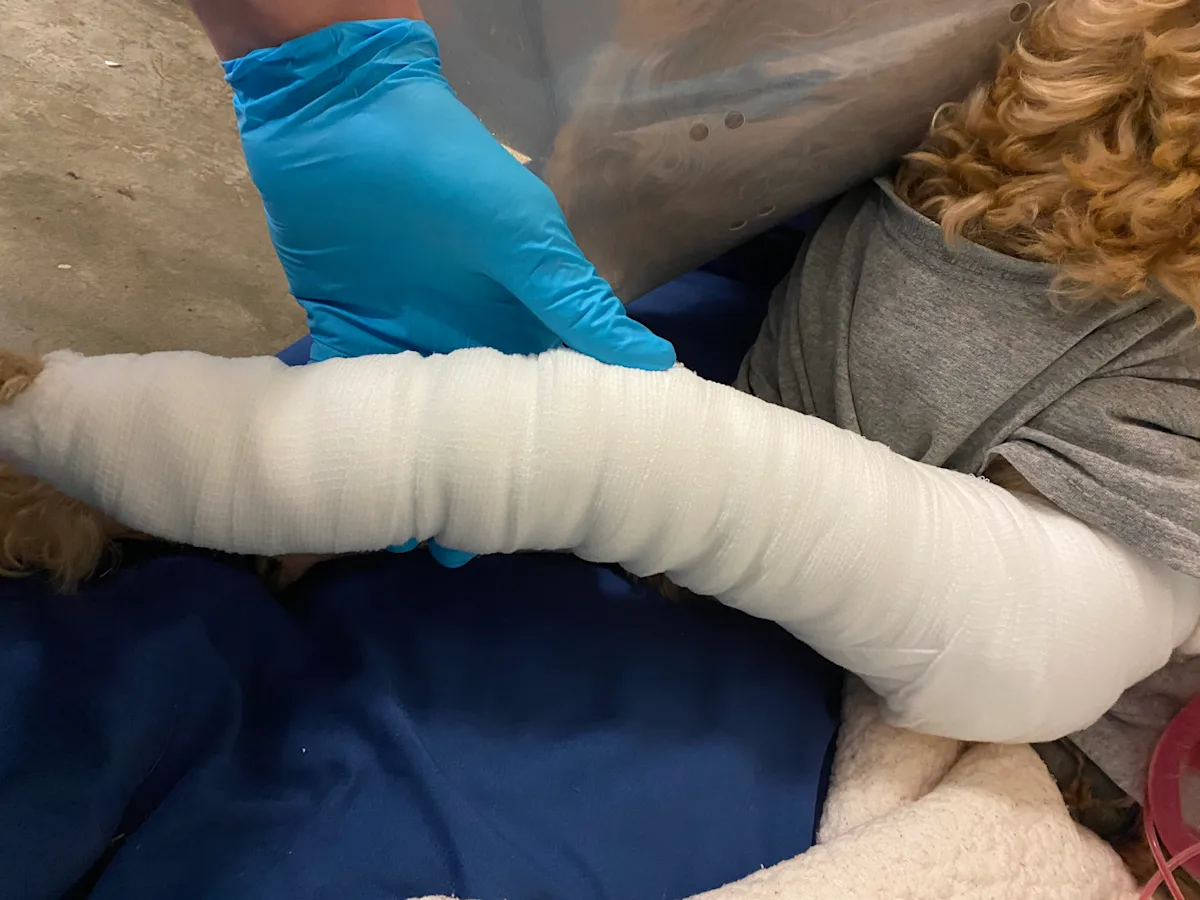
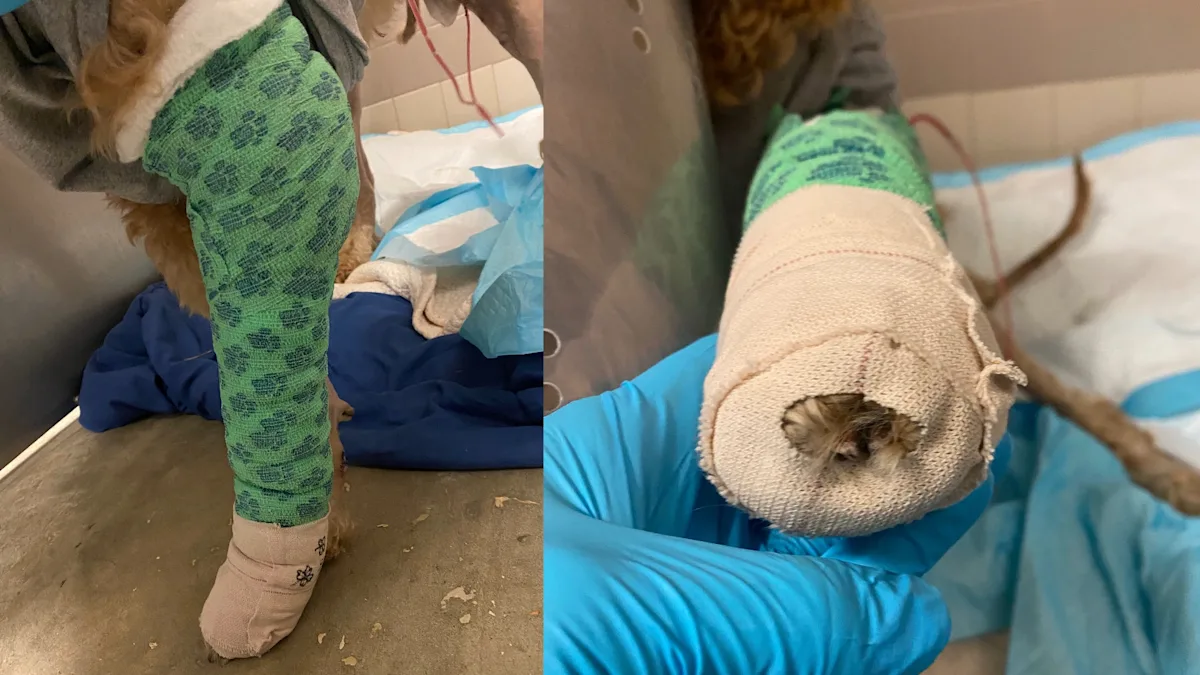
This article examines the steps involved in the initial and ongoing management of open wounds in the inflammatory phase (Figure 1).
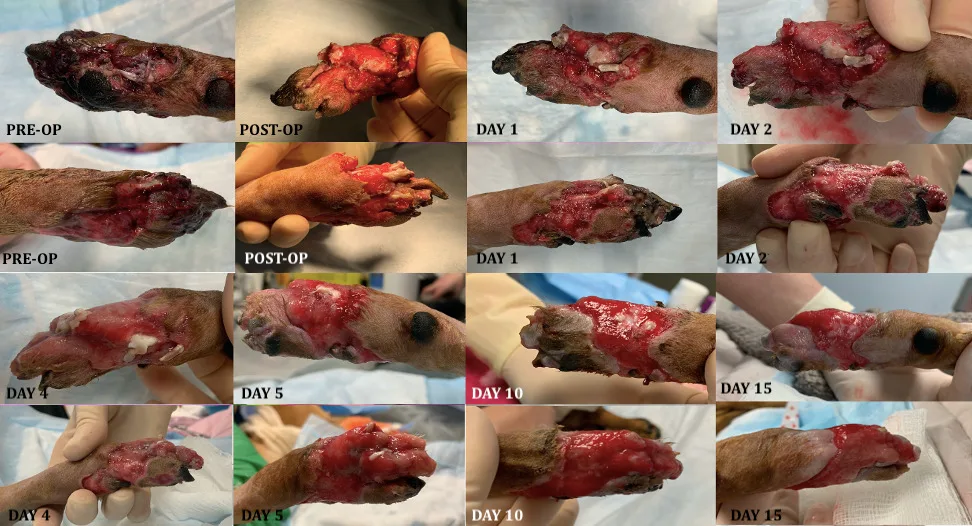
FIGURE 1 Progression of a distal pelvic limb wound through the inflammatory and proliferative phases following surgical debridement
Antimicrobial Stewardship
Antimicrobials should be used judiciously. Minimally contaminated wounds can be thoroughly lavaged without the need for systemic antibiotics, as studies have shown significant reduction in bacterial numbers in acute wounds following lavage.4 Broad-spectrum topical antibiotics (eg, neomycin/polymyxin/bacitracin) and antiseptics (eg, chlorhexidine, povidone-iodine) are preferentially chosen in the early healing cycle to decrease contamination and control the development of infection.
For established infection, a culture should be obtained prior to initiation of broad-spectrum systemic antibiotics. Culture sampling should be performed following initial cleaning, ideally prior to initiation of antibiotics. Tissue specimens are generally preferred over superficial swabs and can be obtained via punch biopsy or sharp excision of deep, central tissues with a scalpel blade. Cytology can help confirm bacterial presence, rule out other potential underlying causes of open sores, and evaluate for the presence of fungal spores. Once a healthy granulation bed covers the entire wound surface, infection is less likely, and systemic antibiotics can be discontinued.5
Variations in Species
Wound healing varies by species. In cats, the breaking strength (ie, maximal endured force before wound breakdown) of sutured wounds has been reported to be less than half of that measured for dogs at day 7. Wound contraction and cutaneous perfusion were also greater in the inflammatory and early proliferative phases for dogs when compared with cats.16
Step-by-Step: Initial Stabilization & Approach to Managing Open Wounds in the Inflammatory Phase
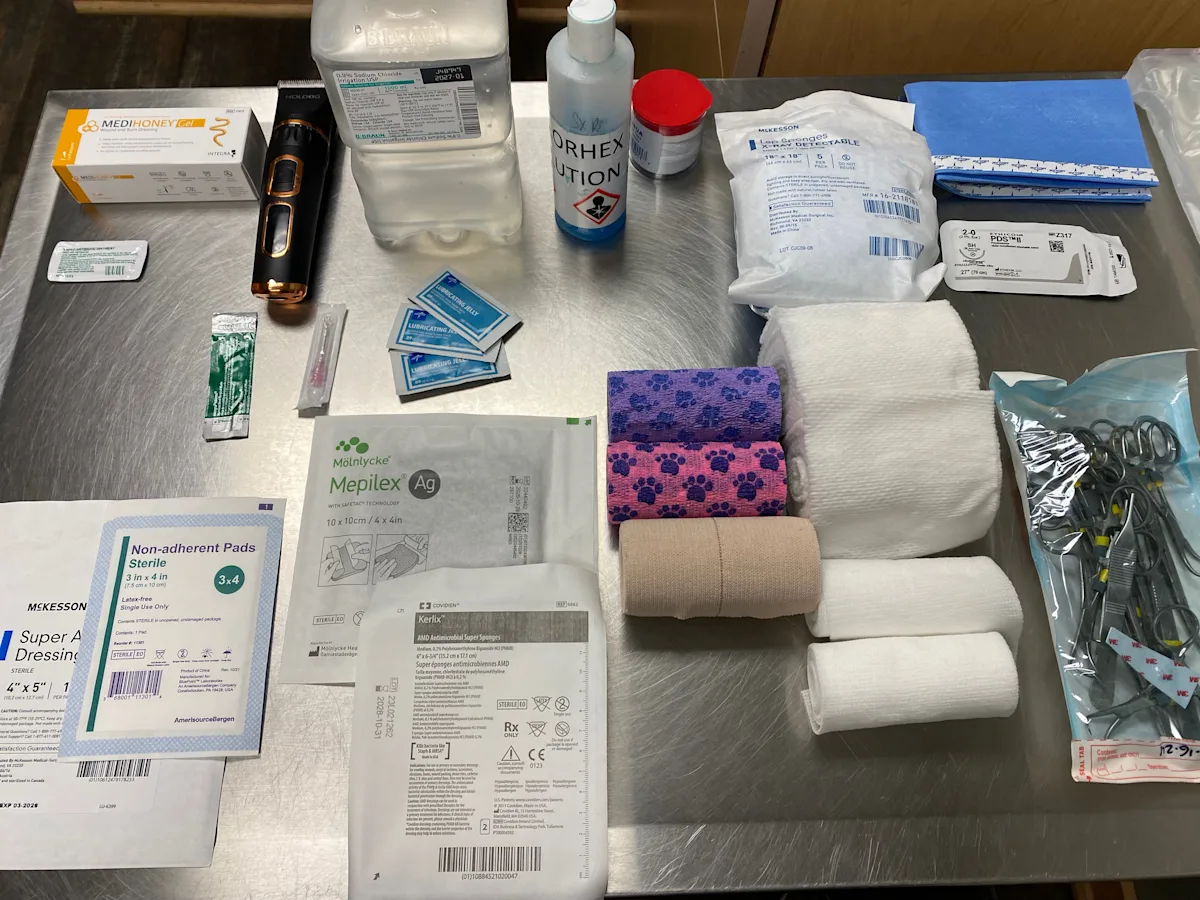
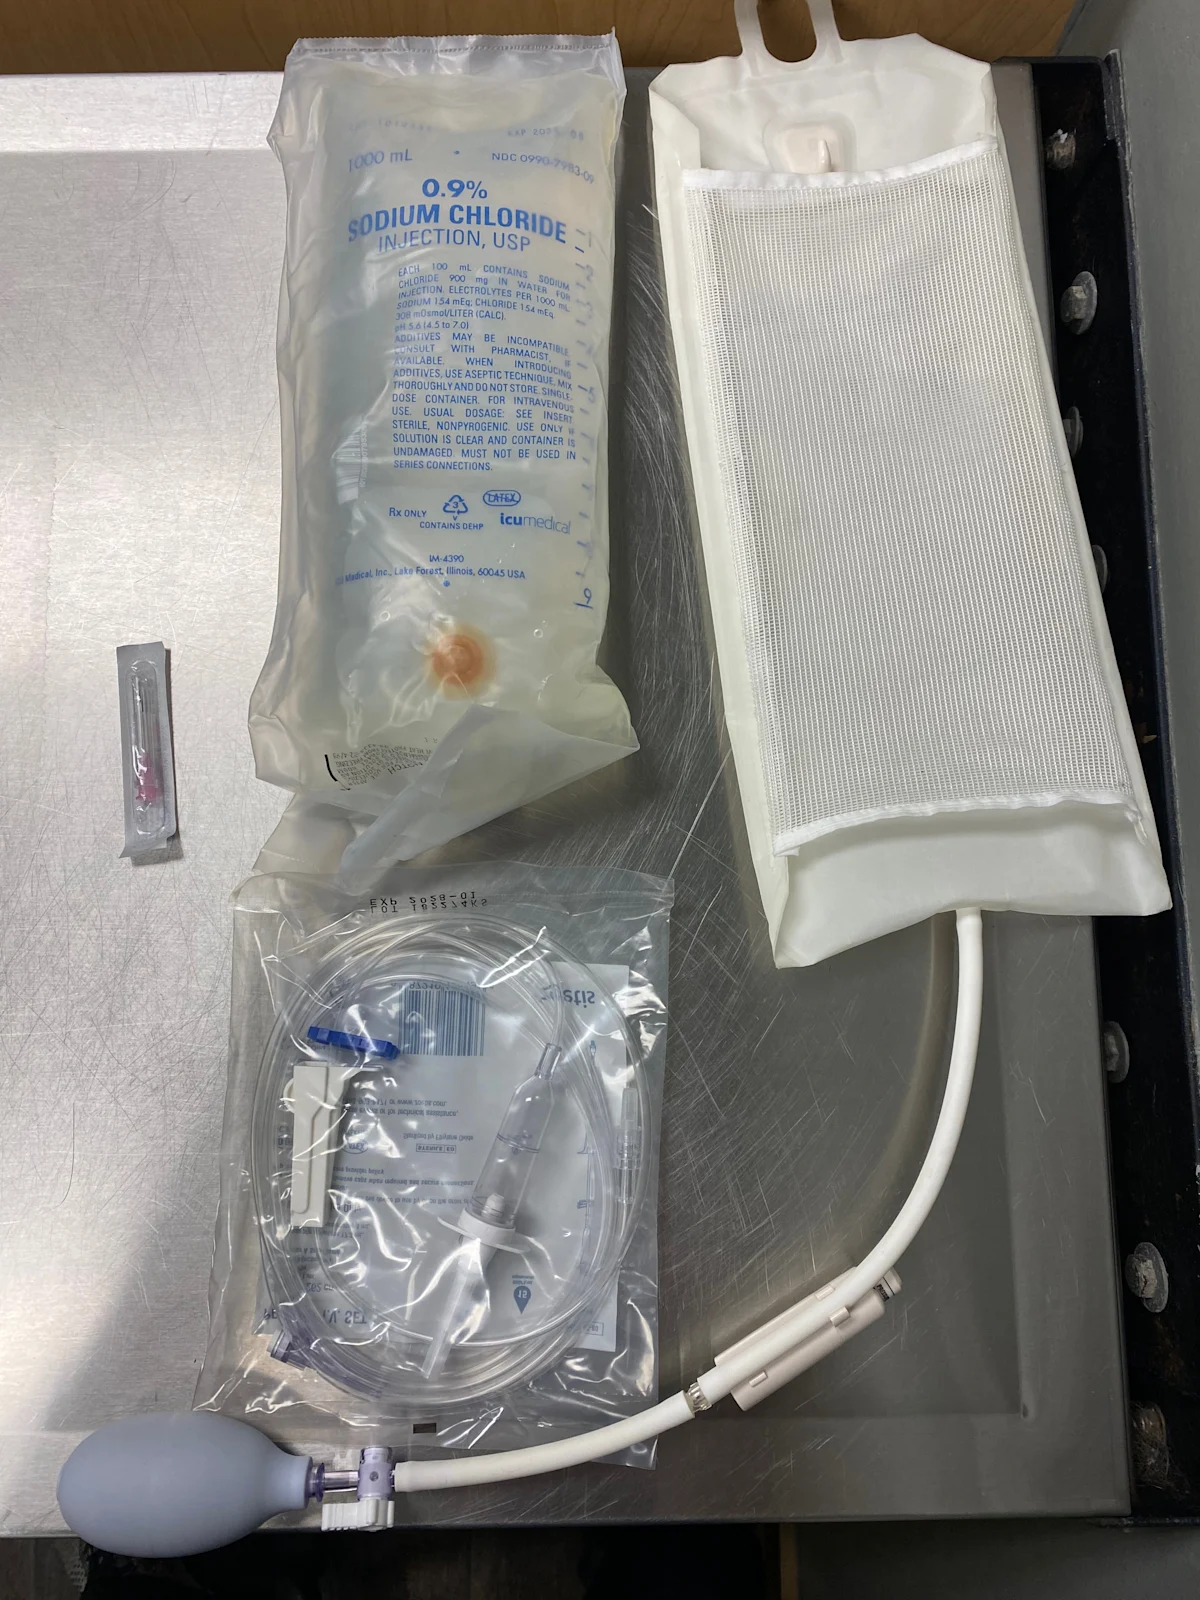
What You Will Need
Sterile lubricant
Surgical clippers with blade
0.1% povidone-iodine solution or 0.05% chlorhexidine solution
Sterile gauze
Lactated Ringer’s solution, saline, or tap water (1 L)
Fluid bag (1 L)
Hypodermic needle (16-22 gauge)
IV line
Pressure infusion cuff
Scalpel blade (#10)
Thumb forceps
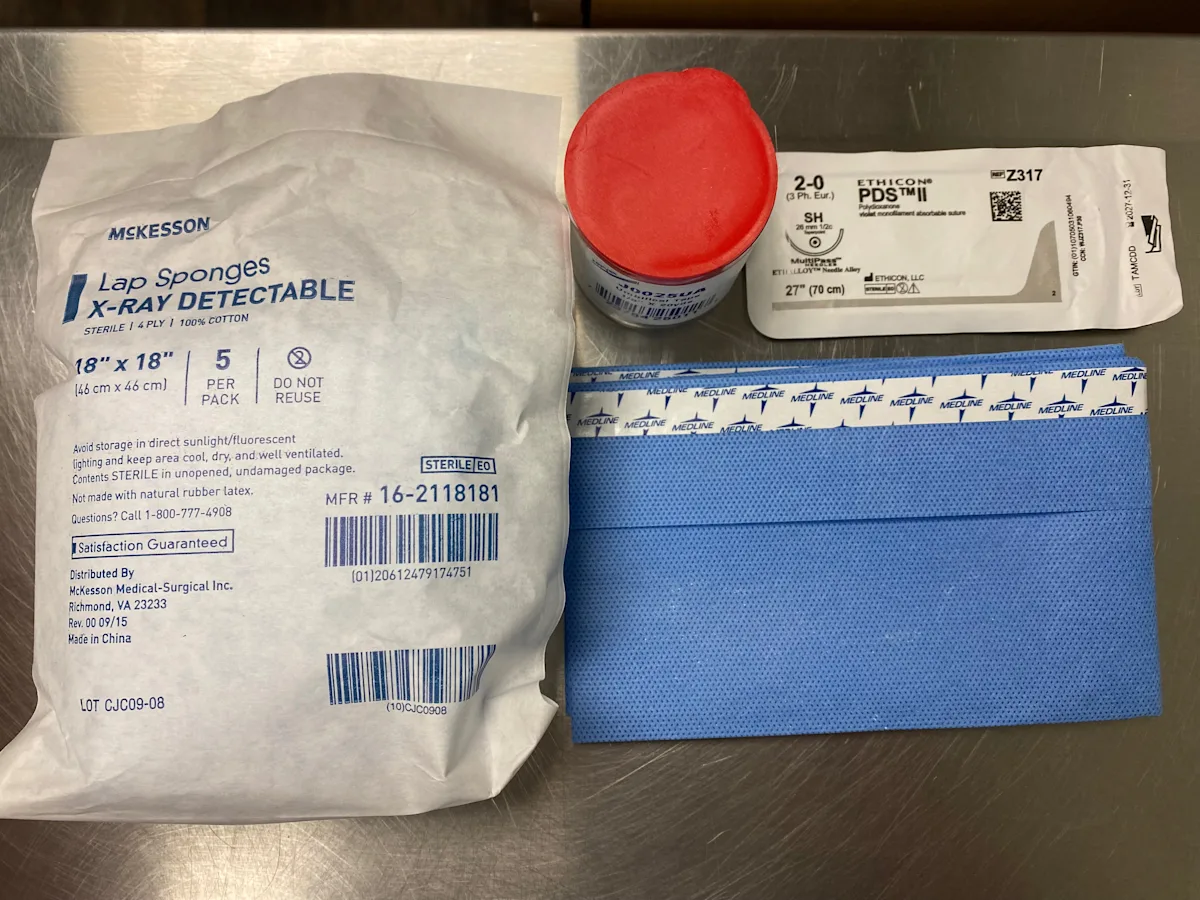
Dressing
Primary dressing layer (eg, adherent, nonadherent, absorptive, hydrophilic/moisture-retentive, bioactive)
Rolled cotton, cast padding, gauze pads, or rolled gauze
Conforming gauze
Tertiary layer (eg, elastic, self-adherent bandage tape and cotton, elastic cloth tape)
Tie-Over Bandage
2-0 polydioxanone (PDS) sutures
Needle holder
Suture scissors
Lap sponges
Umbilical tape
Step 1: Stabilize the Patient
Perform a thorough physical examination to determine cardiovascular, respiratory, and hematologic stability. Stabilize the patient as indicated via IV catheter placement, analgesia, fluid resuscitation, oxygen supplementation, and/or anxiolytics, and perform diagnostic tests (eg, blood work, radiography, ultrasonography) as appropriate.
Author Insight
Following adequate chemical restraint and analgesia, the primary wound can be addressed systematically.
Step 2: Prevent Further Wound Contamination & Clip Hair
Cover the wound with a thin layer of sterile lubricant to protect the wound bed and facilitate hair clumping during the hair clipping process.6 Clip the surrounding hair. Decontaminate the wound with sterile gauze soaked in a nonirritating antiseptic agent (eg, 0.1% povidone-iodine solution, 0.05% chlorhexidine solution).
Author Insight
The appropriate contact time for a nonirritating antiseptic agent is unknown but likely depends on the characteristics and contamination level of each wound. It has been suggested that 0.1% povidone-iodine solution and 0.05% chlorhexidine gluconate have some bactericidal activity within 15 seconds and 1 minute, respectively.7 Depending on what is commercially available, further dilution may be needed to reach these concentrations. Concentrated scrubs should be avoided.
Step 3: Remove Foreign Debris & Contaminants
Manually remove gross debris using a pressure lavage with sterile saline, lactated Ringer’s solution, or tap water.8 Attach a 1-L fluid bag to a 16- to 22-gauge needle using a regular IV line, and place the fluid bag in a pressure infusion cuff. Inflate and maintain the cuff at 300 mm Hg. Flush the wound by directing the needle.
Author Insight
Optimal fluid pressure for debridement has been previously reported to be 7 to 8 psi (≈360-420 mm Hg).9 Generation of excessive fluid pressure can drive contaminants into deeper tissues and damage healthy cells; insufficient fluid pressure can be ineffective at decontamination. Common practices (eg, using punctured bottles of sterile saline) should be re-evaluated for effectiveness.
Step 4: Debride Necrotic & Nonviable Tissue
Remove obviously necrotic tissue from the wound bed to prevent impedance of granulation formation.
Author Insight
Tissue debridement can be performed using various methods broadly categorized as nonselective or selective (Table).
Wounds are clinically treated using more than a single method of debridement (eg, surgical debridement followed by application of selective, autolysis-encouraging dressings). Tissue viability can often be assessed if fresh bleeding occurs when the affected surface is gently pierced with a 22-gauge needle.
Step 5: Select the Primary Layer
Choose a primary contact layer or dressing with a function appropriate for the stage of healing.
Author Insight
Wound dressings promote the healing process, provide protection from bacteria, and facilitate autolytic debridement. The primary layer directly contacts the exposed wound surface and absorbs and retains discharge, which is important for maintaining an appropriate level of wound hydration.
Examples for the Inflammatory Phase
Adherent dressings (eg, wet-to-dry, dry-to-dry) are a nonselective method of debridement previously regarded as the recommended standard but can cause trauma to healthy tissues and are currently rarely used.9
Nonadherent dressings (eg, nonadherent gauze pads) are commonly used in healthy wound beds with mild to moderate exudate. The porous plastic film allows passage of exudate with minimal adherence to the wound bed and surrounding tissues; however, lack of moisture retention can dehydrate tissue and slow healing progression.10,11
Absorptive dressings (eg, polyurethane foam, alginate) absorb and retain exudate, which promotes autolytic debridement and moisture retention in moderately to highly exudative wounds.
Hydrophilic/moisture-retentive dressings (eg, hydrogel-containing) absorb excessive exudate while retaining adequate moisture for the wound surface and are especially useful for minimally exudative wounds to promote epithelialization.
Bioactive dressings (eg, manuka honey) contain a supersaturated solution of sugars with antibacterial properties that aid in reducing tissue edema, as well as stimulating macrophage migration, angiogenesis, and epithelialization,11 and are best used in the early inflammatory phase until a healthy granulation bed is formed.12,13
Step 6: Apply the Primary Layer
Place the wound dressing directly over the wound surface, carefully following the contour of the wound.
Author Insight
Improper application of moisture-retentive dressings to include tissues that extend beyond the wound margins can increase the risk for moist maceration of healthy tissue.
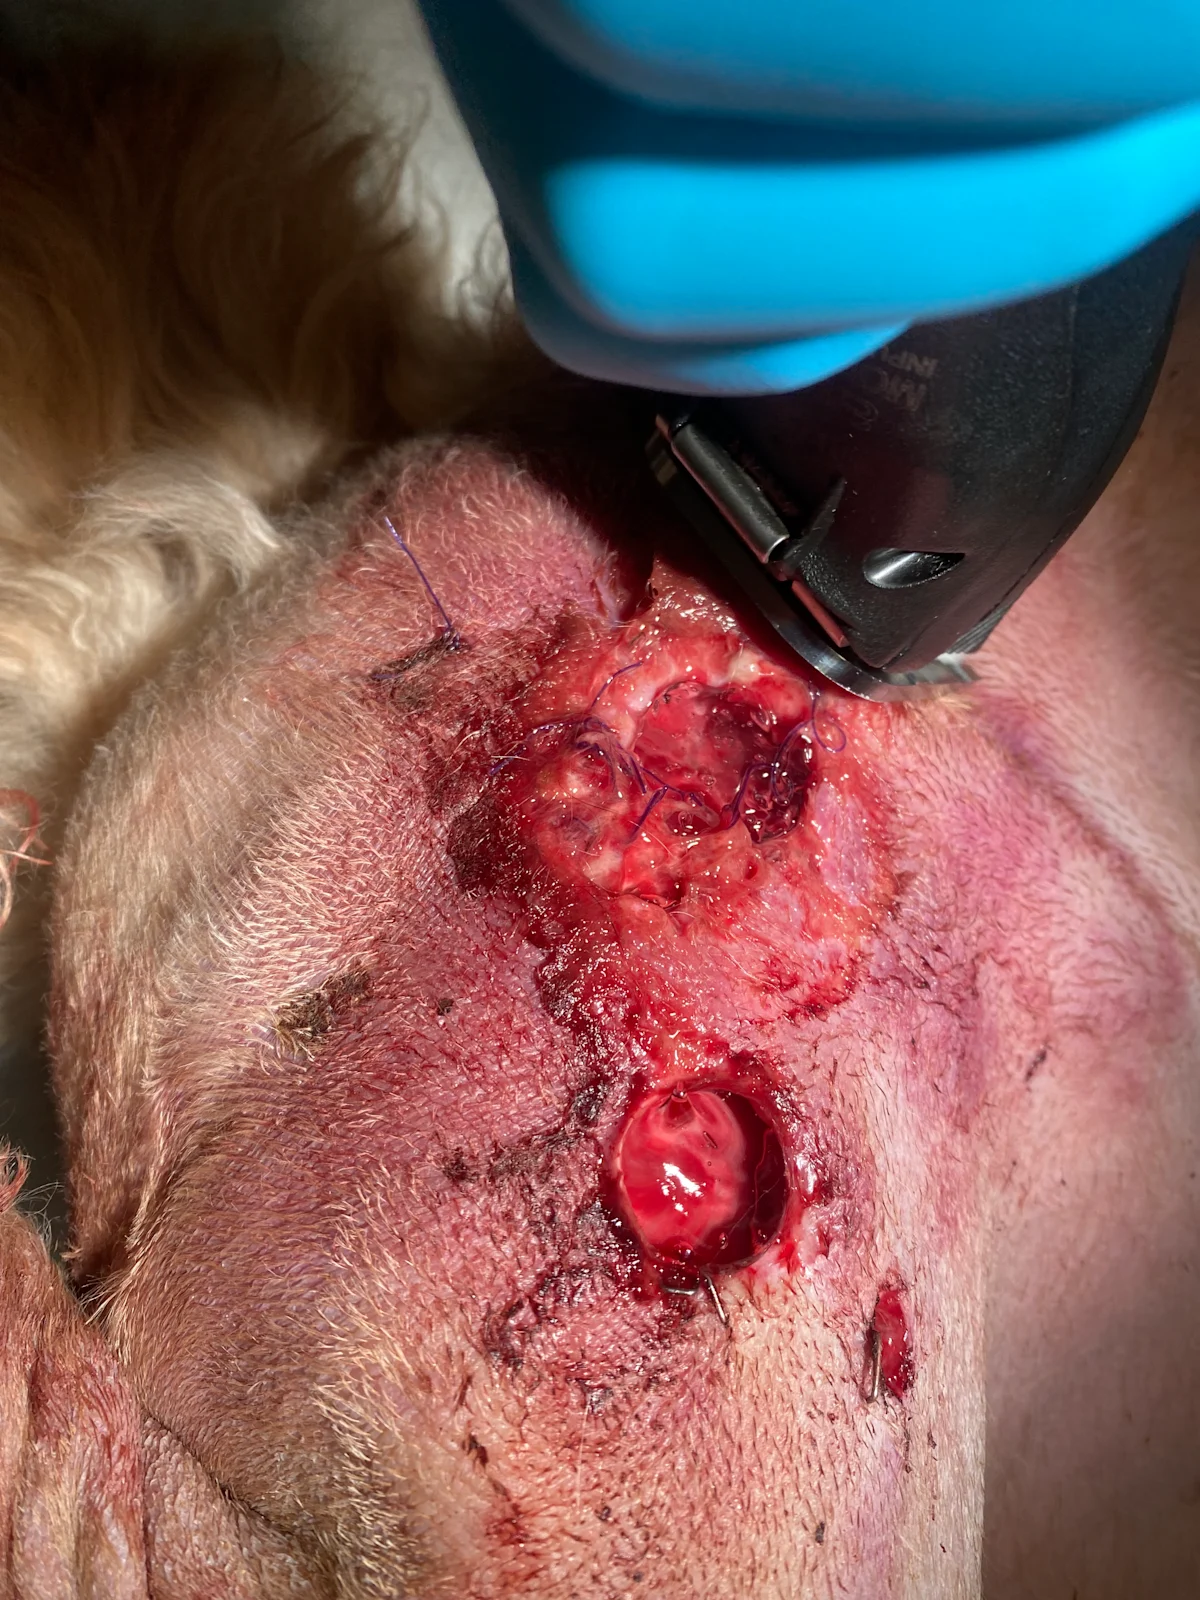
Step 7: Apply a Tie-Over Bandage (Optional)
Place loose, interrupted sutures (typically, 2-0 monofilament) circumferentially around the wound margin 2 to 3 cm from the edge, leaving a 1 to 2 cm in diameter loop. Apply the desired dressing to the wound bed before lacing folded umbilical tape between opposing loops in a back-and-forth (ie, zigzag) pattern, securing the dressing against premature slippage.
Author Insight
Tie-over bandages are important for wounds in which a traditional bandage is not an option or bandages cannot be secured to the wound bed.
Step 8: Apply a Secondary Layer (If Tie-Over Bandage Is Not Used)
Roll layers of gauze or rolled cotton uniformly, overlapping by 50% to ensure organization and support. Although the fragility of cotton gauze often makes it more likely to separate from itself rather than to constrict, take care not to overly tighten the circumferential layers. Place a single or double layer of conforming gauze over the first layer with 50% overlap between each wrap. Ensure appropriate circumferential pressure by applying one-half of the circumference (eg, medial to lateral) of the applied wrap with reasonable tension and applying the other half (eg, lateral to medial) across the remaining circumference with no tension.
Author Insight
The secondary layer is typically rolled cotton, cast padding, gauze pads, or rolled gauze and accounts for the bulk of the absorptive and protective layers. Thickness varies through the wound healing cycle and becomes thinner, more mobile, and less absorptive with time.
Step 9: Apply the Tertiary Layer
Layer the tertiary wrapping around the covered wound, following the course of the primary and secondary layers. Examples typically used in clinical practice include elastic, self-adherent bandage tape and cotton, elastic cloth tape.
Author Insight
The tertiary layer is typically self-adherent and binds and secures underlying layers. Care must be taken with the more elastic tertiary layers, as unintended tightening can lead to vascular or lymphatic circulatory compromise, especially when applied to distal extremities.
For limb wounds, it can be useful to leave central nails/digits exposed if possible to allow monitoring for swelling. Owners can monitor for toe separation as a crude indicator of distal limb swelling or evidence of overly tight bandages.
Selecting a Bandage Change Schedule
The frequency of bandage changes typically varies depending on the level of exudate. The dressing should be changed before becoming dry and adherent to prevent acting as a wet-to-dry bandage that nonselectively strips the healing wound of healthy cells. For highly exudative wounds, the bandage should be changed before the dressing becomes saturated.
In the early inflammatory phase, when wounds tend to be most exudative, bandage changes can be performed once daily or every few hours depending on the level of exudation and absorptive capacity of the primary layer.14 Bandage changes can be performed less frequently (eg, every 3-5 days) after the wound progresses to the proliferative phase and a healthy granulation bed has formed. Care must be taken to change bandages more frequently when slippage, damage, swelling, irritation, or odor are observed. Should strikethrough become apparent, additional thickness of the secondary layer, a more absorptive primary layer, or more frequent bandage changes should be considered. Moisture wicking from the wound through all layers of bandaging increases the risk for bacterial translocation and subsequent wound infection.
Acknowledgments
Treasa Keating, MVB; Tony McEntee, MVB; Maren Goos, DVM; Adam Ogilvie, DVM, DVSc, DACVS-S; and Meagan Walker, DVM, provided photos for this article.