How to Collect Bone Marrow Samples
Elke Rudloff, DVM, DACVECC, Lakeshore Veterinary Specialists, Glendale, Wisconsin
Collection of bone marrow cells for cytologic (aspiration) and/or histologic (core biopsy) analysis is a valuable consideration when examining cytopenias (without identifiable cause), identifying blood cell morphologic abnormalities on blood smear, or staging neoplasia (eg, lymphoma, mast cell tumor) (see Indications for Bone Marrow Evaluation). Contraindications may include anesthesia risks and infection of overlying soft tissue.
Bone Marrow Cytology (Aspiration) vs Histology (Core Biopsy)
Simultaneous evaluation of bone marrow cytology and core biopsy samples can provide a more complete overview of the disease process; samples for both can be procured from a single site. Bone marrow cytology can provide the best and most rapid evaluation of cell morphology; however, cytologic evaluation alone may not yield a specific diagnosis. In these cases, examining core biopsy can be definitive because it compares the amount of fat and connective tissue with cell numbers to provide specific information about the bone marrow’s architecture. Core biopsy can identify inflammation, neoplasia, marrow necrosis, osteolysis, and myelofibrosis. Depending on the case, cytology may identify these disorders as well.


Common bone marrow sampling sites include the proximal humerus (A) and the proximal femur (B).
Sampling Sites & Patient Preparation
The proximal humerus (after the epiphyseal growth plate has closed), proximal femur (in small dogs and cats), and iliac crest are the most accessible sampling sites (Figure 1). General anesthesia or heavy sedation (depending on the patient) can be used for immobilization. Appropriate cardiovascular monitoring should be provided.
Indications for Bone Marrow Evaluation
Persistent depression in RBCs, neutrophils, or platelets without evidence of regeneration (ie, reticulocytosis, bands)
Unexplained, persistent elevation in peripheral WBCs
Presence of abnormal cells (eg, megaloblastic cells, rubricytes, neutrophil hypersegmentation, giant platelets) in peripheral blood
Suspicion of bone marrow dysfunction
Staging for certain hemolymphatic cancers
Unexplained persistent hypercalcemia (dogs)
Unexplained monoclonal or polyclonal gammopathy
Fever of unknown origin
What You Will Need
Lidocaine, 2–4 mg/kg (may be diluted 50% with sterile isotonic saline)
Sterile gloves
Scalpel blade, #11
Bone biopsy needle (eg, Illinois Sternal 15–18 g, 1–2 inches or Jamshidi 11–13 g, 2–4 inches; cardinal.com)
Syringe, 6–12 mL
Glass slides and/or laboratory container*
10% buffered formalin in small container
Hypafix dressing, if necessary
* If a laboratory is to receive the sample, it should be contacted in advance, as some require fresh smears, others require anticoagulated samples, and others require clotted samples. Anticoagulant may be placed in the aspirating syringe before sampling.
Step-by-Step: Core Biopsy Sample of Bone Marrow
Step 1
Surgically prepare the area (in this case, the lateral proximal humerus) and inject local anesthetic into the dermis and periosteum. Drape as necessary.

Step 2
Use a #11 blade to make a facilitating incision in the skin over the proximal humerus.

Step 3
Remove the stylet from the collection needle, keeping it sterile.

Step 4
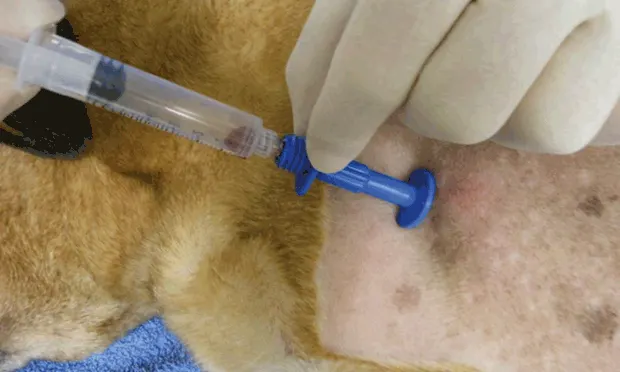
Seat the collection needle into the periosteum along the cranial and lateral aspect of the greater tubercle at the proximal humerus (A); use firm pressure and a twisting wrist motion to direct it ~1 cm along the axis of the bone, perpendicular to the flat surface. Penetrating the cortex requires persistence and effort. Once it is firmly embedded in the bone (B), the needle should be rotated 360° in both directions and rocked back and forth to disconnect the sample from remaining tissue.


Step 5
With the stylet, push the core sample through the bottom of the needle (Illinois) (A) or top of the needle (Jamshidi) (B) and into a formalin jar. Replace the stylet and cap.
Author Insight
To ensure that the needle is in bone and not surrounding soft tissue, wiggle the needle—the bone should move with it.


Step-by-Step: Bone Marrow Aspiration & Cytology
Step 1
Insert the needle into or near the opening made during the core sample collection.

Step 2
Remove the cap and stylet and attach a sterile syringe.
Author Insight: Because formalin fumes can distort cells prepared on the glass slide, keep the formalin container away from the samples and package separately.

Step 3
Gently aspirate a small amount (<0.5–2 mL) of marrow with 1 or 2 pulls. If marrow is not aspirated, either disconnect the syringe, advance further, and retry or pull out the needle and reseat.

Author Insight
The aspiration procedure can be painful; however, only a small fluid sample is needed.
Step 4
Once marrow is aspirated, disconnect and immediately place drops on slides, tilting them along one end. Immediately smear the sample in the same manner as is done with a peripheral blood smear for obtaining a manual differential count. Using minimal pressure to avoid damaging cells, pull the slides apart; work quickly to prevent clotting.
Author Insight
The core sample should have red marrow attached. If only white is seen, collect additional samples.

Step 5
Evaluate a dry slide in-house with the same stain used for a peripheral blood smear. Before recovering the patient and packaging the sample, ensure that there is a diagnostic sample (eg, spicules, cellular sample, megakaryocytes). If necessary, place a topical Hypafix dressing over the wound for a day. Prescribe an oral analgesic (eg, tramadol at 4 mg/kg q6–8h) for 3–5 days postprocedure.
Author Insight
Bone marrow samples are evaluated with a peripheral blood sample (for CBC and pathologist review) obtained at the same time or within 24 hours of marrow sample collection.
Author Insight
Although complications are rare, even in thrombocytopenic patients, they can include pain, fracture, or nerve damage (during femoral sampling). Tumor seeding has not been reported in veterinary patients.
