The Avian Physical Examination
Thomas N. Tully, DVM, MS, DABVP (Avian), ECZM (Avian), Louisiana State University School of Veterinary Medicine
To the uninitiated veterinarian or veterinary technician, the avian physical examination can be a challenging and uncertain task, with many aspects presenting concerns and problems. As with other animals, a full appreciation of the owner's interests as well as the patient's clinical condition and general physical status can be gained by following prescribed steps during the examination; a comprehensive physical examination is required to make a definitive diagnosis and plan for treatment. If life-threatening conditions are noted at presentation (eg, respiratory distress, bleeding, or severe depression), treatment should be conducted immediately in the least stressful, most effective manner, waiting until the bird improves sufficiently for further physical evaluation.
History
Never underestimate the value of questioning the owner when formulating a historical perspective of the case. First, ask basic then species-specific questions. It is helpful to use a guide when interviewing the owners (See Avian History Form). Assess the owner's general knowledge of bird care. How much of his or her knowledge has been transferred into the overall environment and nutritional offerings to the bird? The bird's age, where purchased, exposure to other birds, and past medical history all help determine possible exposure to infectious disease. Information about cage location, other animals within the house, and household environment aid in determining possible stress-induced illness. All information relating to the presenting condition that is gathered prior to an examination helps establish a definitive diagnosis and treatment plan.
Procedure Pearl
If diagnostic testing is anticipated, all materials used for sample collection should be in place prior to capture.
Procedure Pearl
Advise owners that birds should always be brought to the clinic in a small carrier cage or plastic pet carrier. This not only protects the bird during travel and in the waiting room but also allows the animal to recover from the examination without being handled.
Visual Assessment
First, assess the bird by observing it from a distance, preferably out of sight of the patient. This can be through a one-way mirror or small window in the examination room door. For the routine "postpurchase" examination, yearly physical examination, or noncritical presentation, this external examination is useful, especially if the owner is present. The sense of protection and comfort provided by the owner creates an opportunity to witness clinical signs that otherwise may be lost if the patient were excited by the presence of strangers.
The assessment consists of observing the bird's respiration, perching/walking ability, posture, feather condition, and any abnormality that was mentioned when taking the history from the owner. It provides a good indication of whether the bird's condition will allow a thorough "hands-on" physical evaluation. Conditions that may preclude a physical examination include severe dyspnea or respiratory distress exhibited by open-beak breathing, extended wings, bobbing tail, or standing or sitting in a depressed state with feathers fluffed out.
What You Will Need
The basic equipment needed for the avian physical examination includes (left to right) a digital gram scale, head light, ophthalmic tool, stethoscope, avian speculum for small birds, cotton-tipped applicators, large speculum, and a towel.

Step-by-Step: Capture, Restraint, & Identification
Capture & Restraint
If the bird is deemed able to withstand a thorough hands-on physical examination, it must be captured and restrained. This is one of the most traumatic events for veterinarians, owners, and birds during the examination process. The smooth and uneventful capture of a pet bird goes a long way in winning the confidence of the owner.
If sample collection for diagnostic testing is anticipated, all materials used for sample collection should be in place prior to capture.
Birds that have full crops (eg, young hand-fed patients or birds with crop stasis) should be allowed to digest the food or have the crop ingesta removed prior to restraint and subsequent physical examination. This may be difficult to achieve with a neonate because many illnesses will induce crop stasis.
Procedure Pearl
Cage furniture, including feed and water bowls and perches, should be removed before one attempts to capture a caged bird.
Procedure Pearl
The darkened-room technique may work for capturing smaller psittacine species (eg, budgerigars, lovebirds), but is ineffective in larger parrots.
Small Birds
The owner may bring small birds (eg, canaries, finches) to the clinic in their normal living environment. The secret to capturing canaries, finches, and similarly sized birds is to put a hand in the cage door, spot the bird, then have someone turn off the light. Grasp the bird within seconds, before it has time to accommodate to the darkness. This technique works wonders in reducing the stress of chasing the bird around the cage and is very impressive to owners. For smaller birds (< 150 grams) the bird can then be held in dorsal recumbency in the palm of the hand with the head placed between the middle finger and forefinger (Figure 1).

Large Birds
Owners should be instructed to bring large birds to the office in plastic pet carriers. The carrier can be modified by inserting a wooden dowel perch across the bottom half and then lining it with newspaper substrate. The dowel gives the patient a place to perch out of its feces while the newspaper can be changed after the fecal sample has been gathered for sampling and the bird's return trip home.
It is helpful if the owner can remove the bird to the examination table or hand the bird to the veterinarian; this is the first step to restraint (Figure 2). A white bath towel can be used to cover the restrainer's hand. Most birds will accept the towel-covered hand as it moves from in front of them to slowly grasping them from behind the neck. If a bird is reluctant to be restrained, place the towel-covered hand into the carrier and grasp the bird, without hesitation, from behind the head when it bites on the side of the container. Use a one-handed Elizabethan grip (gripping the bird under the mandible, touching the thumb to the forefinger) to hold the head while gripping the feet with the other hand (Figure 3).


With the hand within the towel, use the little finger (pinkie) to tuck the outside wing in and hold the inside wing in place against your body. By slightly extending the bird's neck, the practitioner can restrain the bird in a manner that reduces its ability to bite. The pectoral area should not be restricted or compressed while the thumb and little finger maintain body/wing security.
A grip on the mandible, with the thumb and forefinger, should never be used to restrain the head of a psittacine bird. With this grip, one never has control of the head; with larger parrots (eg, macaws) bruising of the face or fingers slipping into the beak are common sequelae.
In my experience, a towel around the body makes it difficult to complete the physical examination as it gets in the way of many examination procedures. However, some practitioners prefer towels as they prevent wing flapping and provide a less stressful examination.
Once the bird is captured, it can be held by an experienced technician or placed on an avian restraint board for completion of the physical examination (Figure 4). While some practitioners deem restraint boards as unnecessarily traumatic to the bird, they provide secure restraint without the added stress of its fighting with the restrainer and minimize the need for additional staff assistance.

Procedure Pearl
An external assessment or examination helps determine the exterior physical status of the avian patient. A basic evaluation on a patient exhibiting clinical signs associated with disease includes a complete blood count, plasma biochemistry panel, and whole body radiographs. Other diagnostic tests should be performed as needed to confirm a diagnosis or monitor treatment response.
Identification
Verify the identification of the patient, if possible, through its leg band or microchip implant, which would be located in the pectoral muscle. To identify the sex of the bird, check for a tattoo, a black subcutaneous amorphous circle, on the right ventral propatagium (wingweb) for a male or on the left ventral propatagium for a female.
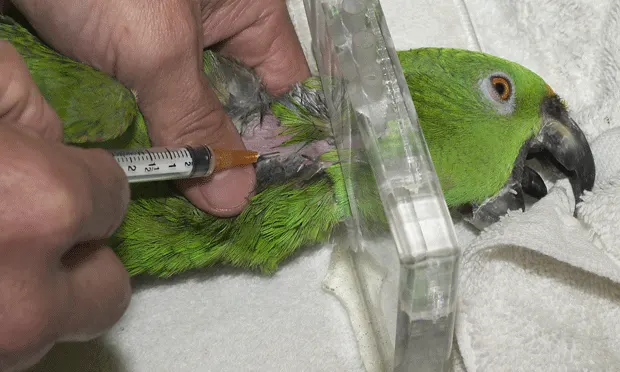
Diagnostic Samples
If conducting diagnostic testing, collect samples prior to the examination process (Figure 5). Waiting until the end of a stressful physical examination may alter the test results. The vein of choice for blood collection in pet avian species is the right jugular. Once the bird is restrained, the examination is similar to that of other animals. It begins at the head and ends at placing the bird back in its carrier.

For Your Information
Understanding of basic nutrition and husbandry issues is recommended for those who provide the care and treatment of companion avian species.
Leg bands aid in patient identification but they may cause stricture of the lower limb, resulting in autoamputation of the foot or serious trauma to the leg when entangled in cage hardware. Because of these common presentations, microchip application is recommended for companion avian species identification.
Few, if any, circumstances warrant an owner bringing a bird to a veterinarian's office outside of a cage or a pet carrier. Too many opportunities exist for the bird or owner to be injured in an unfamiliar environment often including dogs, cats, and curious humans. After the examination, the avian patient is often stressed and upset and may even bite an owner who is trying to "settle it down."
The nonfused pubic bones in the caudal coelomic cavity are the landmarks aviculturists use to determine sex of certain avian species. Commonly called pelvic sexing, this indicator is very inaccurate in monomorphic birds.
Step-by-Step: Physical Examination
What You Will Need
Digital gram scale
Headlight
Ophthalmic tool
Stethoscope
Avian speculum for small birds
Cotton-tipped applicators
Large speculum
Towel
Step 1
Look at the beak and head straight on, examining for symmetry and normal beak occlusion

Step 2
Examine the nares for symmetry and nasal discharge. Because most birds have feathers around the nares, it is easy to determine if there is nasal discharge (matted feathers).
Step 3
Check the eyes for lens opacity, anterior chamber condition, corneal health, and conjunctival inflammation. Again, if ocular discharge is present, the feathers along the cranial ventral lid margin will be matted. Hydration status can be evaluated in the avian patient using ocular parameters such as corneal moisture (dull appearance with dehydration) and position of the globe (recessed with dehydration).
Procedure Pearl
Palpation of lymph nodes is not part of the examination because birds do not have accessible lymph tissue to evaluate.
Step 4
Examine the ears (although the avian ear is seldom diseased). The ears are located caudal and ventral to the lateral canthus of the eyelids. By lifting the modified feathers covering the external ear canal, this structure can be scrutinized for abscesses or discharge.

Step 5
Observe the oral cavity and choanal slit (dorsal surface of the oral cavity) by opening the beak with a specialized avian speculum. One must be careful to place the speculum in the leading edge of the upper and lower beak to prevent iatrogenic trauma to the lateral beak walls of the rhinotheca and rhamphotheca. The edge of the normal choanal slit is thinly lined with prominent 1- to 2-mm conical projections (papillae) extending from the edge to the center of the opening. Abnormal choanal openings present as edematous, inflamed tissue with eroded papillae. There are varying degrees of choanal presentation depending on cause and chronicity of the problem.
The tongue is the prominent feature on the ventral surface of the oral cavity. The psittacine tongue is often noted as a thick blunt muscular appendage. At the base of the tongue is the glottis. The oral cavity tissue should be dry and smooth. Abnormal findings involving oral tissue include abscesses and fungal plaques.

Step 6
Palpate the thoracic inlet, checking for crop stasis, ingested foreign objects, or thermal crop trauma.

Step 7
Determine body condition by checking the pectoral muscles. A body score of 1 indicates a patient that is extremely emaciated while a body score of 5 is considered overweight. The pectoral muscles should round up without extending higher than the keel.


Step 8
Examine the feathers over the body for coloration and normal architecture. Feathers should be smooth, bright, and of uniform color. Stress bars or bands are black horizontal bands across the feathers that show a compromise in feather architecture due to endogenous corticosteroid release (stress) or malnutrition-most often seen in hand-raised birds-during feather development.

Step 9
Extend the wings to evaluate extension, flexion, and skeletal condition. Examine exposed joint surfaces over the wing for abrasions and bruising.
Step 10
Palpate the caudal coelomic cavity. While it is difficult to palpate internal organs due to the caudal extension of the keel over the coelomic cavity, it is possible to feel eggs within the coelom. However, a negative palpation does not rule out the presence of an egg.

Step 11
Examine the vent for proper appearance and the feathers around the vent for fecal material. They should be thoroughly clean. In many parrot species, particularly larger birds, the vent should be everted to view the mucocutaneous junction for evidence of papillomas. One method is to use the thumb and forefinger to press down and stretch the vent apart.
However, use of a cotton-tipped applicator or culturette provides a better field of view: slowly insert the cotton tip and then slowly remove it from the cloaca, examining the circumference of the tissue. Papillomas may appear as a roughened surface on the mucocutaneous junction or as proliferative tissue protruding from the vent. If there is doubt concerning the validity of one's diagnosis of papillomatous tissue involving the vent, vinegar can be used to moisten the mucocutaneous area in question. If the surface epithelium is disrupted, the vinegar will turn the unhealthy tissue white.
Step 12
Flex and extend each leg to evaluate range of motion. Palpate the leg bones and joints for swelling, edema, callous formation, and abnormal position.
Step 13
Check the toes for consistent diameter. Claws should be sharp, ending just below the plantar surface of the foot when placed on a flat surface. The plantar surface of the foot commonly has a smooth, textured appearance. A clinical condition involving the plantar surface of an avian patient's feet, often associated with nutritional compromise, is a smooth and worn appearance, without the raised textured look observed in normal birds. Other initiating factors leading to plantar surface lesions include abrasive perches (eg, sandpaper) and obesity.
Step 14
Examine the uropygial gland (preen gland) for symmetry and overall appearance. It is located on the extreme caudal dorsal surface of the bird, proximal to the pygostyle or last vertebra of birds.
Step 15
Auscultate to assess heart health and respiratory condition. The heart is best evaluated with a pediatric stethoscope over the lateral body wall, while respiratory condition is best determined by listening over the craniodorsal body wall. Also place the bell of the stethoscope at the thoracic inlet, over the keel and caudal coelomic area to gain a complete evaluation of the heart and respiratory system including air sacs.
Step 16
Weigh the bird on a digital gram scale. The scale should have a maximum weight of 6 kilograms and should weigh in 1-gram increments.
Step 17
Newspaper substrate should be placed in the cage or carrier prior to returning the patient to the owner and all blood should be removed from the feathers or skin with hydrogen peroxide