Image courtesy of Rachel Halpin, DVM, DACVECC
Autotransfusion is the acquisition and transfusion of autologous blood. The most common scenario for autotransfusion is in critically bleeding patients with significant intracavitary hemorrhage. Transfusion protocols with compatible allogeneic donated blood are the standard treatment for critically hemorrhaging patients, but autotransfusion can be a life-saving alternative in circumstances in which donor blood is unavailable due to compatibility concerns or clinic or pet owner resource limitations.
Autotransfusion has various collection techniques and administration considerations that can be divided into 3 categories.
Direct aspiration of blood via percutaneous catheterization of an intracavitary space, followed by reinfusion
Blood collection into syringes or via suction into canisters during a surgical procedure
Use of red cell savers, which are perioperative blood salvage devices designed to collect, wash, and concentrate red cells for reinfusion (more information is available in the literature)
Definitions
Autologous: blood obtained from the same patient
Autotransfusion: acquisition and transfusion of autologous blood
Allogeneic: blood obtained from patients of the same species, with a separate donor and recipient
Alloimmunization: immune response when a patient is exposed to a foreign antigen; for example, blood transfusion from another patient
Indications
Transfusion is indicated in critically bleeding patients with hypovolemic hemorrhagic shock. States of hemorrhagic shock may be classified using common transfusion triggers (eg, heart rate, blood pressure, mucous membrane color and capillary refill time, respiratory rate, mental state, lactate). Autotransfusion is typically reserved for critically hemorrhaging patients with ≥30% blood volume loss and evidence of persistent hemodynamic instability.1 In these patients, rapid resuscitation with blood products is indicated. In patients with signs of shock and minor or moderate blood loss (<30%), crystalloid administration may suffice.1
Advantages of Autotransfusion
Advantages of autotransfusion circumvent some of the limitations of allogeneic transfusions and potential complications of massive transfusion or overzealous crystalloid administration.
The supply of donor blood is universally limited in veterinary medicine, and autotransfusion is a conservation strategy, particularly when large volumes of blood are needed. Autotransfusion preserves the donor blood supply while also lowering costs for the owner. With use of autologous blood, compatibility is assured, eliminating the time delay necessary for precompatibility testing and concerns for immune-mediated hemolytic reactions or alloimmunization for future transfusions.
Hypothermia, hypocalcemia, and hypomagnesemia are possible with a massive transfusion of stored donor blood. Autologous blood has not been stored and therefore is warmer than refrigerator-stored allogeneic blood and is generally devoid of added constituents (eg, citrate anticoagulant) responsible for chelating the divalent cations calcium and magnesium.
Other red cell storage lesions (eg, altered red cell deformability, depletion of 2,3-diphosphoglycerate [2,3-DPG]—a determinant of RBC oxygen offloading) are not present in salvaged blood, suggesting autotranfused red cells are of higher quality.2-4 Transfusion-associated circulatory overload and exogenous transfusion–transmitted infections are not concerns with use of autologous blood.
Potential Benefits of Autotransfusion
Compatible blood (no risk for blood incompatibility or sensitization)
Warm blood product (decreased risk for hypothermia, as seen with massive transfusion of stored blood products)
Higher 2,3-DPG and oxygen carrying capacity (no storage lesions)
Better than crystalloids in patients with significant hemorrhage
No transfusion-associated circulatory overload (volume replaced is volume lost)
No risk for infectious disease transmission
No citrate anticoagulants (negating the complications of hypocalcemia and hypomagnesemia secondary to massive transfusion of donor blood)
Cost-effective
Resource conservation of banked blood
Disadvantages of Autotransfusion
Complications with autotransfusion are possible. Depending on the etiology of the hemorrhage, shed blood can be contaminated with bile, urine, fat, fibrin, hemostatic agents (eg, gel foam), bacteria, or neoplastic cells. Contaminated shed blood should ideally not be transfused, but washing and/or passing salvaged blood through a leukoreduction filter can be effective for removal of bacteria, fat, fibrin, and neoplastic cells.5,6
Some circumstances (eg, lack of banked blood [ie, resource-limited environment], poor long-term prognosis) may also support use of contaminated blood despite disadvantages. It is suspected that many patients with intracavitary hemorrhage secondary to neoplasia already have metastatic disease and tumor cells in circulation. In patients with malignant disease, additional evidence supports that intraoperative blood salvage with filtration does not increase tumor recurrence rate and may have fewer immunomodulatory consequences.7
Other deleterious effects include induction of consumptive coagulopathy, excessive fibrinolysis, and decreased platelet aggregation and function in recipients, particularly in those receiving larger volumes.8-11 Washing and leukoreduction can help abrogate the deleterious systemic effects of autotransfusion.
Potential Complications of Autotransfusion
Systemic consumptive coagulopathy, fibrinolysis, and platelet dysfunction
Blood contamination with bile, urine, fat, fibrin, hemostatic agents (eg, gel foam), bacteria, or neoplastic cells
Fragile RBCs (air contact, mechanical damage from collection or infusion)
Considerations
Important procedural considerations include anticoagulation, allocation of necessary equipment for creating a closed circuit/system, washing, and administration filtration. The indication to anticoagulate shed blood is debated but likely unnecessary. Blood that comes into contact with serosal surfaces (eg, parietal or pleural serosa) becomes defibrinated and unable to clot within 20 to 60 minutes. The basis for defibrination and the incoagulability of intracavitary blood is supported by low to undetectable fibrinogen concentrations in ascitic fluid; fibrin degradation products and D-dimers are significantly higher than paired plasma samples.12,13
Addition of an anticoagulant can be considered in patients actively hemorrhaging during blood collection. A small aliquot of shed blood may be visually inspected for clots to aid in determining whether to add an anticoagulant to the shed blood collection system. Closed collection and administration circuits can be created to minimize contamination of blood. Blood collected in an open system should not be refrigerated >24 hours or kept at room temperature >6 hours.
If time permits, shed blood should be washed to remove contaminants (eg, bacteria, fat particles, plasma constituents—including fibrin degradation products, free hemoglobin, and inflammatory mediators). The recommended wash volume of saline is a minimum of 3 times the blood volume in most cases. The supernatant should be visually clear when the wash is complete.14 Maintenance of an aseptic technique and a closed system is imperative.
Microaggregate blood administration filters are recommended for autotransfusion. In human medicine, guidelines for autotransfusion and cell salvage recommend inline 40-micron microaggregate blood transfusion filters or leukoreduction filtration.15 Leukoreduction filters are recommended if there is concern for bacterial contamination or malignant cells. Standard transfusion administration sets with incorporated filters of 170 to 260 microns are inadequate for filtration of smaller aggregates of leukocytes, platelets, fibrin, and fat often found in shed blood. Due to the presence of these aggregates, smaller (18-micron) blood filters with 50-mL capacity should be changed frequently during autotransfusion. Inline 150-micron blood filters are also available and validated for whole blood transfusions as large as 250 mL and at rates as high as 50 mL/minute.
Step-by-Step: Autotransfusion via Intracavitary Percutaneous Catheterization
What You Will Need
Clippers
Topical antiseptic
Local anesthetic (eg, lidocaine)
Sterile gloves, drape(s)
Scalpel blade (#11)
3-way stopcock or centesis valve
Syringe (60 mL)
Extension sets (2)
Microaggregate filter or leukoreduction filter
Multifenestrated centesis catheter
IV catheter for venous access
Anticoagulant (citrate-phosphate-dextrose [CPD]/CPD-adenine [CPDA-1])(optional)
Female to female Luer adapter (optional)
Administration set (optional)
Collection/transfer bags (optional)

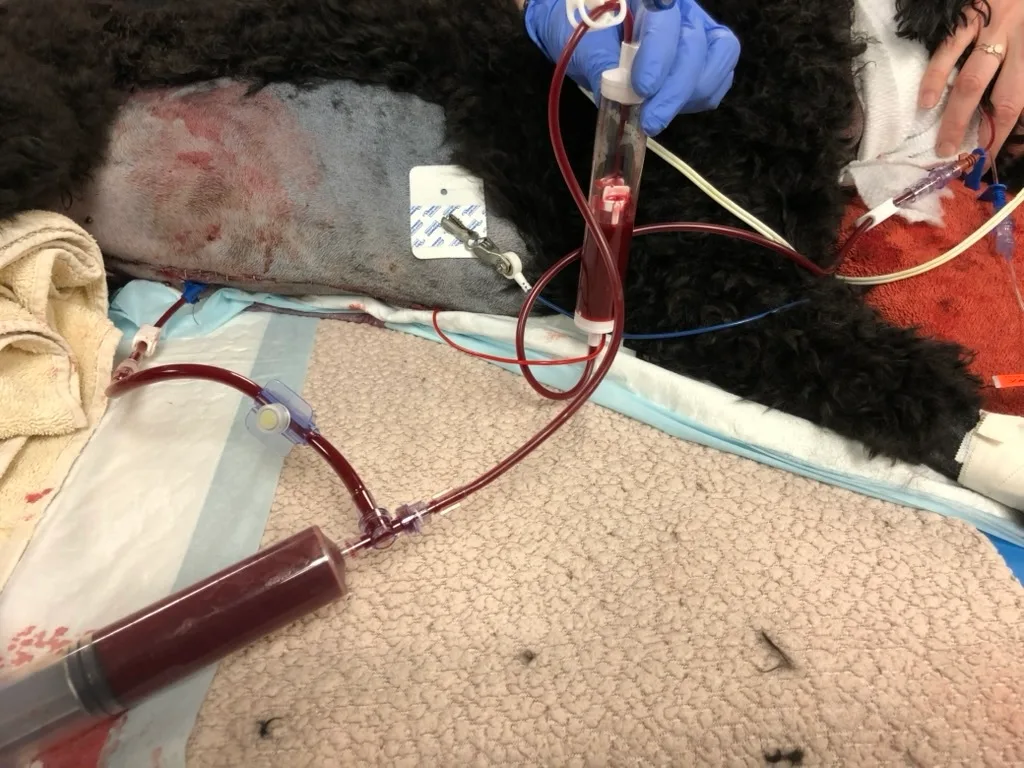
Step 1: Assemble the Collection & Administration Circuit
Choose the appropriate circuit.
Author Insight
The selected transfusion circuit depends on available supplies and the requirement to wash shed blood (see Figures 1-4 for options).

FIGURE 1 Closed collection and administration circuit for direct autotransfusion with a 3-way centesis valve. Use of an anticoagulant for autotransfusion of intracavitary hemorrhage is often unnecessary. If shed blood is clotting, anticoagulant solution can be integrated into the system by attaching a syringe with anticoagulant to the clave port on the extension set connected to the centesis catheter. The ratio of CPDA or CPD anticoagulant to whole blood is 1:7. The ratio of 3.8% sodium citrate anticoagulant to whole blood is 1:9. Heparin anticoagulation for blood transfusion is not recommended.

FIGURE 2 Closed collection and administration circuit for direct autotransfusion with a female to female Luer adapter

FIGURE 3 Closed autotransfusion collection system with a 3-way centesis valve and collection bag. An extension set may be added on the patient side to facilitate collection. A blood transfusion administration set with an incorporated microaggregate or leukoreduction filter can be connected at the spike port. Alternatively, the collection bag can be used for washing and centrifugation of shed blood prior to administration.

FIGURE 4 Closed autotransfusion collection system with a 3-way stopcock and collection bag. A blood transfusion administration set with an incorporated leukoreduction or microaggregate filter can be connected at the spike port. Alternatively, the collection bag can be used for washing and centrifugation of shed blood prior to administration.
Step 2: Prepare the Patient
Clip the area.
Step 3: Block & Prepare the Site
Administer a local lidocaine block, and aseptically prepare the skin over the catheterization site. Wear sterile gloves, and secure the drape over the centesis site.
Step 4: Make the Incision
Using a #11 scalpel blade, make a small skin incision at the site of the lidocaine block completely through the dermis and approximately the size of the centesis catheter.
Step 5: Place the Catheter
Place the percutaneous multifenestrated catheter into the cavitary space.
Author Insight
Ultrasonography may help direct the catheter.
Step 6: Perform Aspiration
Aspirate intracavitary blood with a 60-mL syringe. For active hemorrhage, inspect the blood for clots to determine whether an anticoagulant should be added. Determine the packed cell volume to assure the effusion is adequately hemorrhagic.
Step 7: Perform Autotransfusion
Using a microaggregate transfusion filter, autotransfuse the shed blood directly into an IV catheter, or wash the shed blood in a collection bag, and transfuse the remaining packed RBCs via microaggregate filter.
Step-by-Step: Perioperative Autotransfusion
What You Will Need
Sterile catheter-tip syringe (60 mL) or suction canister
Luer-tip syringe (60 mL)
Microaggregate filter
Step 1: Collect & Transfer Blood
Collect shed blood via a sterile catheter-tip 60-mL syringe, or suction blood into a new suction canister. Transfer blood into a Luer-tip slip/lock 60-mL syringe for direct transfusion via an integrated microaggregate filter.16

A
FIGURE 5 Two-syringe autotransfusion technique: 60-mL catheter-tip syringe used to collect blood from the surgical site (A); Luer-tip syringe connected to the catheter-tip syringe to transfer blood (B); Luer-tip syringe, microaggregate filter, and extension set for blood administration (C)
Author Insight
Autotransfusion is a salvage procedure. Prudent steps to avoid contamination (eg, use of gloves and sterile syringes) are essential.