Alternative Methods for IV Access
Tove Maria Hultman, DVM, Evidensia Sodra Djursjukhuset, Stockholm, Sweden; Massey University, Palmerston North, New Zealand
Ivayla Danielova Yozova, MVM, Dr.med.vet., AFHEA, DACVECC, DECVECC, Massey University, Palmerston North, New Zealand
Søren Boysen, DVM, DACVECC, University of Calgary, Calgary, Alberta, Canada
Establishing vascular access in critically ill patients is essential for administration of fluids and medications. Peripheral percutaneous IV access can be challenging due to hypovolemia, hypotension, thrombosis, small patient size, obesity, peripheral edema, cardiopulmonary arrest, and other factors that impede anatomic landmark palpation.1
Alternative methods (eg, venous cutdown, intraosseous [IO] placement, ultrasound-guided IV catheter placement) can be used when peripheral venous access cannot be achieved via conventional methods.1,2 It is important to be comfortable with these alternative procedures in emergency and critical care settings.
Technique should be chosen based on equipment availability, operator experience and comfort level, and patient considerations. Venous cutdown or IO device placement is generally recommended for patients that require immediate, lifesaving vascular access. Ultrasound-guided IV catheter placement is preferred in cardiopulmonary-stable patients in which IV access is challenging (eg, due to obesity, venous thrombosis).
Venous Cutdown
Venous cutdown is indicated when blind percutaneous IV catheter placement is unsuccessful and ultrasound-guided placement or IO access is unavailable or contraindicated (eg, due to fracture at the insertion site, orthopedic surgery, severe pre-existing bone disease, neoplasia at the insertion site). Although any peripheral vein can be used, the lateral saphenous vein is often preferred due to its size and superficial location.2,3 Contraindications include trauma or infection at the desired cutdown location and coagulopathy. Catheters placed via cutdown should generally be removed within 12 to 24 hours or as soon as a percutaneous catheter can be placed.
Intraosseous Placement
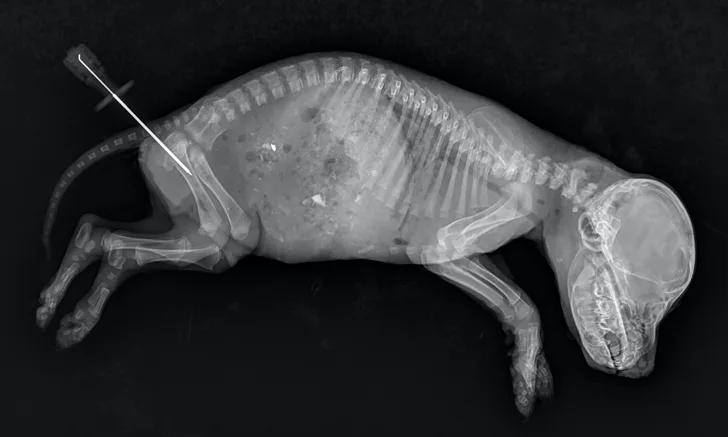
The IO cavity is a noncollapsible space that allows direct IV access. Clinical indications for IO access include vascular collapse, severe vascular trauma, peripheral edema, thrombosis, and small patient or vessel size.2 Common locations for IO devices include the femoral intertrochanteric fossa in neonates (Figures 1 and 2) and the proximal humerus (Figure 3) and tibial tuberosity (Figure 4) in adult patients.2 Although research has not been conducted for all drugs and fluids, recommendations in human medicine support the same doses via IO and IV routes.4 Potential complications include fracture or bone infection at the access site, edema, fat embolism, nerve injury, or compartment syndrome.2 Contraindications include orthopedic surgery, skin infection, neoplasia, severe pre-existing bone disease, or prior IO access within 24 hours in the target extremity.

FIGURE 1
IO catheter placement using a 20-gauge hypodermic needle in the femoral intertrochanteric fossa of a neonate
Ultrasound-Guided IV Catheter Placement
Short-axis out-of-plane and long-axis in-plane techniques are generally used for ultrasound-guided IV catheter placement. The short-axis out-of-plane technique is more common with small-diameter peripheral veins and is the preferred technique used by the authors.5 A high-frequency linear array probe is preferred, but a microconvex probe can be used.
Step-by-Step: Lateral Saphenous Venous Cutdown
What You Will Need
Clippers
Surgical scrub
Sterile gloves
Sterile mosquito forceps
Sterile thumb forceps
Sterile sharp-ended scissors
Sterile needle holder
Sterile catheter (typically 18-22 gauge, depending on patient size)
Sterile absorbable monofilament suture
Sterile #11 scalpel blades
Bandage material
Step 1
Make an incision through the skin and subcutaneous tissue directly over the vein (experienced clinician) or directly alongside the vein (less experienced clinician; to avoid accidentally cutting the vein).

Step 2
Use blunt dissection to identify and isolate the vein to be catheterized from surrounding connective and subcutaneous tissues.

Step 3
Pass a hemostat under the dissected vein.

Step 4
If the vein is distended with blood, pass a stylet and catheter through the proximal wall at a 35- to 40-degree angle to enter the venous lumen. Once the catheter tip is in the lumen, decrease the angle so the catheter is almost parallel to the vein, and slide the catheter off the stylet down the center of the vein.
If the vein is substantially constricted, incise using a #11 scalpel blade. Pass the scalpel through both vein walls to ensure the lumen is traversed (A). Use a venous catheter introducer (eg, bent, dulled needle) to dilate and hold the vein open to allow catheter passage (B).


Author Insight
The needle tip of the introducer can be dulled by rubbing its point along a scalpel handle before bending it at a 90-degree angle.
Step 5
After the catheter is in the lumen, remove the introducer, retract the hemostat distally to straighten the vessel (A), and advance the catheter down the lumen to the level of the catheter hub (B). Remove the stylet, and then remove the hemostat.


Step 6
Pass a suture around the vessel and catheter (A), suture the wings of the catheter to the skin (B), and protect the catheter with a bandage (C).


Step 7
Allow the skin incision to heal by second intention.
Video 1
See Video for peripheral venous cutdown techniques. Video reused with permission of Søren Boysen.
Step-By-Step: IO Access
What You Will Need for Automated Placement in Adult Patients
Rotational automated device with custom IO needles (A and B)
Lidocaine hydrochloride 2%
Sterile #11 scalpel blade
What You Will Need for Manual Placement in Neonatal and Adult Patients
Commercial IO needle for neonates and adult patients (C)
OR
16- to 20-gauge bone marrow needle for adult patients (D)
OR
18- to 25-gauge spinal needle for neonates and young dogs and cats (E) or hypodermic needle
Lidocaine hydrochloride 2%
Sterile #11 scalpel blade

Step 1
Using sterile technique, infuse lidocaine to the level of the periosteum if possible.
Author Insight
Lower doses should be used in cats due to their increased sensitivity to local anesthetics.
Step 2
Make a stab incision through the skin with a #11 scalpel blade.
Step 3
For manual techniques, place the IO needle in the cortex by pushing it lightly against the bone and rotating it back and forth around the long axis of the needle.
For automated techniques, use a drill to rotate the catheter and stylet.
Step 4
For manual techniques, when the needle is seated within the cortex of the bone, apply increased pressure and continue the rotating motion until the cortex is breached.
For automated techniques, apply more pressure to the drill.
Author Insight
Loss of resistance is often felt at this stage. A properly seated needle should move with the bone and limb when the leg is manipulated.
Step 5
If desired, use radiography to confirm placement.

Step 6
To help confirm proper IO placement of the catheter, apply negative pressure to a syringe connected to the needle and check for bone marrow aspiration.
Step 7
Administer a small bolus of heparinized saline through the needle. Use normal saline if heparinized saline is unavailable.
Author Insight
There is more resistance to IO fluid infusion than IV infusion, but fluids should flow slowly via gravity and can be administered more rapidly with a pressure bag.
Step 8
Secure the needle by passing a suture through the periosteum and butterfly tape attached to the needle hub. Cover the site with antiseptic ointment, and place a donut bandage thick enough to cover the needle hub.
Videos 2 & 3
See these videos for automated IO device placement. Videos reused with permission of Søren Boysen.
Step-by-Step: Short-Axis Out-of-Plane Technique for Ultrasound-Guided IV Catheter Placement
What You Will Need
Clippers
Sterile scrub
Tourniquet
Sterile gel or gel-filled sterile glove that can be placed over the ultrasound probe
High-frequency linear array probe (8-13 MHz); microconvex probe if linear probe is unavailable
Sterile IV catheter (1.8 or 2.5 in)
Bandage material
Step 1
Set the depth of the probe to maximize vessel size; cover the probe with a sterile glove if desired.
Step 2
Aseptically prepare the skin distal to the probe.
Step 3
Place the probe on the skin at a 90-degree angle to the vessel (A). Use probe manipulations (eg, sweeping, sliding, rocking, fanning) to identify and situate the vessel (B, arrow) in the horizontal center of the ultrasound display.


Step 4
Insert the catheter needle and stylet into the skin at a 30- to 45-degree angle, just distal to the probe (A). Identify the needle tip as a white dot (B, arrow) on the display between the skin and the vessel, and stop advancing.


Step 5
Slowly move the ultrasound probe proximally along the vessel (ie, away from catheter) until the stylet tip disappears.
Step 6
Hold the probe stationary, and advance the catheter and stylet until the hyperechoic tip is again visible.
Step 7
Repeat Steps 5 and 6 until the stylet tip is visible as a white dot in the vessel lumen. A flash of blood will be visible in the stylet hub.

Step 8
Finish placing the IV catheter normally.
Video 4
See video for placement of an IV catheter using short-axis out-of-plane ultrasound-guided technique. Video reused with permission of Søren Boysen.