Tensioning Sutures for Open Wounds
Ava H. Song, DVM, University of Tennessee
Karen M. Tobias, DVM, MS, DACVS, University of Tennessee
The approach to wound closure (Table) is influenced by multiple factors, including time elapsed since initial injury, degree of contamination, amount of tissue damage, wound location, extent of tension or dead space, and the patient’s general and local health.1
Table: Approach to Wound Closure
Delayed primary closure may be indicated when there is a mild degree of contamination that cannot be removed with cleansing or debridement or when the health of the skin along the wound edges is questionable (eg, bite wounds).1,2 Secondary closure is commonly preferred when severe infection is present or periwound skin is unhealthy and cannot be fully resected. Delayed primary closure and secondary closure require initial open wound management until the periwound skin and wound bed are healthy.
Considerations for Using Tensioning Sutures
It is essential that periwound tissues are healthy when tensioning sutures are being considered.
Analgesics and sedation (or general anesthesia) should be used during initial suture placement and are usually required during dressing changes.
Common mistakes noted by the authors include:
Placing the initial suture too tight to allow easy insertion of a dressing under the deep loops
Tightening the sutures too much during initial tensioning
Open wound management can be facilitated via skin-stretching devices such as tensioning sutures. Skin has inherent elastic properties that allow approximation of wound edges over small distances. Skin can also extend its natural boundaries through a phenomenon known as mechanical creep.3,4 When tension is applied gradually over 2 to 4 days, randomly oriented dermal collagen and elastic fibers straighten and elongate, becoming more parallel to tension lines and lengthening the skin. Over time, less force is required to maintain the collagen fibers in their stretched position because the skin’s elastic fibers lose their natural recoil (ie, stress relaxation).3,4 The goal of tensioning sutures is to take advantage of these properties to stretch the skin and hasten wound closure. In addition, tensioning sutures and similar devices hold dressings in place and prevent retraction of skin edges.
Tensioning sutures typically consist of large diameter (ie, 2-0 or 0, depending on patient size and skin thickness), monofilament nonabsorbable suture, preferably on a cutting needle. Suture bites should be wide (ie, 1-3 cm from the wound edge) and perpendicular to the skin edge to spread tension and decrease damage to blood vessels supplying the region (see Considerations for Using Tensioning Sutures). The suture is placed loosely to create a gap at least 3 cm wide between the skin edges to allow insertion of a dressing. For a small wound, a single simple continuous pattern can be used along the entire length, with each end tied off. Stretching is accomplished by tightening the suture from each end toward the middle; excess suture is gathered in a loop in the middle of the pattern and held in place with a reusable fishing split shot sinker (Figure 6B) or other device. Longer wounds may require placement of 2 or more suture patterns; these patterns are tightened toward their junctions and again secured with 1 or more reusable split shot sinkers (Figure 1).

Tensioning suture using 2 simple continuous patterns at opposite ends of the wound.
Reusable split shot sinkers, made of malleable metal, have a head with a wide mouth and a tail with 2 fins. The 2 lengths of suture forming the middle loop are crossed within the mouth of the split shot, and the head of the split shot is squeezed together to hold the sutures in place. The split shot can be removed by squeezing the tail fins of the split shot together, which opens the split shot mouth and releases the suture. Nonlead split shot is preferred to avoid the risk for lead toxicosis in case of ingestion.
At least once a day, the suture is released from the split shot, tightened, and resecured. The patient is typically sedated, particularly if the dressing is to be changed, as aseptic technique must be maintained. The procedure is repeated on succeeding days until the wound is ready for definitive closure. The suture will be noticeably looser at each tensioning because of stress relaxation. The time required to stretch the skin depends on wound size, wound location, patient age, and general health.3 Most stretching is expected to occur 48 to 96 hours after initial placement.3
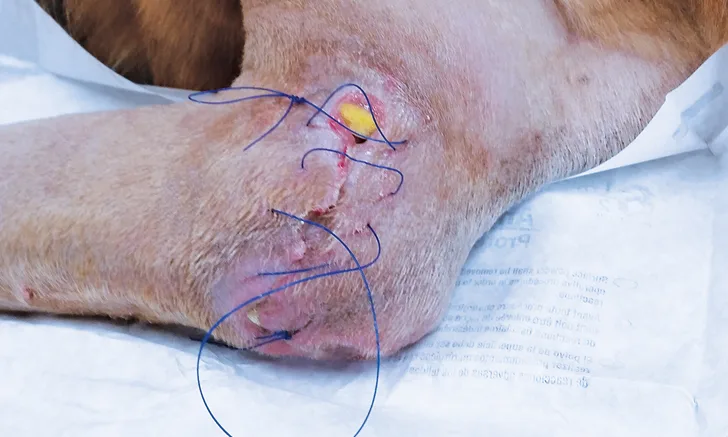
Excessive tension may cause vascular and lymphatic compromise, especially to distal tissue when used on extremities, and may result in swelling, edema, and ischemia.5 In addition, excessive tension can lead to pain, discomfort, and suture cutout (ie, skin rupture or transaction by the suture itself). A safe threshold for stretching of normal canine skin is 1 to 3 kg of tension5; however, measuring tension during suture tightening is uncommon. The affected skin can also be examined for subjective signs of overstretching (eg, pallor, tautness, severe distortion, pain) or for evidence of compartment syndrome (ie, severe tissue swelling) distal to the site.4 In the authors’ experience, the tension is too great if the skin is indented by overlying suture or the area around and medial to the suture turns white from lack of blood supply. If either of these signs is present, the split shot should be removed and the entire length of suture relaxed so that tension can be reapplied evenly and to a lesser degree.
Once the wound bed is healthy and skin edges are able to be apposed, the tensioning sutures are removed and the wound is closed by placement of subcutaneous and cutaneous sutures with minimal undermining and disruption of the tissue. Granulation tissue does not need to be removed nor the skin edges debrided. The tensioning suture can occasionally be left in place to serve as the primary closure; however, stretched skin in dogs has more dermal edema and thinner epidermis,5 and healing may benefit from a more accurate closure.
Step-by-Step: Tensioning Suture Placement
What You Will Need
Monofilament nonabsorbable suture (2-0 or 0)
Needle holders
Brown-Adson tissue forceps
Suture scissors
Split shot fishing weights
Sterile primary dressing (eg, sterile gauze, foam, pads)
Bandage materials
Step 1
Clip, clean, and prepare the wound. Debride the wound as needed to expose healthy tissue edges. Necrotic skin along the wound edges should be sharply debrided before placing tensioning suture.

Step 2
Using a 2-0 or 0 monofilament nonabsorbable suture, start a simple continuous pattern at one end of the wound, taking full thickness bites of the skin.
Author Insight
Suture bites should be 1 to 3 cm from the wound edge, depending on skin thickness and wound location.

Step 3
Place simple continuous sutures loosely to allow a gap of 3 cm or more between skin edges. Tie a knot at the end of the suture.
Author Insight
For longer wounds, place 2 or more continuous suture patterns, starting at each end of the wound and meeting in the center (Figure 1).
Step 4
Lift the deep suture loops and place sterile dressing underneath all crossing sutures and on the wound bed. (A) The crossing sutures are elevated with a scalpel handle, and (B) the dressing (eg, honey paste on antimicrobial-impregnated roll gauze) is (C and D) fed under all the sutures and packed in the wound.

Author Insight
An additional hand may be needed to lift the crossing suture loops while packing the wound with dressing.
Step 5
(A and B) Tighten the sutures by bringing each end together until there is a loop in the middle.

Step 6
Cross the middle loop on itself, then place the split shot by squeezing the ball of the split shot with a needle holder or a hemostat. If the skin is pale or distorted, remove the split shot and loosen the suture, then retighten to a lesser degree.

Author Insight
The split shot should be made of tin (vs lead) to avoid lead toxicosis in case of ingestion.
Step 7
Cover the area with a protective, absorptive bandage. For wounds on extremities, monitor for signs of swelling and edema distal to the wound (eg, swelling of the toes, edema of the lower limb, increased pain or discomfort with ambulation or limb manipulation), as these may indicate an over-tightened bandage or tensioning suture. If the wound requires additional tensioning or time to clear infection, repeat the procedure by placing a new dressing, retightening the sutures, and applying a split shot to maintain tension until the wound is ready for definitive closure.
