Indirect Blood Pressure Measurement
Jamie M. Burkitt Creedon, DVM, DACVECC, Red Bank Veterinary Hospital Network, Cherry Hill, New Jersey

*All photos of Beezus courtesy of Dr. Burkitt Creedon
Maintenance of appropriate systemic arterial blood pressure is vital for survival. Because many common situations and conditions (eg, general anesthesia, renal or cardiovascular disease) place animals at risk for dangerously high or low blood pressure, blood pressure monitoring is a fundamental necessity.
In clinical practice, blood pressure is usually measured indirectly. The two most common methods of indirect blood pressure measurement are Doppler ultrasound using a sphygmomanometer and oscillometry. Both techniques use an inflatable cuff placed around an extremity. High-definition oscillometry, a newer indirect technique, is not used often in clinical practice.
Doppler Ultrasound Measurement
Doppler ultrasound measurement is likely the most common blood pressure measurement technique used in small animal practice. The procedure is straightforward, and the equipment is relatively inexpensive and reliable.
Doppler ultrasound reliably measures only systolic blood pressure in dogs and cats; it cannot be used to measure mean or diastolic blood pressure.
Standard Oscillometry Measurement
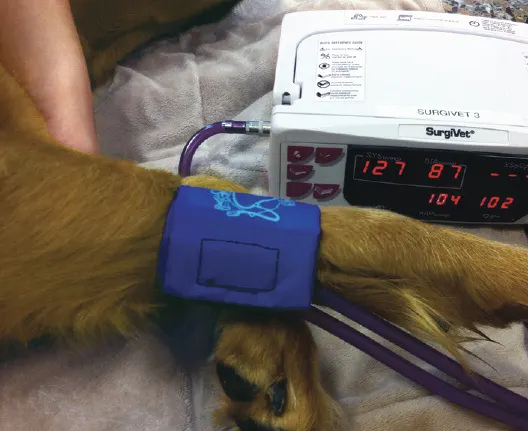
In clinical practice, oscillometers are often built into multiparameter monitors and usually have a stat feature that allows continual, repeated measurements. Thus oscillometers are commonly used for critically ill or anesthetized patients that may require more intensive monitoring.
Oscillometers report systolic, diastolic, and mean blood pressures; however, they are unreliable in patients with cardiac dysrhythmias because measurement relies on rhythmic arterial pulsations.
General Techniques
While actual blood pressure measurement varies between the techniques described here, some important points apply to both.
Patient Acclimation & Restraint
Ideally, blood pressure should be measured in a quiet, comfortable environment after the patient has become acclimated (ie, without disturbance) for at least a few minutes, but acclimation is rarely possible for acutely or critically ill patients.
The patient should remain still during measurements to optimize accuracy and, if necessary, can be physically restrained gently. However, some patients cannot be restrained in lateral recumbency because of agitation, respiratory distress, or other reasons. Chemical restraint should be avoided, as it often alters results.
Cuff Height
To acquire the most accurate blood pressure values, cuff height should be as close to the level of the right atrium as possible (Step 1A). The cuff can be placed on the antebrachium, distal pelvic limb, or tail.
If the vertical distance between the cuff site and the right atrium exceeds 10 cm, a correction factor must be integrated to interpret blood pressure measurement results (see Correcting for Cuff & Right Atrium Level Disparity). When the cuff is much lower than the right atrium, pressure values are falsely high because of the weight of the blood column between the atrium and cuff site.
Multiple Measurements
The first blood pressure measurement should be discarded. At least 3 additional measurements should be obtained for a minimum of 3 to 7 consecutive, consistent measurements with less than 20% variability. Once these measurements have been obtained, they should be averaged to yield the blood pressure measurement.
What You Will Need
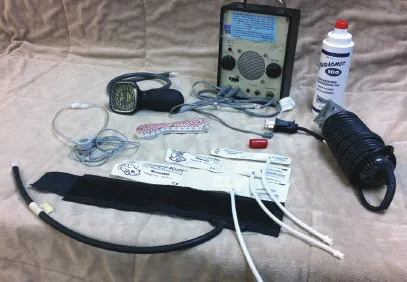
For Doppler Ultrasound Blood Pressure Measurement
Doppler ultrasound with attached Doppler probe
Headphones, if desired
Sphygmomanometer
Tape measure with metric scale
Cuff of appropriate size
Clippers with clean blade
Ultrasound transmission gel
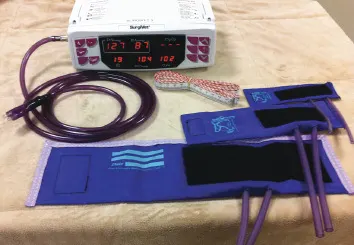
What You Will Need
For Standard Oscillometry Blood Pressure Measurement
Oscillometer with pressure tubing attached
Tape measure with metric scale
Cuff of appropriate size
Step-by-Step: Doppler Ultrasound Blood Pressure Measurement
Step 1
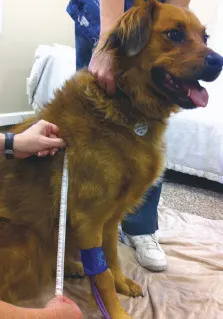
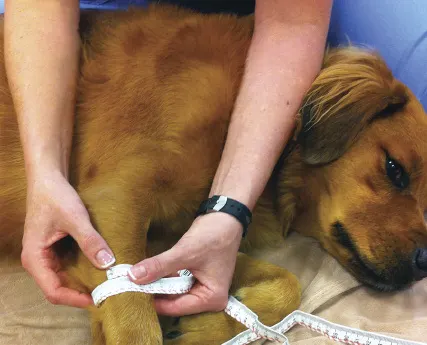
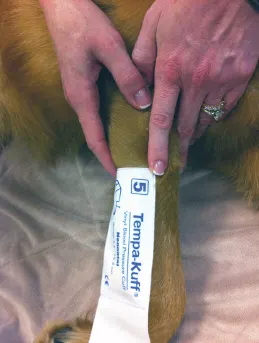
Gather supplies and select appropriate cuff size. The numeric cuff size (ie, width in centimeters) should be 40% of the circumference of the cuff site in dogs and 30% to 40% of the circumference of the cuff site in cats. Measure the site using a centimeter-marked tape (A) or estimate using the cuff itself (B). A cuff that is too small or tight results in falsely elevated readings, and a cuff that is too large or loose results in falsely low readings.


Correcting For Cuff & Right Atrium Level Disparity
If the height difference between the cuff and the right atrium exceeds 10 cm, subtract 0.8 mm Hg for every 1 cm the cuff sits below the right atrium. In lateral recumbency, the sternum can generally be used as the reference. In sternal recumbency the right atrium level is at about 40% the height of an imaginary line between the sternum and the dorsal spinous process at the caudal edge of the scapula.
Here, the midpoint of the cuff sits approximately 27 cm below the right atrium. If the measured systolic pressure at this level were 142 mm Hg, correct the measurement as follows to yield a more accurate reading:
27 cm × 0.8 mm Hg/cm = 21.6 mm Hg
142 mm Hg – 21.6 mm Hg = 120.4 mm Hg
Step 2
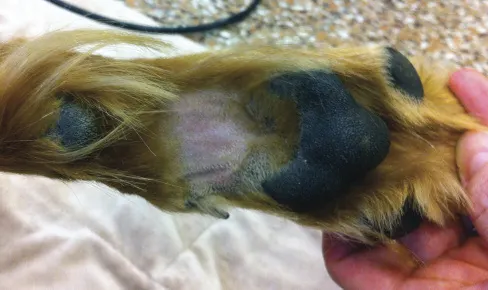
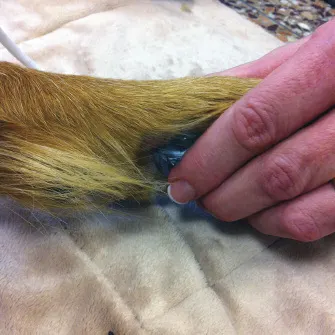
Clip the hair overlying the Doppler probe’s target artery. The target artery must lie distal to the cuff site. When using the antebrachium for cuff placement, clip over the palmar aspect of the metacarpals (shown). When using the distal pelvic limb, clip from the dorsal or plantar surface of the metatarsals for access to the dorsal pedal artery or branch of the saphenous artery, respectively. When placing the cuff at the tail base, clip from the tail’s ventral midline just distal to the intended cuff site.
Step 3
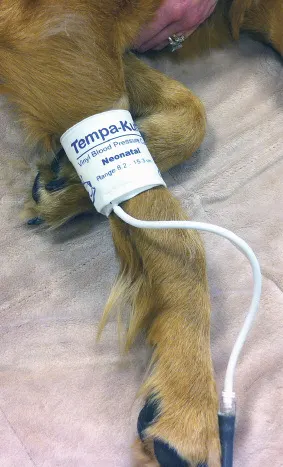
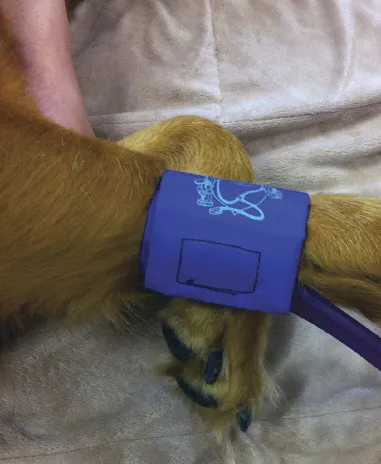
Apply the cuff securely and snugly around the appendage, and attach it to the sphygmomanometer. The cuff should not be occlusively tight, and there should be no room to insert a finger between the cuff and appendage. The sphygmomanometer pressure should read 0 mm Hg.
Author Insight
Most commercial cuffs have Velcro closures that can loosen during inflation. Medical tape can be placed to secure the cuff’s closure, but be certain not to further tighten the cuff with the tape, which would invalidate the measurement. This is true for both techniques.
Step 4
Apply copious acoustic gel to the concave surface of the Doppler probe, and press the concave surface gently but firmly over the target artery. Turn the Doppler unit on and listen for the pulsatile whooshing sound of the artery. With the patient in lateral or sternal recumbency, it is usually possible to hold the limb comfortably at approximately the level of the right atrium (see Step 5).
Author Insight
Consider using headphones to minimize ambient noise and to avoid frightening the patient.
Step 5
Use the sphygmomanometer to inflate the cuff to approximately 20 mm Hg greater than the expected systolic blood pressure. The cuff should occlude the artery at this pressure, and whooshing arterial pulsations should be inaudible. Slowly deflate the cuff and note the pressure at which arterial pulsation is again audible; this marks the systolic arterial blood pressure.
Author Insight
Deflate the cuff only a few mm Hg/sec in order to hear the first pulse wave passing under the cuff, heralding systolic pressure. Opening the valve too quickly results in falsely low readings because the true systolic pressure is missed.
Step-by-Step: Standard Oscillometry Blood Pressure Measurement
Step 1
Note: Same as Step 1 for Doppler Ultrasound Blood Pressure Measurement.
Gather supplies and select the appropriate cuff size. The numeric cuff size (ie, width in centimeters) should be 40% of the circumference of the cuff site in dogs and 30% to 40% of the circumference of the cuff site in cats. Measure the site using a centimeter-marked tape (A) or estimate using the cuff itself (B). A cuff that is too small or tight results in falsely elevated readings, and a cuff that is too large or loose results in falsely low readings.
Step 2
Place the cuff securely and snugly around the appendage. It should not be occlusively tight, but there should be no room to insert a finger between the cuff and the appendage. Attach the cuff to the oscillometer.
Step 3
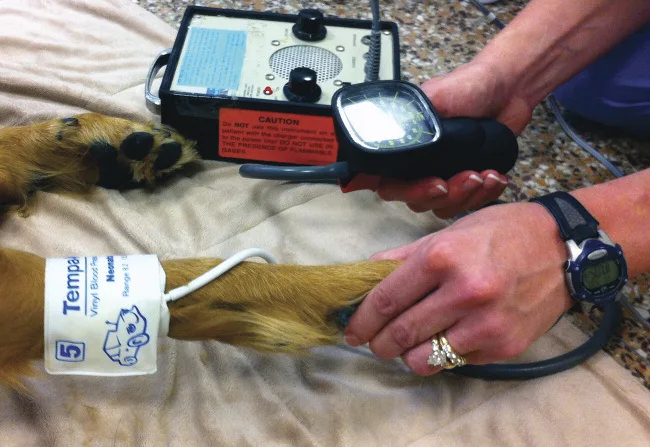
Turn on the oscillometer and depress the measurement button while holding the cuff at approximately the height of the right atrium.
Author Insight
Support the dog’s limb from underneath while restraining the dependent limb. Many dogs resent having their paws handled, and this technique minimizes patient movement and tension in the limb, which can adversely affect results.