A Fly in My Ointment: Maggot Therapy
Maggot debridement therapy, a biologic treatment used for centuries to improve wound healing in humans, is today reserved primarily as a last resort. Maggot debridement of necrotic and infected wounds (Figure 1) should be used in combination with other medical and surgical treatments.
Maggot therapy inhibits growth of Pseudomonas aeruginosa, Staphylococcus aureus, and Escherichia coli, making it ideal for treating multidrug-resistant organisms. Another clinical effect is enhanced fibroblast migration, which may increase the rate of wound healing.

Figure 1. Necrotic wound before maggot therapy (A, above), with maggots in place (B, left), and after therapy (C, right).
Medical-Grade Maggots
Medical-grade maggots of Lucilia (formerly Phaenicia) sericata (common green bottle fly or blowfly larvae) are particularly useful because of their tissue selectivity. Green blowfly larvae secrete proteolytic enzymes that break down devitalized tissue, leaving healthy tissue unaffected.
Medical maggot therapy in the United States is regulated by the Food and Drug Administration; maggots are purchased by prescription through a licensed laboratory (eg, Monarch Labs). At the laboratory, fly eggs are washed with dilute disinfectant, packaged in sterile containers, and allowed to hatch at room temperature. The hatched instar-1 larvae (larvae in the first developmental stage) are translucent white and approximately 2 mm long. Over 4 to 5 days they undergo 2 additional molts, reaching 10 to 14 mm long.
Maggots are shipped overnight in a temperature-controlled package (Figure 2). On arrival, the package should be inspected immediately. Maggots should not be used if the sterile container seal is broken, a bad odor is present, or the larvae are not alive. Larvae should be used within 24 hours of arrival; however, if necessary, they can be refrigerated for up to 60 hours.

Figure 2. Inspect the package on arrival to make sure that the seal is unbroken and the maggots are alive. Use within 24 hours (if possible) or place in a refrigerator.
Application
Maggot application typically takes about 20 minutes. Although the procedure is not painful, sedation and injectable anesthesia are often required for wound preparation.
Before placing the maggots, the wound is filled with sterile water-soluble jelly and a wide area around the wound is clipped and vacuumed. The wound bed is then lavaged with 0.9% saline to flush any lubricant or residual topical wound agents. This is especially important if products containing propylene glycol have been used, since these can have a negative effect on maggot viability. The surrounding skin is then cleaned with antiseptic soap, and the area is dried and swabbed with isopropyl alcohol (not to be placed directly on the wound) to remove all dirt and oils.
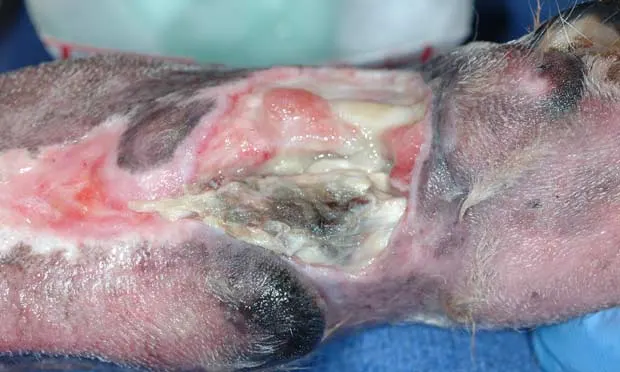
Gross necrotic tissue is surgically debrided with sharp dissection (Figure 3), and a tissue sample is obtained for culture and sensitivity testing.

Figure 3. Necrotic pressure sore over the greater trochanter in a dog. If possible, sharp debridement is performed before maggot application.
Maggot therapy is effusive, so placement of a protective noniodinated adhesive drape on surrounding skin and an absorptive bandage over the wound is critical to prevent skin maceration and protect the wound. A tie-over bandage may be necessary in areas that are difficult to incorporate into a traditional bandage. In these cases, the loops are usually placed outside the skin region to which the adhesive drape has been secured.
The system used to contain maggots and absorb fluid must allow airflow to prevent maggot suffocation. Wide-mesh material is most frequently used but, because of extensive effusion, must be changed at least q12h.
Maggots in a wound do not appear to cause pain, so analgesia is geared toward controlling discomfort from the wound itself. When indicated, systemic antimicrobials should be instituted or continued. An Elizabethan collar should be placed to prevent bandage molestation. Although most patients are hospitalized, the decision is made on a case-by-case basis.
Removal
Maggots can be left in place for up to 72 hours. However, we usually remove them after 36 to 48 hours because they tend to migrate out of the wound toward the external edges of the bandage. Maggots are removed from the wound with sterile saline flush or by wiping them from the area with a moistened sterile gauze pad.
The maggots and any sponges are discarded into a plastic bag and double bagged. Maggots should be disposed of as a biohazard when used in wounds containing resistant pathogens.
Contraindications
Contraindications include wounds that have sinus tracts or are located near vital organs. Because maggot debridement can cause bleeding, patients with coagulopathies or with wounds adjacent to large blood vessels must be monitored closely. Multiple applications may be required to achieve a healthy bed of granulation tissue.
What You Will Need
1 L of 0.9% sterile saline
Sterile maggot larvae
Sterile centimeter ruler
Sterile polyester mesh (Creature Comforts, monarchlabs.com)
Sterile tongue depressor
Barrier film (Cavilon, 3m.com)
2 adhesive dressings (Tegaderm, 3m.com) or adhesive dressing ad hydrocolloid pad (LeFlap, monarchlabs.com) large enough to extend >3 cm from the wound edge in all directions
Sterile straight Mayo scissors
Sterile surgical gloves
Waterproof tape
Materials That May be Needed for Wound Preparation & the Absorptive Bandage
Clean exam gloves
Disinfected scissors
4 × 4–inch mesh sterile gauze
Umbilical tape
Electric clippers and clean #40 blade
Antiseptic soap
Waterproof tape
Sterile water-soluble gel
Step 1.
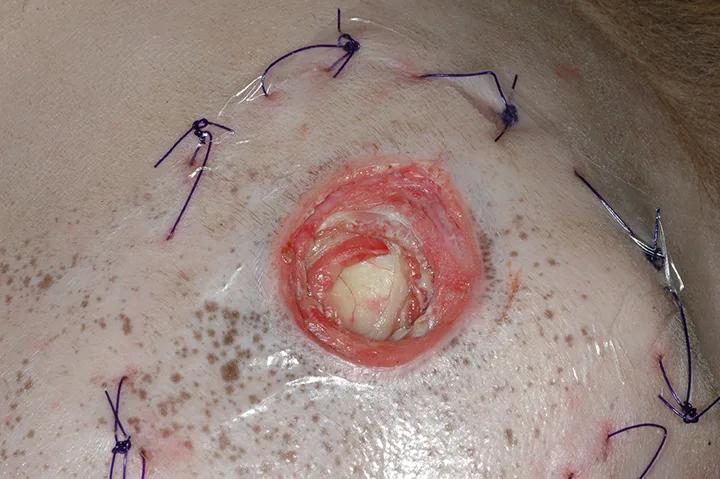
After preparing the wound area, lightly swab surrounding skin with a barrier film to prevent adhesive stripping and provide a better surface for dressing adherence. Do not place barrier film dressing directly in the wound. Use sterile technique to apply a noniodinated adhesive drape to the periwound skin (leaving an opening directly over the wound) and place tie-over suture loops as needed.
Author Insight
Cut a hole the size of the wound in the center of the adhesive drape before removing the backing.
This is the second article in The Essential Wound Care Series, which provides expert tips and techniques for managing both basic and specific wound challenges. See Basic Wound Care
KAREN TOBIAS, DVM, MS, DACVS, is a referral surgeon and professor of surgery at University of Tennessee Veterinary Medical Center. Prior, Dr. Tobias taught at University of Georgia and Washington State University. She is the author of Manual of Small Animal Soft Tissue Surgery and co-editor of Veterinary Surgery: Small Animal. She graduated from University of Illinois College of Veterinary Medicine and completed an internship and residency at Purdue University and Ohio State University, respectively.
DANIELLE BROWNING, LVMT, is the ward technician for University of Tennessee small animal soft tissue surgery service. She is a founding board member for the Academy of Veterinary Surgical Technicians. Ms. Browning shares responsibility for instructing students, interns, and residents on wound management techniques. She is a graduate of Lincoln Memorial University Veterinary Technology program and a frequent speaker on soft tissue topics at national meetings.