Arthrocentesis in Dogs
Daniel A. Degner, DVM, DACVS, Animal Surgical Center of Michigan, Burton, Michigan
Arthrocentesis and synovial fluid analysis should be included in the diagnostic evaluation of patients with single or multiple joint effusion (see Detecting Effusion), fever of unknown origin, generalized stiffness, or shifting limb lameness. The procedure is safe and simple and requires little time, and supplies are often inexpensive.
Detecting Effusion
The author prefers patients to be in a standing position because weight-bearing pushes joint fluid to the periphery of the joint, facilitating detection of effusion; however, effusion can also be detected in a nonweight–bearing limb. Joint effusion cannot be palpated in the hip, shoulder, or articular facets of the spine.
Stifle: Patellar ligament should be very distinct. The medial joint pouch, just caudal to the patellar ligament, is normally concave. With effusion, the patellar ligament becomes indistinct and the medial joint pouch protrudes.
Tarsus: Joint capsular distention is best noted on the craniomedial, craniolateral, caudolateral, and caudomedial aspects of the joint, adjacent to the collateral ligaments.
Carpus: Joint capsular distention is most obvious on the cranial and medial aspects of the joint. Marked effusion is easily detected by palpating the area medial or lateral to the common digital extensor while the carpus is flexed.
Elbow: Joint capsular distention is best detected on the lateral aspect of the joint between the lateral epicondyle and olecranon.
Preparation
Patients should be sedated, as arthrocentesis is painful (see Sedation Protocol for Arthrocentesis); supplies must be ready before sedation. Because the primary complication of arthrocentesis—albeit rare—is infection, hair should be clipped over the joint and the skin aseptically prepared.
Sedation Protocol for Arthrocentesis
Dexmedetomidine, 0.5 mg/mL: 2.7 μg/kg (0.1 mL/40 lb)
Butorphanol, 10 mg/mL: 0.055 mg/kg IV (0.1 mL/40 lb)
If additional analgesia is needed, hydromorphone at 0.1 mg/kg IV can be administered.
Procedure
The joint space should be palpated; sterile gloves are necessary. The needle should be inserted into the joint and negative pressure gently applied to the syringe. If no joint fluid can be obtained, rotating or twisting the needle 90° and repeating aspiration are indicated. After fluid has been collected, the needle hub should be grasped with hemostatic forceps and the syringe removed, after which the needle should be removed from the joint; this technique can help prevent blood from entering the syringe as the needle is withdrawn. A drop of joint fluid should be placed on a glass slide and spread gently with another glass slide. If bacterial culture is indicated based on cytologic findings, joint fluid should be expelled into a culture tube (culture medium). If there is insufficient fluid for culture, a small volume of sterile saline can be aspirated into the syringe after the glass slides have been prepared; this fluid can be submitted for culture.
Joint Fluid Analysis
The gross appearance of joint fluid can frequently indicate whether it is pathologic or normal (ie, clear, straw color, viscous, able to clot). Only approximately 0.05–0.3 mL of fluid can be retrieved from smaller nondiseased joints; up to 1 mL may be aspirated from larger nondiseased joints (eg, stifle, hip; see Reasons for Unsuccessful Retrieval of Joint Fluid).
Reasons for Unsuccessful Retrieval of Joint Fluid
Turbid joint fluid typically indicates nonseptic or septic inflammatory disease. An amber color may result from old hemorrhage, whereas serosanguineous fluid may be indicative of iatrogenic or acute hemorrhage (eg, intraarticular fracture, other trauma).
Cytologic Findings
Slides should be prepared by placing a drop of joint fluid on a clean glass slide using a squash-and-smear technique. Slides should dry at room temperature then be stained shortly thereafter. Because of the minimal joint fluid commonly retrieved, serum chemistry analysis, clot testing, and immunologic testing are seldom possible.
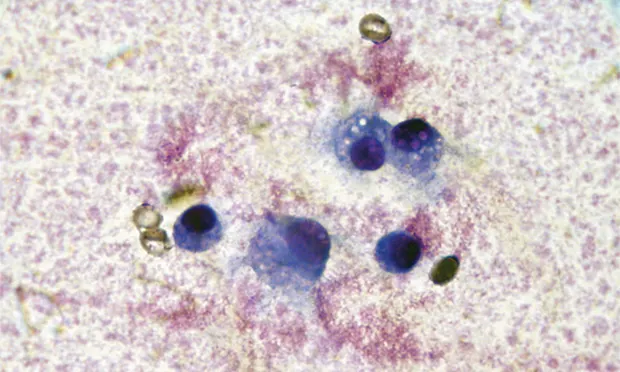
Two major groups of arthropathy are nonsuppurative inflammatory and suppurative inflammatory. Nonsuppurative inflammatory conditions, such as degenerative joint disease (DJD; eg, cruciate ligament rupture, elbow dysplasia, hip dysplasia, chronic joint trauma), trauma, and hemarthrosis typically have a total WBC count less than 5000 cells/µL with mononuclear cells predominating (Table). Macrophages may have phagocytic vacuoles and phagocytized cartilage fragments in cases of DJD (Figures 1 & 2).

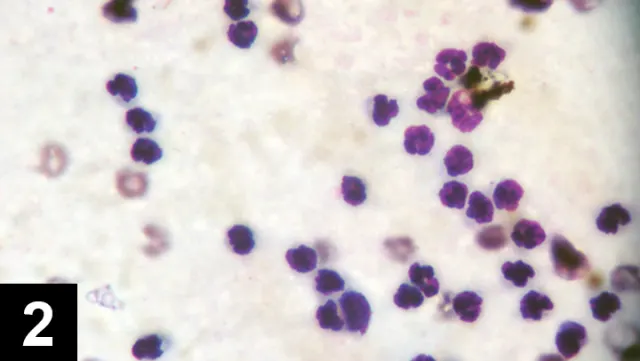
Figure 1 Cytology of joint fluid showing predominance of mononuclear cells with vacuolar inclusions, commonly seen in patients with DJD.
Figure 2 Cytology of a septic joint showing predominance of neutrophils.
Table: Characteristic Changes in Fluid1
Inflammatory arthropathy may be caused by infection or immune-mediated disease. Most infections are caused by bacteria; cell counts in these cases generally exceed 15,000 cells/µL (see Acquiring Cell Counts) and are predominantly neutrophilic. Gram staining and microscopic evaluation can be used to identify bacteria, but bacteria are only seen in 25% of septic arthritis cases. When such a cytologic profile has been identified, a sample should be submitted for aerobic and anaerobic bacterial culture (see If Suppurative Inflammation Is Seen). Even when bacterial infection is present, false-negative culture findings are common. Results are false-negative in about 30% to 50% of dogs with septic arthritis.1 Therefore, if septic arthritis is suspected, the clinician should institute an empirical antibiotic trial. Synovial tissue samples can also be collected for bacterial culture to improve sensitivity. Cephalexin, amoxicillin–clavulanate, or clindamycin are first-line antibiotics against Staphylococcus and Streptococcus spp, common causes of joint infection in small animals. If only one joint has suppurative inflammation, bacterial infection is probable.
Acquiring Cell Counts
From cytology preparation:
Nucleated cells/µL = (average number of nucleated cells per field) × (microscope objective power)2
From hemocytometer: Evaluation of cell count chamber
If Suppurative Inflammation Is Seen
Culture for aerobic and anaerobic bacteria
Antibiotic trial
Doxycycline trial and/or diagnostics for suspected tick-borne disease
Radiography to evaluate for erosive joint disease (rheumatoid arthropathy*)
*Antinuclear antibody and rheumatoid factor testing are usually nonspecific in dogs; thus, many clinicians do not pursue these tests.

Figure 3 Cytology of joint fluid from a dog with immune-mediated polyarthritis. Note the phagocytized material representing antibody–antigen complexes. Courtesy of Dr. Anne M. Barger
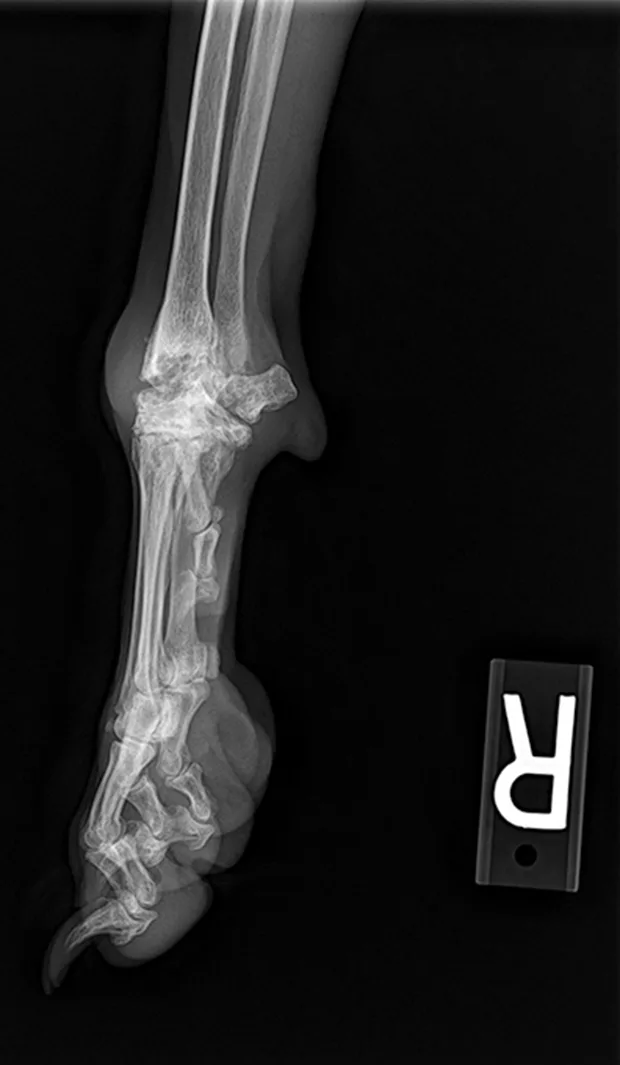
Figure 4 Lateral view of carpus with erosive lesions of the joint, which is seen with rheumatoid arthritis.
If suppurative inflammation is evident in multiple joints, immune-mediated arthritis (eg, idiopathic immune-mediated polyarthritis, rheumatoid arthritis, systemic lupus erythematosus) is a leading cause. Finally, tick-borne diseases (eg, Rocky Mountain spotted fever, ehrlichiosis, Lyme disease) may also cause suppurative inflammation in single or multiple joints.
If inflammation is nonpurulent, additional diagnostics and advanced imaging need to be pursued (see If Nonsuppurative Inflammation Is Seen).
If Nonsuppurative Inflammation Is Seen
Evaluation for joint instability with patient under sedation or anesthesia
Stress radiography of joint
Advanced imaging (eg, MRI, CT) to check for ligament or tendon injury or occult fractures and fissures of bones at the level of the joint
Diagnostic arthroscopy
Step-by-Step: Arthrocentesis
What You Will Need
3-mL syringes
Sterile gloves
Needles
Small dogs: 25-gauge, 0.75-inch
Large dogs: 22-gauge, 1- to 1.5-inch
Hip arthrocentesis: 20- or 22-gauge, 3-inch spinal needle
Shoulder arthrocentesis: 22-gauge, 1.5-inch spinal needle
Clean glass slides with frosting for labeling
Diff-Quik cytology stain kit
Culture tubes
Slide mailers
Because regular disposable hypodermic needles have a longer bevel than do spinal needles, the lumen of the needle may not enter the joint completely, preventing fluid collection—a concern with small joints. In addition, a plug of tissue may enter the tip of the needle and prevent aspiration of joint fluid. Therefore, spinal needles, which have a stylet and short bevel, are recommended for aspiration of deep or small joints, as bevel may not penetrate joint completely in deep joints or may not reach in small joints.
Shoulder
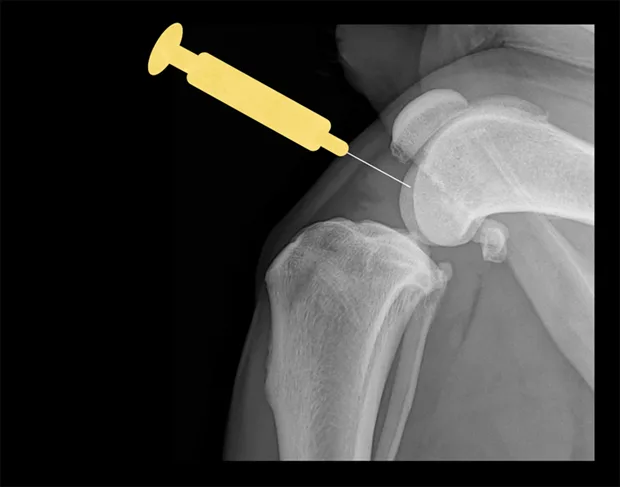
Place the patient in lateral recumbency with the shoulder joint in a neutral position. For large dogs, insert the needle about 0.5–1 cm distal to the acromion process of the scapula in a lateral-to-medial direction; a lateral radiograph of the shoulder joint may help determine the distance from the distal acromion to the joint space. The needle may need to be passed in a slightly dorsal direction to enter the joint. A 1.5-inch needle is adequate for even large-breed dogs.
Craniocaudal view of shoulder. Place needle just distal to the acromion (yellow dot), angled slightly dorsally.
Lateral view of shoulder. Insert needle just distal to the acromion (yellow dot).
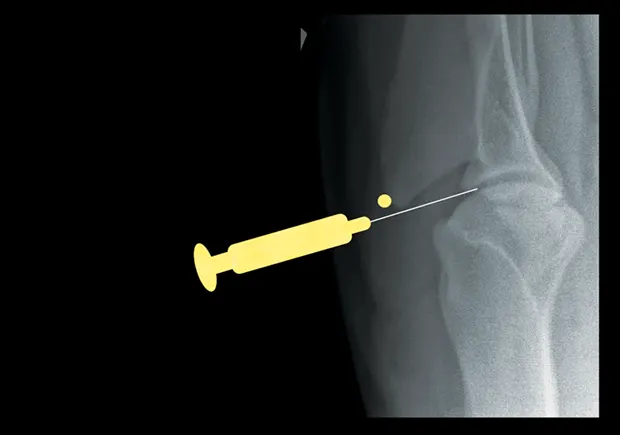
Elbow
With the patient in lateral recumbency and the affected elbow downward, place a rolled towel beneath the elbow. Apply valgus stress on the joint over the towel to open the medial side of the elbow. For large-breed dogs, insert the needle 1.5 cm distal to the medial epicondyle in a medial-to-lateral direction. The caudolateral pouch of the joint is an alternate site; however, marked effusion must be present for successful arthrocentesis.
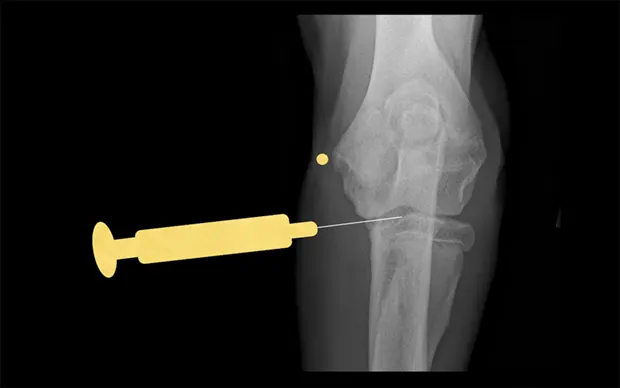
Craniocaudal view of elbow. Insert needle about 1.5 cm distal to the medial epicondyle (yellow dot) in large-breed dogs.
Tarsus
Place the patient in lateral recumbency with the affected limb on top. The lateral aspect of the joint usually provides the best yield of fluid because this area has the least villous synovium. In large-breed dogs, insert a 22-gauge, 1-inch needle in the caudodistal aspect of the distal fibula (lateral malleolus) at a 30°–45° angle from caudodistal to cranioproximal and in a distolateral-to-proximomedial direction. Another option is the dorsal joint pouch approach: place the needle between the tibia and talus to the medial or lateral side of the saphenous vein and extensor tendons.
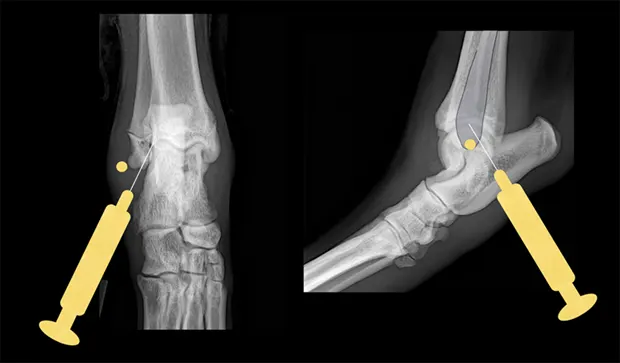
Lateral and craniocaudal views of hock. Insert the needle just distal to the lateral malleolus at a 30°–45° angle in a craniomedial direction.
Carpus
Place the patient in lateral recumbency with the affected limb upward. The radiocarpal joint is the largest and easiest of the carpal joints to aspirate from the cranial side. Flexing the carpus by 45° opens the joint to facilitate needle entry. Palpate the cranial aspect of the distal radius, and insert the needle perpendicular to the long axis of the radius bone (parallel to the joint surface of the distal radius). Avoid penetrating the cephalic vein and tendons during the procedure by inserting the needle just medial or lateral to the midsagittal plane of the carpus.
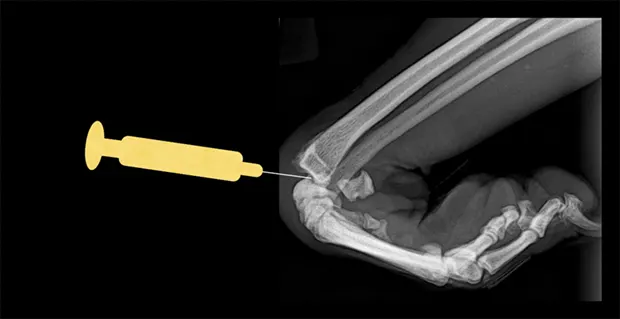
Lateral view of carpus. Flex the carpus and insert the needle into the radiocarpal joint just distal to the distal extent of the radius bone.
Stifle
Place the patient in dorsal recumbency with the stifle flexed to a 90° angle. The fat pad of this joint may hinder aspiration of joint fluid. Insert a 22-gauge, 1.5-inch needle just medial or lateral to the patellar ligament and about half the distance from the tibial crest to the patella. The needle should aim toward the intercondylar notch.
Lateral view of stifle. Insert the needle medial or lateral to the patellar ligament toward the intercondylar notch.
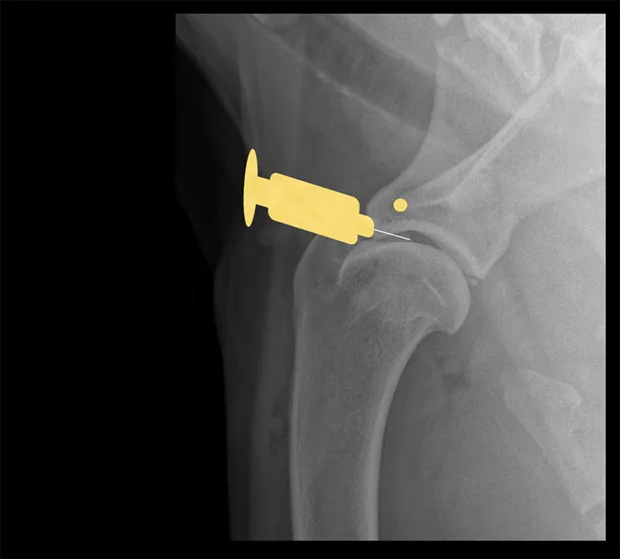
Hip
Place the patient in lateral recumbency with the hip upward in slight abduction and slight external rotation. Insert a 22- or 20-gauge, 3-inch spinal needle just dorsal to the greater trochanter, and enter the joint in a lateral-to-medial direction. For a ventral approach, insert the needle just caudal to the pectineus muscle over the hip joint, directed at a 45° angle in a craniodorsal direction. Some resistance may be felt as the needle is passed through the ventral joint. Ultrasound guidance is helpful but not essential.
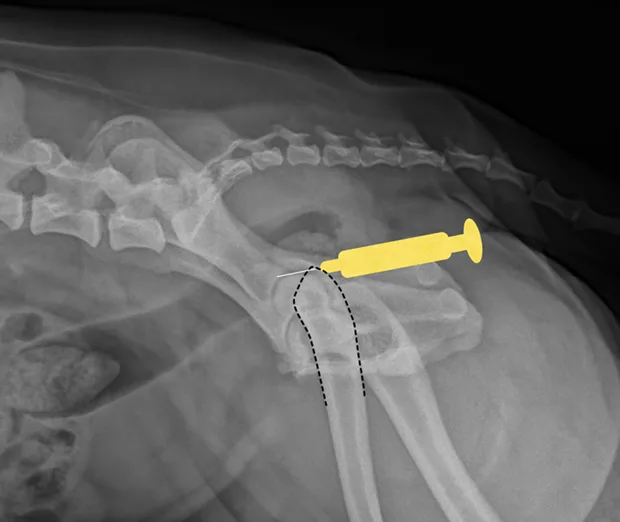
Lateral view of pelvis. Insert the needle at the proximal extent of the greater trochanter into the hip joint in a lateral-to-medial direction.