Esophagostomy Feeding Tubes
Enteral nutrition is indicated for conditions that prevent oral food intake or result in chronic caloric insufficiency and is useful for fluid supplementation or administration of medications in intractable animals. When the esophagus and stomach are functional, enteral feeding can be provided via an esophagostomy tube. Benefits include minimal cost; limited equipment requirements; and rapid, easy placement, especially in cats and smaller dogs (see Benefits & Disadvantages of Esophagostomy Tubes). Esophagostomy tubes are well tolerated and do not interfere with eating or drinking.
Related Article: Nasoesophageal & Nasogastric Tube Placement
The main disadvantage is the necessity for general anesthesia. When placing an esophagostomy tube in a giant breed or obese patient, which can be challenging, specialized percutaneous feeding tube applicators (ELD Tube Applicator) may help. Esophagostomy tube feeding is contraindicated in patients with persistent vomiting and is not usually recommended in animals that have undergone esophageal surgery or have esophageal disorders (eg, megaesophagus, esophageal strictures or neoplasia, esophagitis, esophageal stenosis from vascularring anomalies).
Related Article: Percutaneously Placed Gastrostomy Tubes: Prevention and Treatment
Compared with nasoesophageal and jejunostomy feeding tubes, esophagostomy tubes can be large enough to permit feeding a blenderized commercial canned diet. Unlike pharyngostomy tubes, esophagostomy tubes do not cause pharyngeal or laryngeal irritation or blockage. Unlike gastrostomy or jejunostomy tubes, esophagostomy tubes can be removed any time after placement.
Related Article: How To Place An Esophagostomy Tube
Step-by-Step: Esophageal Tube Placement
Step 1. Place the anesthetized patient in lateral recumbency and clip and aseptically prepare the lateral cervical region.
Step 2. Premeasure the tube from the midcervical esophagus to the level of the 5th–8th intercostal space.
Step 3. Cut the tip of the tube to remove any blind end and to ensure appropriate length. Alternatively, if the tube does not need to be shortened, elongate the side-hole opening to help prevent clogging. The tube should be long enough so that the proximal end exiting the neck can be gently curved away from the head.
Author Insight: To ensure appropriate placement, use a permanent marker to indicate where the tube will be level with the skin when properly positioned. Alternatively,have a second tube of the same length available.
Step 4. Insert Carmalt (medium and large dogs) or Kelly (cats and small dogs) forceps through the oral cavity and into the cervical esophagus with the tips facing outward. Choose forceps that are long and narrow enough to pass caudal to the hyoid apparatus.
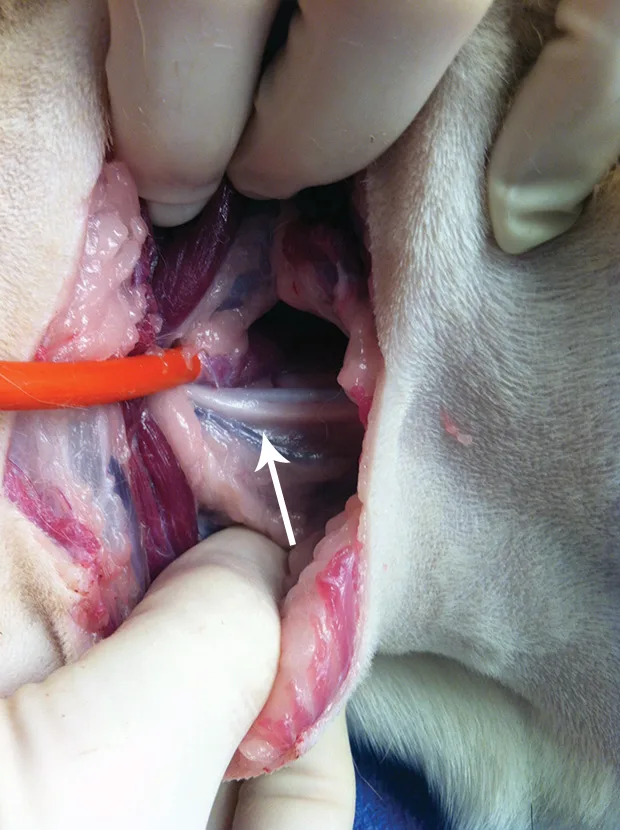
Step 5. Tilt the forceps (ie, lower the handle toward the table) so the tips (arrow) are pressing the esophagus outward and dorsal to the jugular vein, and palpate the neck to determine where the esophagus is most superficial. Placing a sandbag or towel under the neck may facilitate passing and tilting the forceps and aid in isolation of the esophagus against the skin.
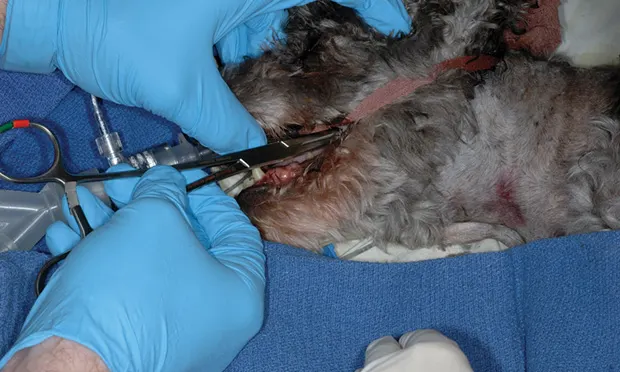
Step 6. Figure A Using the palm of the dominant hand, apply steady pressure to the forceps rings (A), making sure not to insert fingers into the rings. With the nondominant hand, make a fist and apply downward pressure over the tips of the forceps to force them through the esophageal wall and musculature of the neck.
Step 6. Figure B This pushes the jugular vein (B), carotid artery (arrow; note proximity of carotid artery and vagosympathetic trunk to the esophagostomy tube), and other neurovascular structures aside to prevent trauma. On palpation, the forceps tips are indistinct until pushed through the esophageal wall and cervical musculature.
Author Insight: The esophageal wall can be inadvertently caught and torn if the box locks of the forceps open and the tips separate before they penetrate the skin. The clamps must remain firmly closed until the tips protrude through the skin incision.
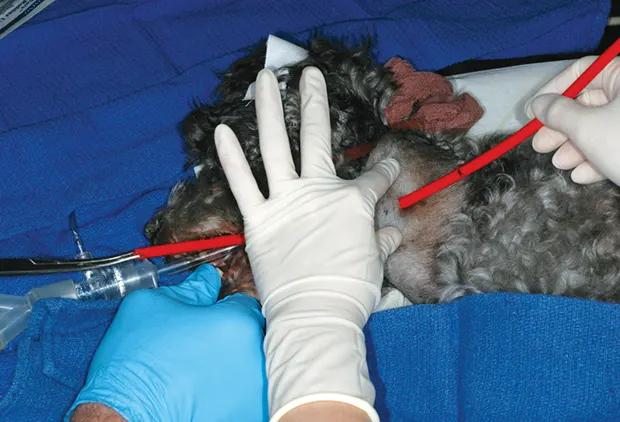
Step 7. With a scalpel blade, incise the skin over the forceps tips. Place a palm on the handle rings and push the forceps tips through the incision. Open the tips just enough to grasp then clamp the tube end.
Author Insight: If the tube end is large, it can be cut at an angle to more easily clamp the forceps to pull the tube end back through the skin and esophageal wall.
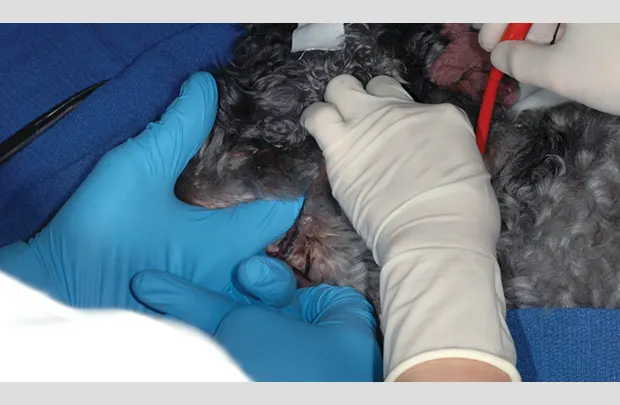
Step 8. Pull the tube end rostrally through the neck and out through the oral cavity. Leave several centimeters of the proximal tube end protruding from the incision. At this point, the distal tip of tube will be facing rostrally and the proximal end will be facing caudally.
Step 9. Figure A Redirect the distal tip of the tube through the oropharynx (A) and gently advance the tube as far as possible into the esophagus using fingers or forceps tips. Avoid encircling the endotracheal tube or its gauze tie with the esophagostomy tube.
Step 9. Figure B Once the tube has been advanced as distally as possible, retract the proximal end through the skin incision several centimeters until the tube is redirected in arostro caudal position (B). Adjust the tube to the premeasured appropriate length and cap the end.
Step 10. Secure the tube to the skin with 0 or 2-0nylon in a finger trap pattern. A purse-string suture should not be used. In cats, include a bite of deep muscle or the periosteum of the atlas wing to prevent tube migration from neck movement.
Author Insight: Esophagostomy tubes frequently fold as they are advanced through the oropharynx and into the esophagus. If the proximal end of the tube is retracted from the neck while the folded section is pushed down toward the esophagus, the folded section is gradually pulled out of the esophageal perforation and will palpably unfold, allowing the tube to reorient itself with the proximal end facing rostrally. The proximal end of the tube can then be redirected and the tube advanced farther down the esophagus.
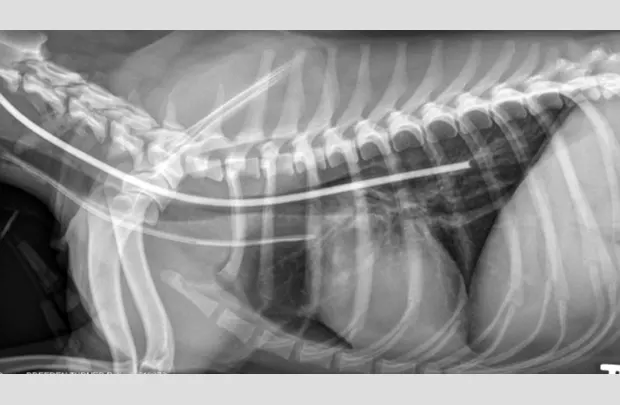
Step 11. Figure A Ensure the tube is properly positioned via lateral radiography (A).
Step 11. Figure B If placement is uncertain, infuse a small amount of nonionic contrast material to differentiate the esophagostomy tube from the endotracheal tube or jugular catheter (B).
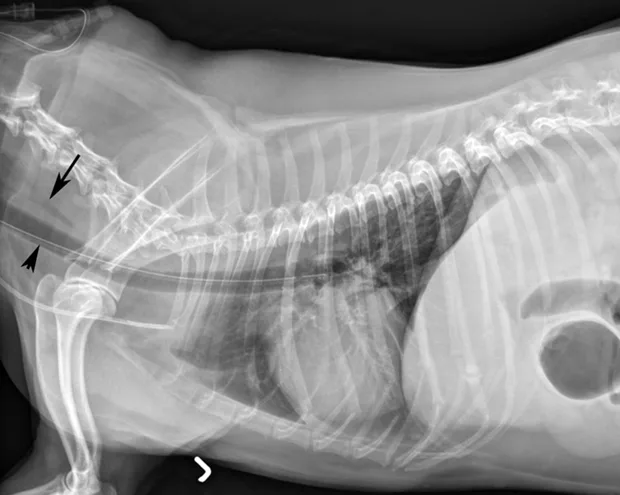
Step 11. Figure C If the tube is in the trachea, the portion running in the proximal cervical region will be visibly ventral to the esophagus on radiography (C).
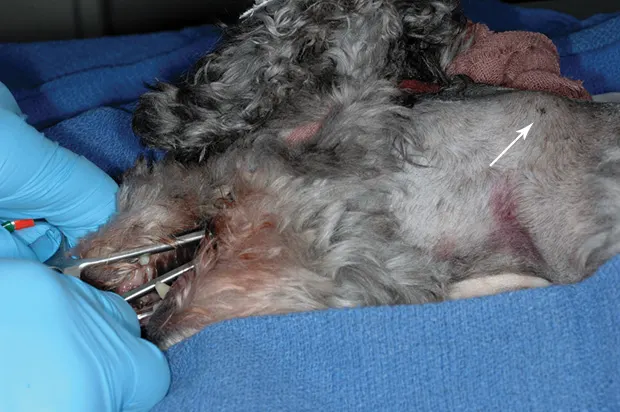
Figures. Inadvertent tube insertion into the trachea; note the position of the proximal esophagus (arrow) compared with the esophagostomy tube (arrowhead). The jugular catheter is in the ventral neck.
Step 12. Once tube position is verified, bandage the neck to cover the stoma site. The bandage should be changed daily for the first week and as needed thereafter.
Step 13. The tube can be left in as long as it is needed (eg, months); sutures may need to be replaced monthly to keep the tube secure. The tube can be replaced if a blockage or degradation occurs or if the end connected to the adapter splits. If the tube has been in place long enough for formation of a fibrous stoma (ie, 7 days or more), it can be replaced as needed through the stoma. The patient should be anesthetized for tube replacement, and tube position should be confirmed with radiographs. Once the esophagostomy tube is no longer needed, anchoring sutures should be removed and the tube clamped and removed. The site should be bandaged and left to heal by second intention, which usually occurs within a week of tube removal.
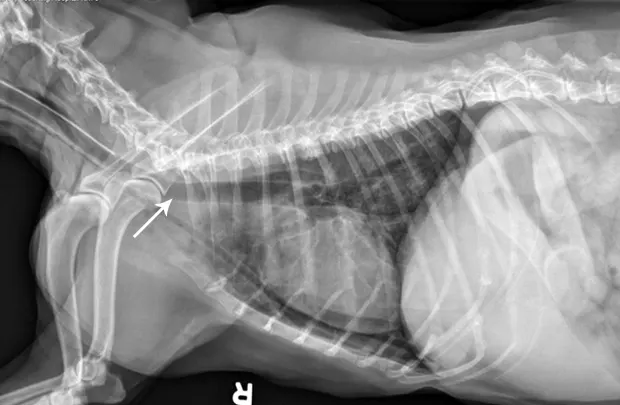
Figures. Replacement of a blocked esophagostomy tube attempted with an awake patient resulted in collapse of the stoma, inadvertent placement of the tube (arrow) into the mediastinum, and subsequent mild pneumothorax.
Benefits & Disadvantages of Esophagostomy Tubes
Benefits
Minimal cost
Limited equipment needed
Rapid, easy placement
Well tolerated
No interference with eating or drinking
Allows feeding of a blenderized commercial canned diet
No pharyngeal or laryngeal irritation or blockage
Can be removed any time after placement
Disadvantages
General anesthesia necessary
Possibly challenging to place in giantbreed or obese patients
Contraindicated in patients with persistent vomiting
Usually not recommended in patientsthat have:
Undergone esophageal surgery
Esophageal disorders (eg, megaesophagus, esophageal strictures or neoplasia,esophagitis, vascular ring anomaliescausing esophageal stenosis)
Placement
General anesthesia with endotracheal intubation is recommended. Animals should be fully anesthetized to minimize risk for gag reflex when the tube or instruments are passed through the pharynx. Pharyngeal stimulation can cause the patient to vomit, awaken, or bite reflexively. Large-bore tube selection should be based on the size of the patient; a 14- to 20-French red rubber, silicone elastomer, or polyurethane tube can be used. Esophagostomy tubes can be placed in either side of the neck, depending on proximity of the esophagus, which can be evaluated during tube placement.
Feeding
Blenderized commercial canned food is recommended for esophagostomy tube feeding. Canned recovery diets are less likely to clog the tube and have the highest caloric density but may cause diarrhea. Food can be administered as bolus meal feedings several times a day or, with liquid diets, as continuous infusion. The resting energy requirement (RER) of the patient should be calculated:
RER = 70 x (body weight[kg]<sup0.75sup>)
Alternatively, RER for animals weighing more than 2 kg can be calculated:
RER = 30 x (body weight[kg]) + 70
The patient should be fed approximately 25% to 30% of its caloric requirement on the first day of feeding, with subsequent gradual increases of 25% to 30% of its caloric requirement per day.1-3 This may not always be necessary but is recommended to reduce risk for refeeding syndrome in patients with anorexia or hyporexia for more than 3 to 5 days’ duration.1,3 Refeeding syndrome manifests as dramatic decreases in phosphate, magnesium, and potassium and can result in potentially fatal pulmonary, cardiovascular, neurologic, and neuromuscular abnormalities.
Gastric capacities for cats and dogs are 5 to 10 mL/kg during food reintroduction, but capacities as high as 45 to 90 mL/kg have been measured after complete realimentation.2,3 With bolus feeding, the daily volume of food is divided into 4 to 6 feedings according to estimated stomach capacity. Daily fluid requirements should be calculated based on amount of water in or added to the canned diet and used to flush the tube.
Complications
Complications, usually minor, may include tube obstruction, swelling of head and neck from an overly tight bandage, peristomal dermatitis or cellulitis, inflammation, and stomal infection and abscessation.4,5
Tube obstruction with food or medications (common) can usually be remedied by flushing warm water in and out of the tube using alternating gentle pressure and suction. If unsuccessful, carbonated water or a pancreatic enzyme slurry can be instilled into the tube and allowed to sit for an hour before reapplying pressure and suction. Obstructions rarely require a guide wire to unclog the tube, which is more common if the tube has a blind end, a nonblenderized diet is fed, or administration of solid medications (eg, crushed tablets) has been attempted. To prevent clogs, tubes should be flushed with 10 to 20 mL of warm water before and after each feeding, depending on patient and tube size. Straining blenderized food can help prevent tube obstructions, especially when small tubes are used.
The risk for cellulitis and peristomal inflammation is increased if a purse-string suture is placed around the stoma. Inflammation and infection around the stoma site generally resolve with tube removal and local wound therapy; stomas should always be left to heal by second intention. Hemorrhage during tube placement (uncommon) may occur if a skin incision is made before the forceps tips are pushed through the esophageal wall and subcutaneous tissue.
Esophageal leakage through esophageal wall tears (also uncommon) can occur in very young patients with friable tissue, if multiple attempts have been made to pass the tube or an excessively large stoma is in the esophageal wall. Esophagitis and vomiting may occur if the tube passes through the lower esophageal sphincter.
Patients rarely vomit and dislodge the tube, allowing the end to protrude from the mouth (more common with smaller, soft tubes). The patient can then bite through the tube, resulting in a gastric foreign body. Tube dislodgement requires replacement under general anesthesia; immediate replacement through the existing stoma is possible if the tube has been in place long enough for fibrous tissue formation.
Aspiration pneumonia is a potential complication of enteral tube feeding. Risk factors include absence of a gag or cough reflex,impaired mental status, neurologic injury, mechanical ventilation, presence of laryngeal disease (especially after arytenoid lateralization surgery), and previous aspiration pneumonia. In patients at high risk for aspiration pneumonia, gastrostomy or jejunostomy tubes should be considered over esophagostomy tubes. To reduce aspiration risk, feeding should not start until the patient has fully recovered from anesthesia and can be kept in asternal position.
What You Will Need
Clippers, 4% chlorhexidine scrub, gauze or roll cotton (for aseptic prep)
Sterile gloves
Sterile Huck towels and towel clamps (optional)
Sterile needle holders
Mayo suture scissors
Curved Carmalt (medium and large dogs) or Kelly (cats and small dogs) forceps with long jaws and fine tips
Scalpel blade
14- to 20-French red rubber, silicone elastomer, or polyurethane tube
Tubing adapter and injection cap (to permit capping of tube)
0 or 2-0 nylon suture
Nonionic iodinated radiographic contrast (eg, iohexol)
Triple antibiotic ointment
Nonadherent dressing and bandage material
Fabric, washable esophageal feeding-tube collar (eg, Kitty Kollar; optional)
REBECCA T. HODSHON, DVM, DACVS-SA, is a third-year small animal surgical resident at University of Tennessee Veterinary Medical Center, where she also earned her DVM. Dr. Hodshon completed her internship at Affiliated Veterinary Specialists in Maitland, Florida.
KAREN M. TOBIAS, DVM, MS, DACVS, is professor of small animal soft tissue surgery at University of Tennessee and mentors veterinarians in writing educational articles. She taught at University of Georgia and Washington State University, authored Manual of Small Animal Soft Tissue Surgery, and was coeditor of Veterinary Surgery: Small Animal. She completed her internship and residency at Purdue University and The Ohio State University, respectively, and earned her DVM from University of Illinois. Dr. Tobias presented on essential wound care techniques at the NAVC Conference 2013.
References
1. Management of anorexia in dogs and cats. Delaney SJ. Vet Clin North Am Small Anim Pract 36:1243-1249, 2006.2. Esophageal and gastric feeding tubes in ICU patients. Han E. Clin Tech Small Anim Pract 19:22-31, 2004.3. Assisted feeding in hospitalized patients: Enteral and parenteral nutrition. Remillard RL, Armstrong PJ, Davenport DJ. In Hand MS, Thatcher CD, Remillard RL, et al (eds): Small Animal Clinical Nutrition, 4th ed—Topeka: Mark Morris Institute, 2000, pp 351-399.4. Clinical evaluation of tube esophagostomy in small animals. Devitt CM, Seim HB III. JAAHA 33:55-60, 1997.5. A comparison of owner management and complications in 67 cats with esophagostomy and percutaneous endoscopic gastrostomy feeding tubes. Ireland LM, Hohenhaus AE, Broussard JD, Weissman BL. JAAHA 39:241-246, 2003.